In the previous article, we took a deep dive into Google Kubernetes Engine (GKE), which provides Kubernetes as a Service. In this article, we will look at the Cloud Run offering. Google Cloud Run allows us to run containerized workloads on a fully managed serverless platform. It brings the experience you get from GKE one level up by simplifying the process of developing and deploying applications. The service is based on the open source Knative (https://knative.dev/docs/serving) project, so Cloud Run workloads can be ported to any platform that runs Kubernetes. With Cloud Run, you get full integration with Google Cloud services such as Cloud IAM, Cloud Build, and Google Cloud's operations suite. All you have to do is build your application in one of your favorite languages. Once you've done this, you can deploy it to Cloud Run in seconds. The service will take care of scaling and keeping the application live. You will only be charged for the resources that are used, not for the underlying cluster.
blog, we will cover the following topics:
- Introduction to using Cloud Run
- Deploying services to Cloud Run
- Cloud Run IAM roles
- Cloud Run pricing and limitations
Exam Tip
Cloud Run is an important exam topic. The Professional Cloud Architect exam has been updated to contain more and more cloud-native technologies as this is the direction Google is focusing on. Cloud Run is similar to App Engine in that it gives excellent developer experience as it is fully managed and lots of underlying implementation details are abstracted from the user. The difference is that it is based on Kubernetes and Knative, which makes it very portable. Compared to the previous version of the exam, the number of questions for App Engine has been reduced and there has been a shift to test your Cloud Run knowledge instead.
If you want to understand how Cloud Run works under the hood, you might want to do a deep dive into Knative itself. However, you do not need to do so to pass the PCA exam, nor to use Cloud Run.
Using Cloud Run
As we have already mentioned, deploying applications to Cloud Run is a seamless experience. The following diagram shows a simplified flow for building a container and deploying it to Cloud Run:
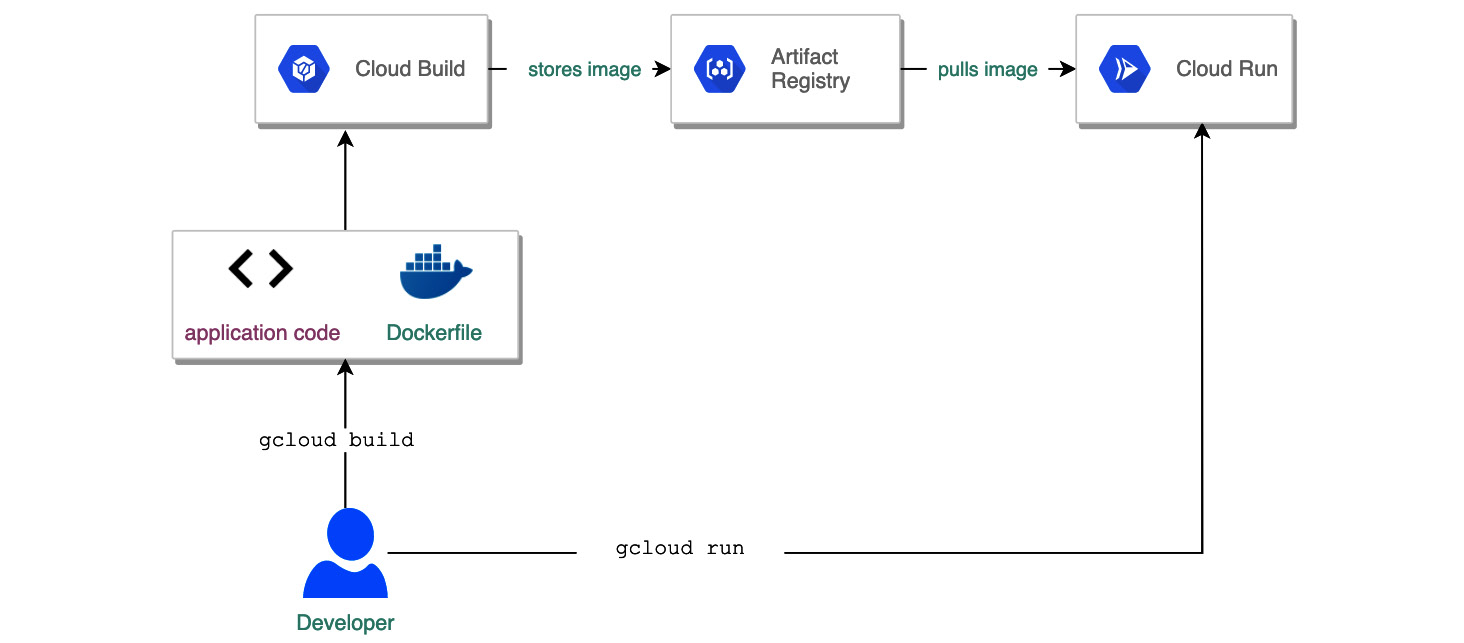
Figure 7.1 – Building a Cloud Run service
You start by developing your containerized application, which can listen for HTTPS or gRPC (https://grpc.io/) requests. To build the application from code, you can use the Google Cloud Build service and store the image of your container in Artifact Registry. Next, you must tell Cloud Run where your container is stored and define some parameters, such as the maximum number of replicas you want to run at once or how the application should be triggered. You request to deploy and in a couple of seconds, your app is ready to serve your users.
Cloud Run will take care of running all the Kubernetes resources that are responsible for scaling the application and load balancing the traffic to your Cloud Run service. It will also send logs to Cloud Logging and deliver metrics to Cloud Monitoring.
If you wish to deploy the new version of the application, you can do so directly from the Google Console. The new version might include changes in the application code, which results in a new container being built. Alternatively, it might include making changes to parameters, such as the maximum number of container instances for the service. The new version of the application is called a Cloud Run service revision (https://github.com/knative/specs/blob/main/specs/serving/knative-api-specification-1.0.md#revision) and is in line with Knative naming convention:
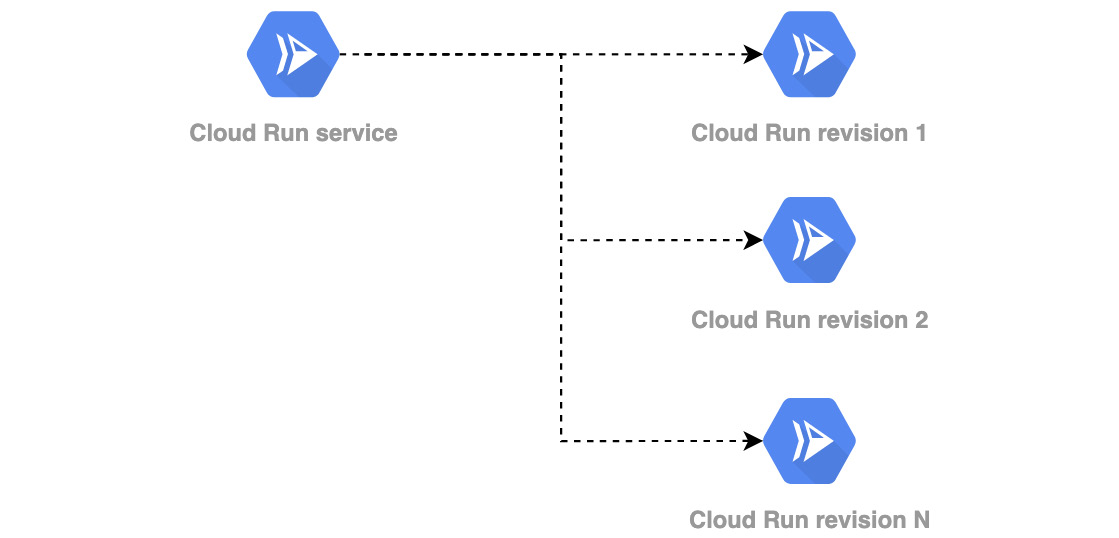
Figure 7.2 – Cloud Run revisions
Can the same be achieved with GKE? Of course. The difference is that with Cloud Run, all the Kubernetes resources that you would need to create in GKE, such as Service, HorizontalPodAutoscalers, and Deployments, are abstracted from you. This helps you develop and deploy cloud-native workloads without having to master the Kubernetes internals.
Cloud Run containers
In the previous section, we looked at a flow for developing and deploying a Cloud Run application. The fundamental task in that flow was building the container. This is because the deployment itself is automated by GCP and the implementation details are not of concern to the developer. Cloud Run containers need to fulfill several requirements to be able to execute. This is well described in the Container runtime contract, which you can find here: https://cloud.google.com/run/docs/reference/container-contract. Let's have a quick look at a short list of requirements:
- You can use any programming language for your application.
- Executables must be compatible with Linux 64-bit (Linux x86_64 ABI format).
- Your application must listen on address 0.0.0.0 and a port you define in the Cloud Run config. By default, the port is set to 8080. The configured port will be set as the PORT environmental variable in the container.
- The container should listen for HTTPS or gRPC requests and TLS should not be implemented directly in the container. TLS is implemented in Cloud Run and proxies the requests.
- The container instance needs to return the response within the timeout specified during the deployment of the service. The container will be terminated if there are more than 20 timeouts in a row.
- The response must contain only printable non-whitespace ASCII characters (no colons).
Also, note that any data that's written to the filesystem resides in the container instance's memory and will not persist when the container is stopped.
Cloud Run triggers
As we have already learned, the Cloud Run service can be triggered over HTTPS or gRPC. However, these are not the only available options. Thanks to the integration with other Google Cloud services, there is a set of triggers that can be used with Cloud Run:
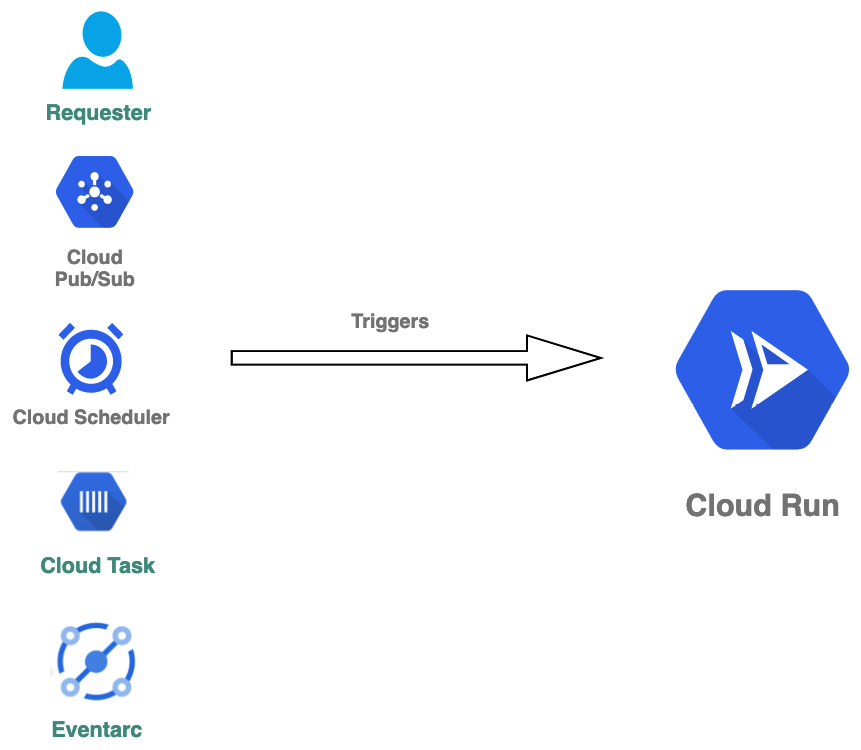
Figure 7.3 – Cloud Run triggers
These triggers are as follows:
- HTTPS or gRPC request: This is the most general way of calling Cloud Run and can be used to create a web API, middleware, reverse proxy, or web applications.
- Pub/Sub: This can use Cloud Run as a webhook where Pub/Sub messages will be pushed.
- Cloud Scheduler: This allows you to run Cloud Run at a scheduled time.
- Cloud Task: Asynchronously executes the Cloud Run service.
- Eventarc: Connects Cloud Run to Eventarc-supported events.
Consult the Google Cloud Run documentation page to understand how you can use these for your use case. If none of these triggers fulfill your use case, you might want to have a look at Eventarc, which gives you even more flexibility. Eventarc is based on the Knative Eventing (https://knative.dev/docs/eventing/) project and provides even more triggers.
Exam Tip
We do not expect questions on Eventarc in the PCA exam. But please keep an eye on the exam guide as this can change without notice. At a minimum, you should remember that Eventarc allows you to trigger events based on Pub/Sub and Audit Logs. The latter is extremely powerful as all the Google Cloud services can generate Audit Logs. To learn more about Eventarc, check out https://cloud.google.com/eventarc/docs/creating-triggers.
Deploying to Cloud Run
To be able to use Cloud Run, you need to enable the Cloud Run API in the API library. If you want to simply test an application that is already containerized, you can deploy it to Cloud Run by running the following command in Cloud Shell:
gcloud run deploy [SERVICE] --image gcr.io/[PROJECT-ID]/[IMAGE]
This will deploy the Cloud Run service called [SERVICE] using the image stored in the gcr.io/[PROJECT-ID]/[IMAGE] path.
Important Note
If you have not configured the default region yet, you will be prompted to do so.
For the exam, you should know about the advanced settings you can set for your Cloud Run service. So, let's have a look at how we can deploy the service from the Cloud console:
- From the hamburger menu, choose Cloud Run. You will see the Cloud Run welcome page:

Figure 7.4 – Cloud Run welcome page
- Click on the CREATE SERVICE link. Fill in the name of the service and choose the region where your service will be hosted. Click NEXT to move to section 2:

Figure 7.5 – Service settings
- In section 2, specify the path to the container image you want to use for the deployment and click NEXT:

Figure 7.6 – Configure the service's first revision
- Alternatively, you can use the second option; that is, Continuously deploy new revisions from a source repository. Below, you will see that if we choose this option, we will have to provide the repository where our code resides. Cloud Build will use this code to build an image for you, store it in the Container Registry, and deploy it to Cloud Run. On every pull request, the flow will execute again. This way, you can get a seamless GitOps flow for your Cloud Run service. Click the ADVANCED OPTIONS dropdown:

Figure 7.7 – Source repository
- In the Build Configuration step, you can configure the branch that will trigger the flow, as well as the build type. You can either provide a Dockerfile with your image manifest or use Google Cloud Buildpacks (https://cloud.google.com/blog/products/containers-kubernetes/google-cloud-now-supports-buildpacks) for the supported programming languages:

Figure 7.8 – Build Configuration
- In our scenario, we will continue our deployment using an existing container image. So, we must move back to the menu from Step 3 and move to the Advanced settings section. This section contains multiple tabs. As you will see, most of those setting are parameters that you can also find in Pod or Deployments Kubernetes resources manifests. Some other settings that you might not be familiar with come from the Knative Service (https://knative.dev/docs/serving) manifest.
In the CONTAINER tab, we can do the following:

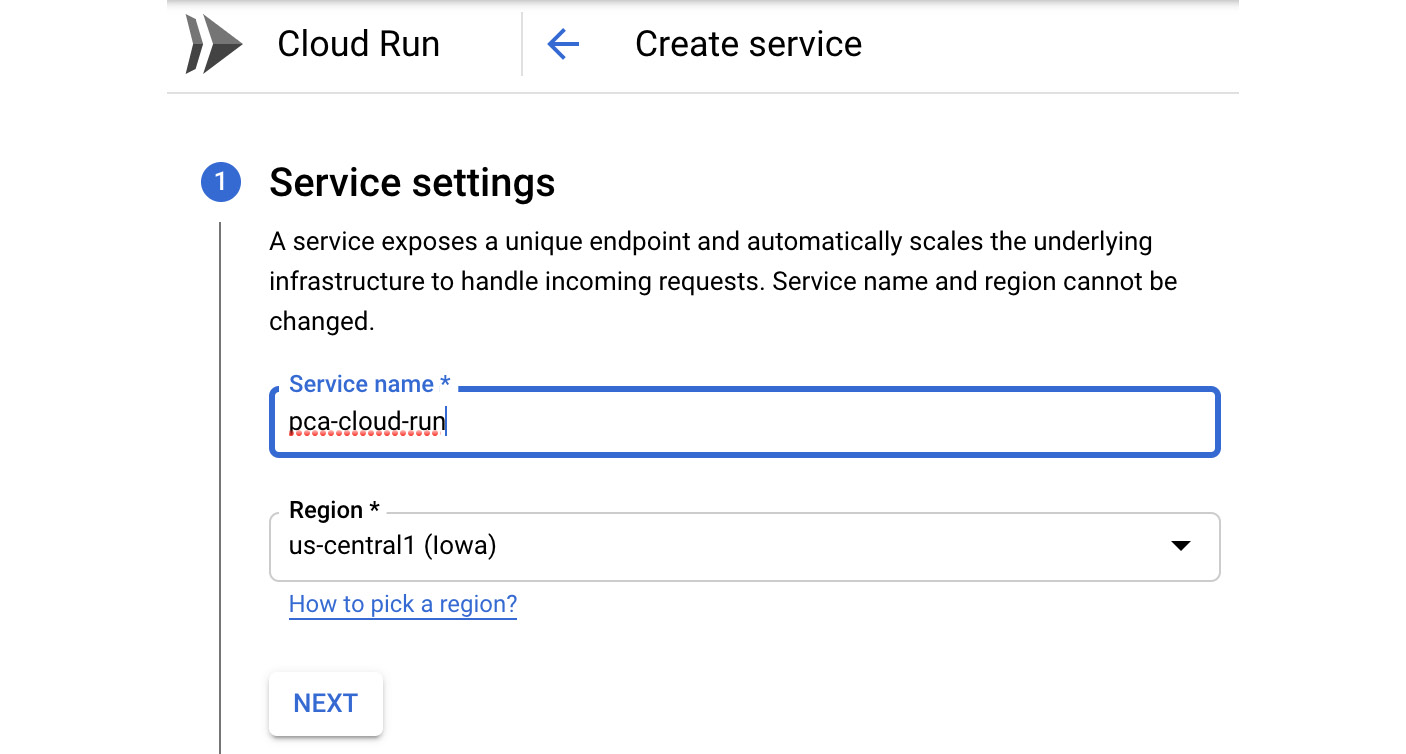
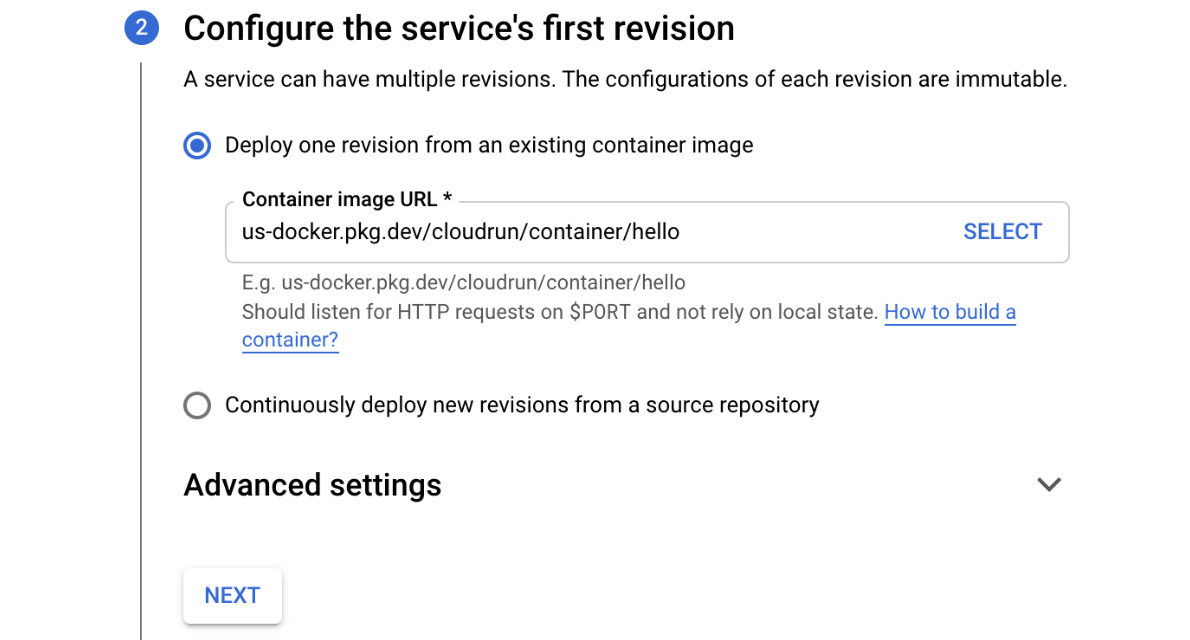
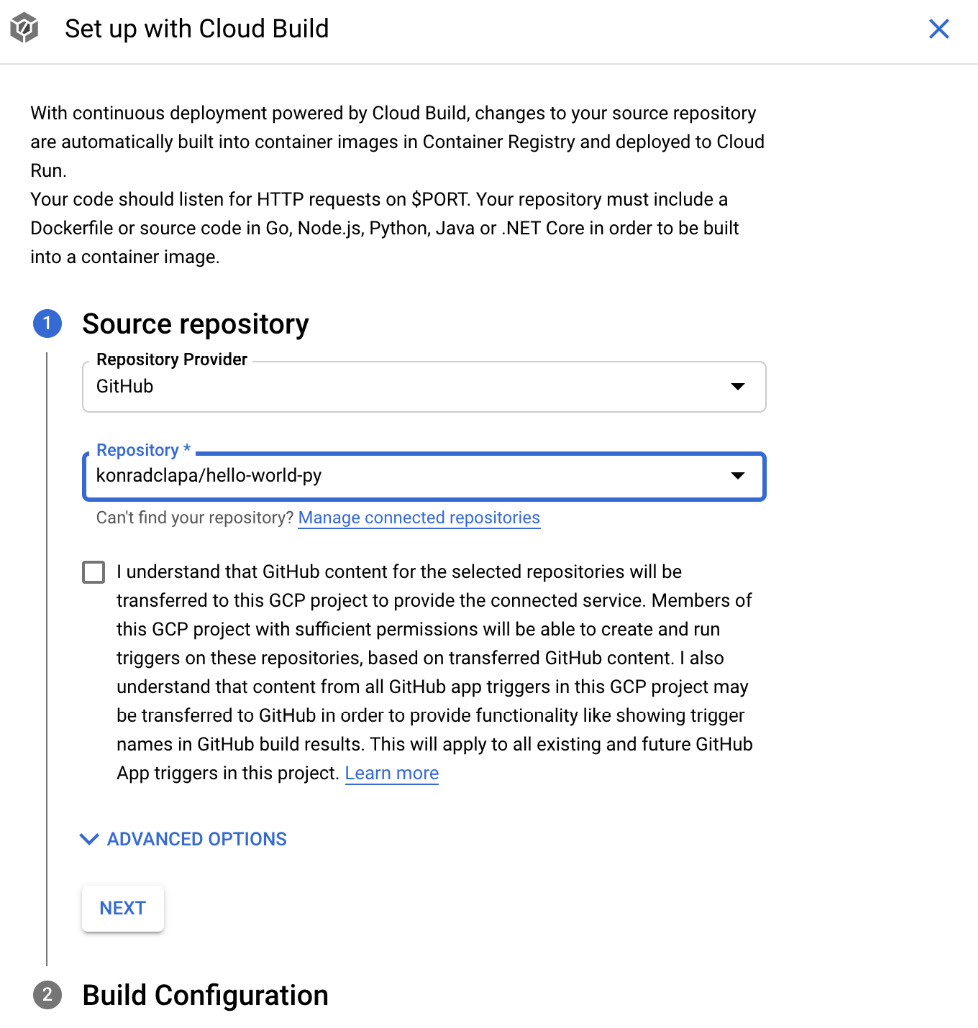
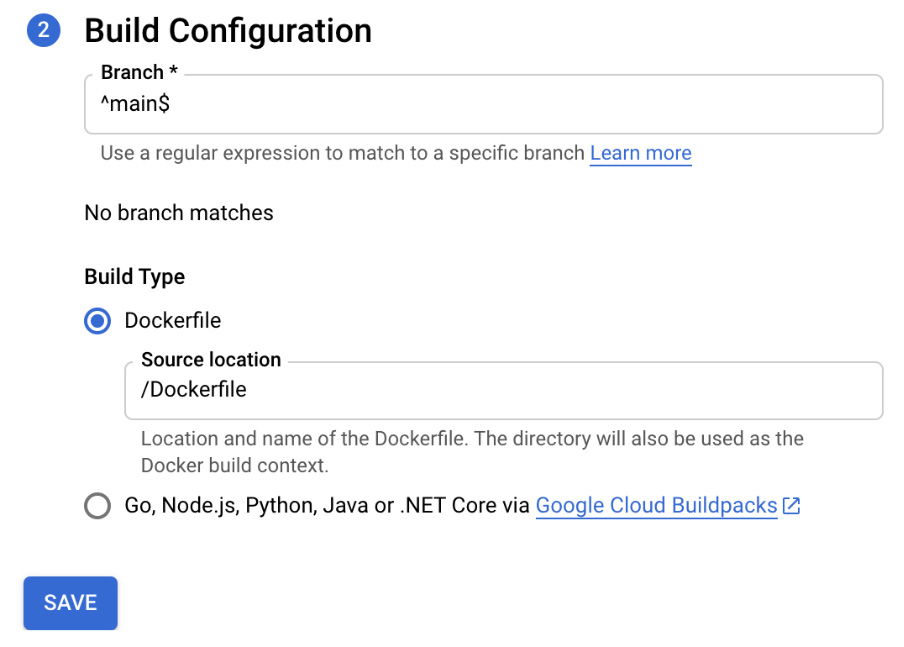
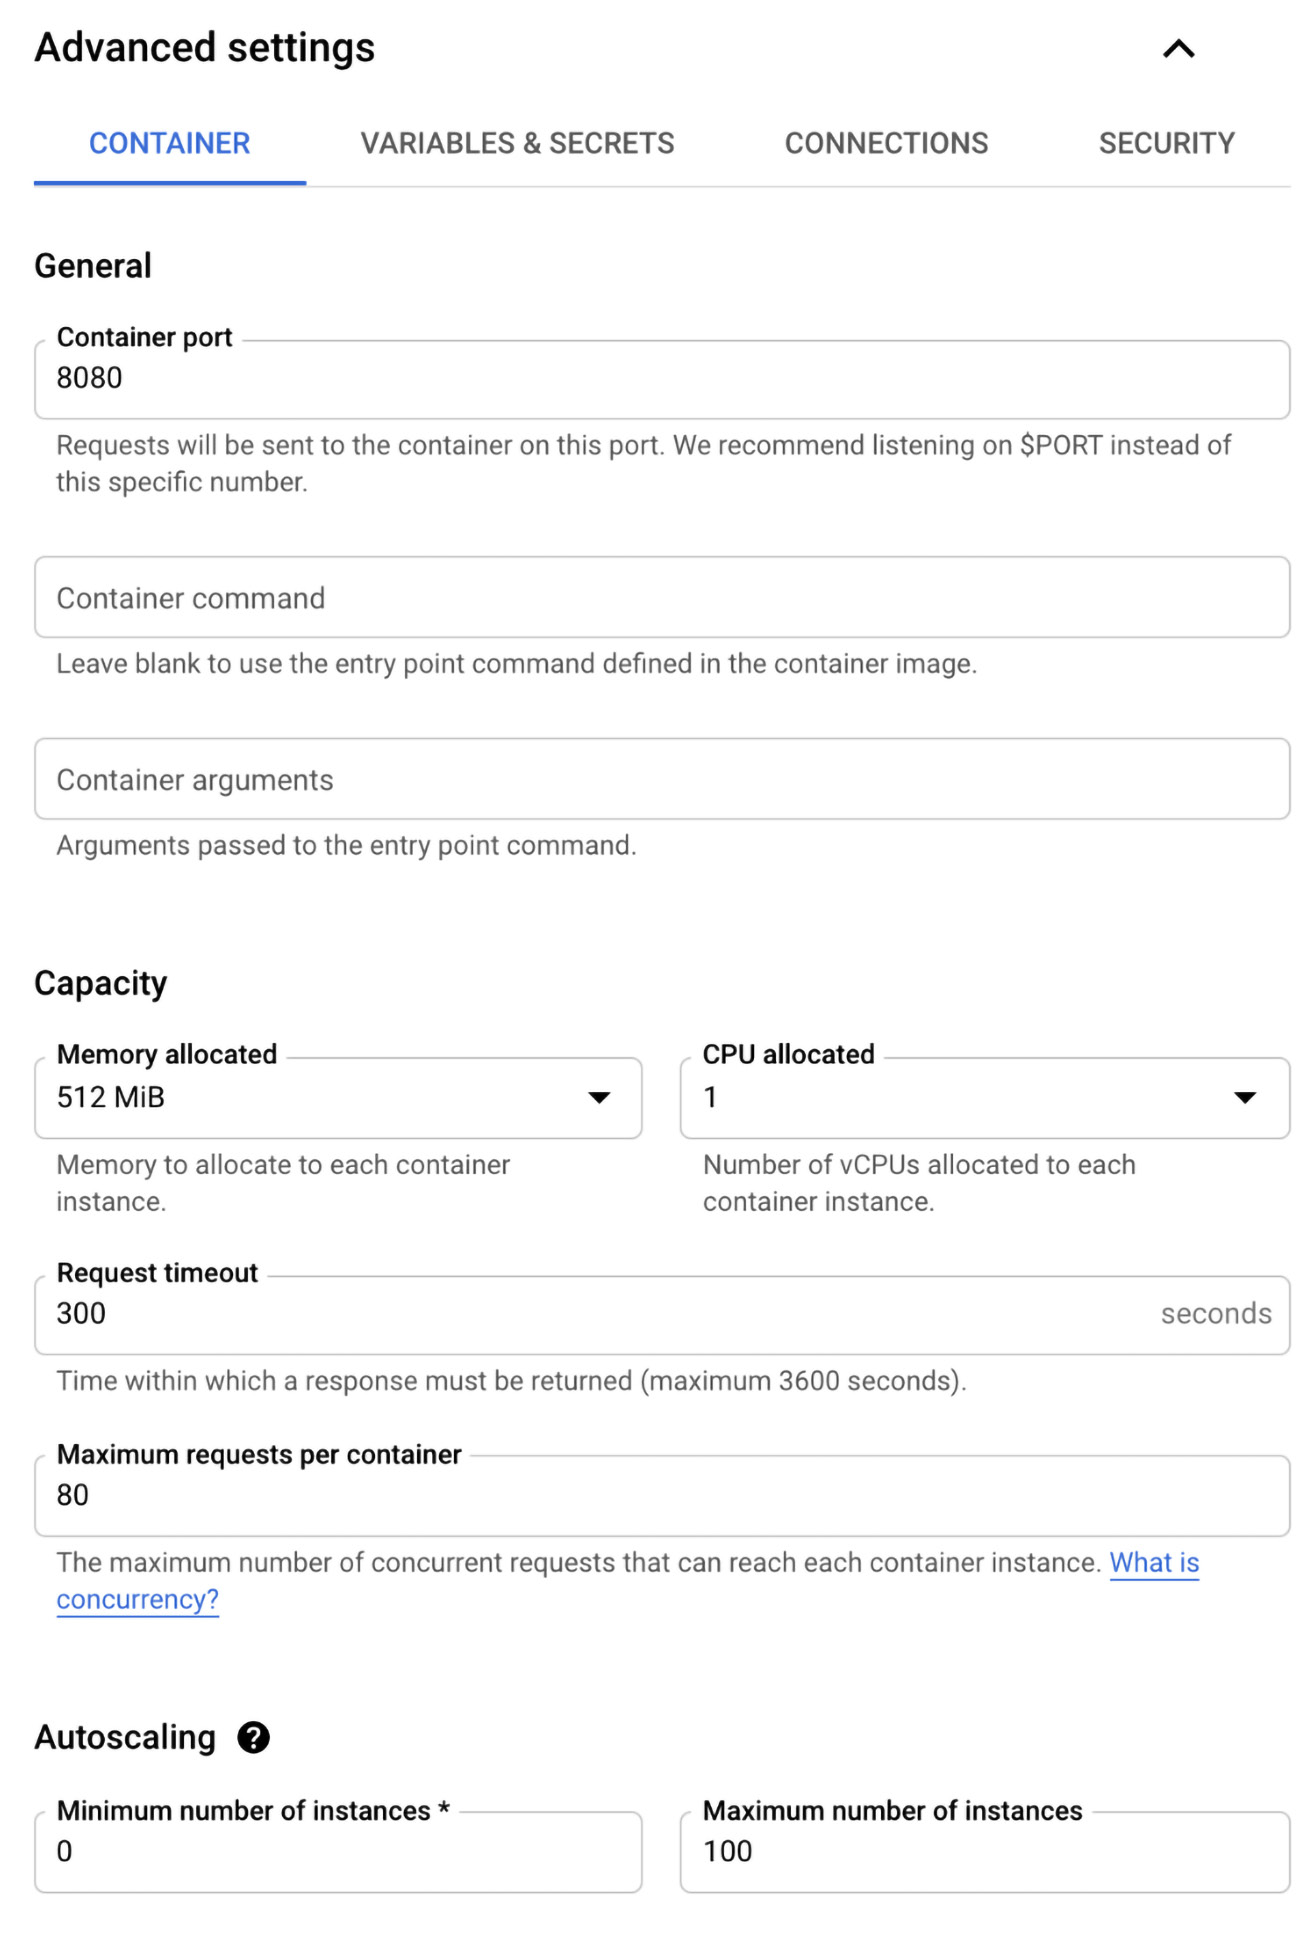
Figure 7.9 – Advanced settings
- In the VARIABLES & SECRETS tab, you can add environmental variables and secrets. These environmental variables can be used by your application to store configurations. Secrets can be useful for passing credentials to your application. To learn more about using secrets, go to https://cloud.google.com/run/docs/configuring/secrets:

Figure 7.10 – VARIABLES & SECRETS
- In the CONNECTIONS tab, you can enable HTTP/2 connections (https://cloud.google.com/run/docs/configuring/http2) for your service. Note that by default, Cloud Run uses HTTP/1. You can also create a connection to Cloud SQL for persisting data. As you may recall, all the data that's saved in the container will disappear when the container is stopped. Storing the data in Cloud SQL will allow you to create stateful applications. Finally, you can create a VPC connector to communicate with any of your workloads that are connected to VPC:

Figure 7.11 – CONNECTIONS
- In the last tab, called SECURITY, you can configure the service account that will be used by your service. You can also configure Binary Authorization (you will learn more about Binary Authorization in This Post, Managing Cloud-Native Workloads with Anthos) and a customer-managed encryption key. We will leave the default settings as is and click NEXT:

Figure 7.12 – SECURITY
- In stage 3, we define how the service will be triggered. In the Ingress section, we define which traffic is allowed. We can either allow all traffic, allow internal traffic and traffic from Cloud Load Balancing, or allow internal traffic only. We must also choose the authentication method. We can either allow unauthenticated invocations for public access or use Cloud IAM for authentication. By clicking + ADD EVENTARC TRIGGER, we can define the trigger for the service:

Figure 7.13 – Configure how this service is triggered
- We will use the default trigger in this case, so we can click on the DEPLOY button. After a couple of seconds, we will see that a single revision of the service was deployed. All the requests will be directed to that revision. Let's click on the URL link and see whether the application is available on the internet:
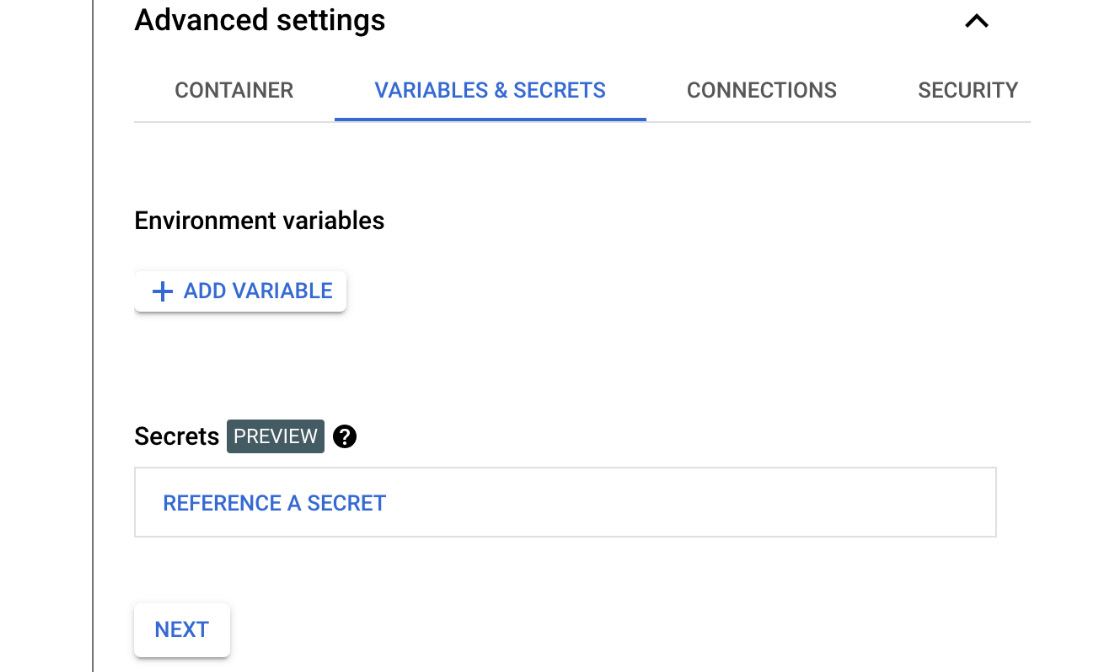
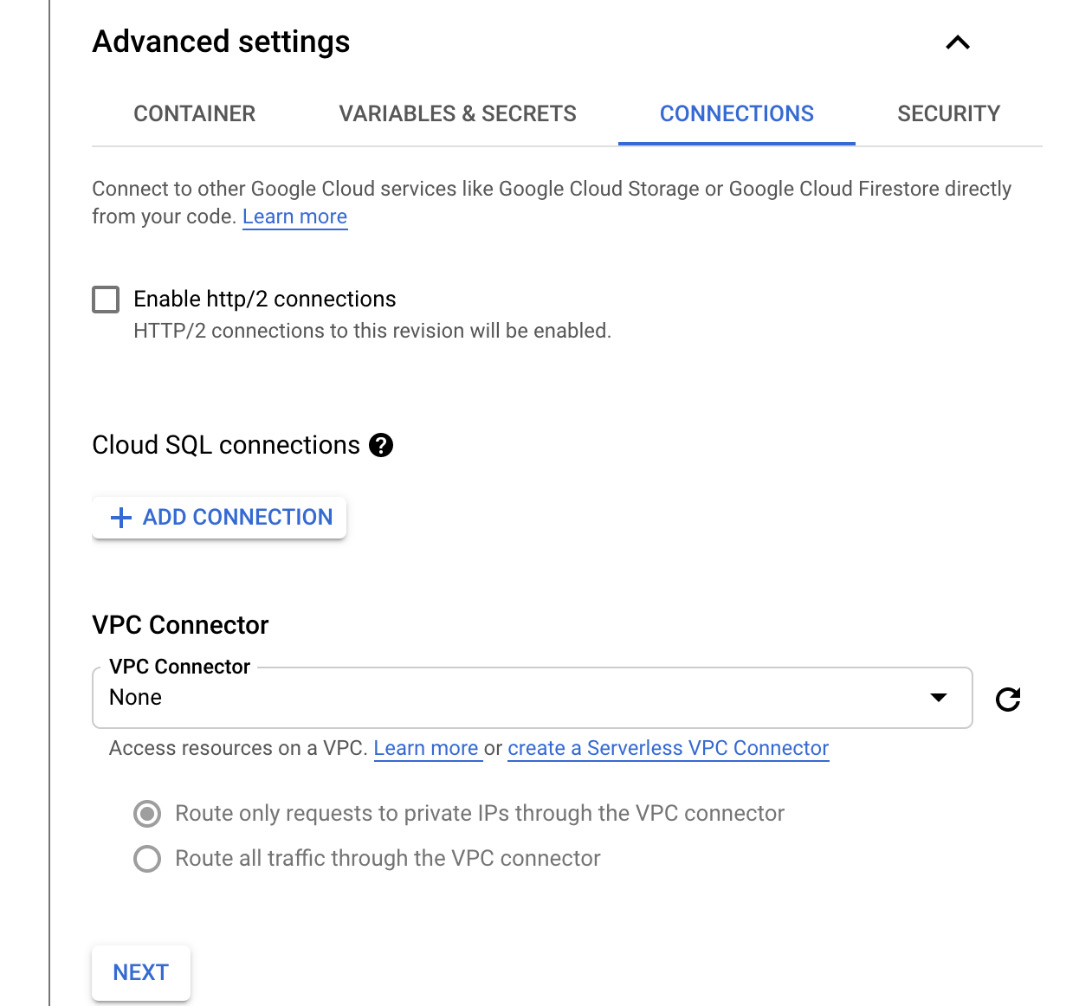
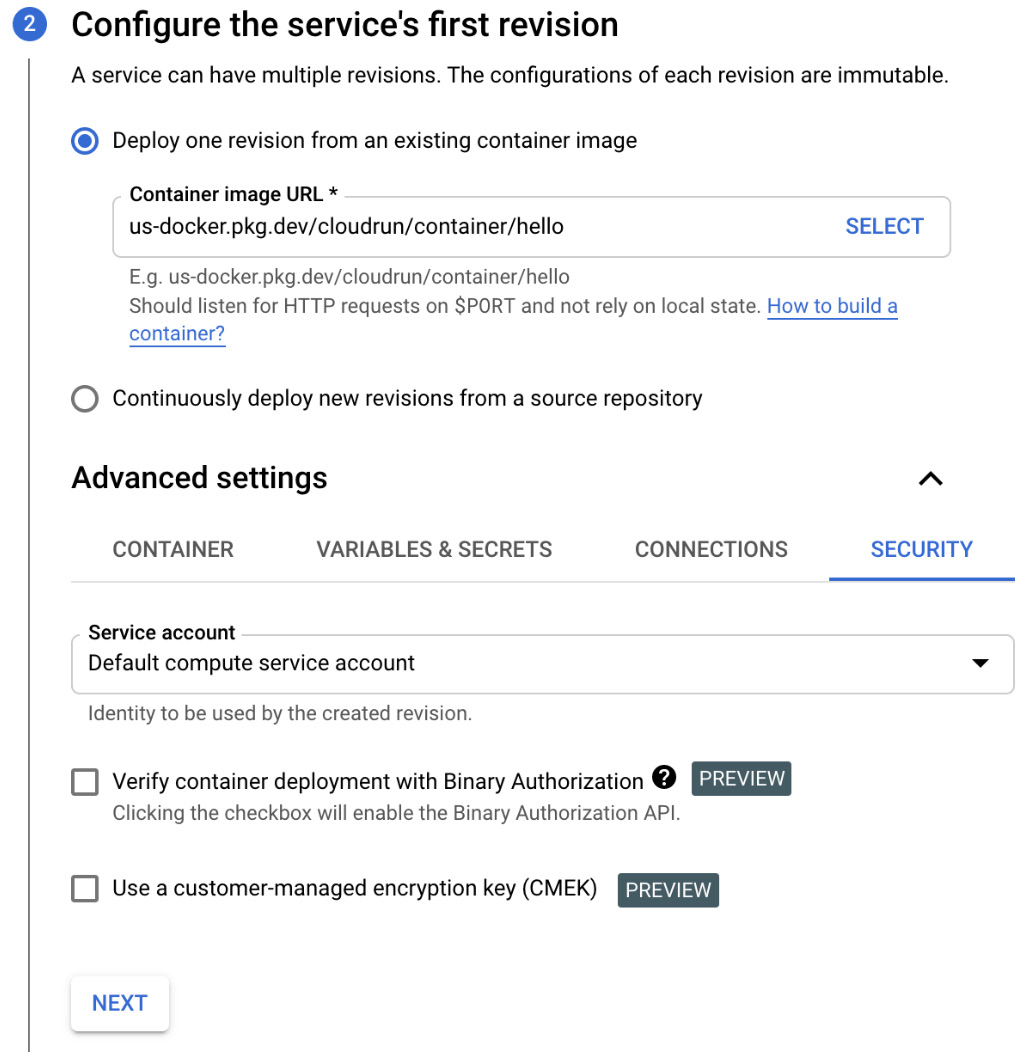
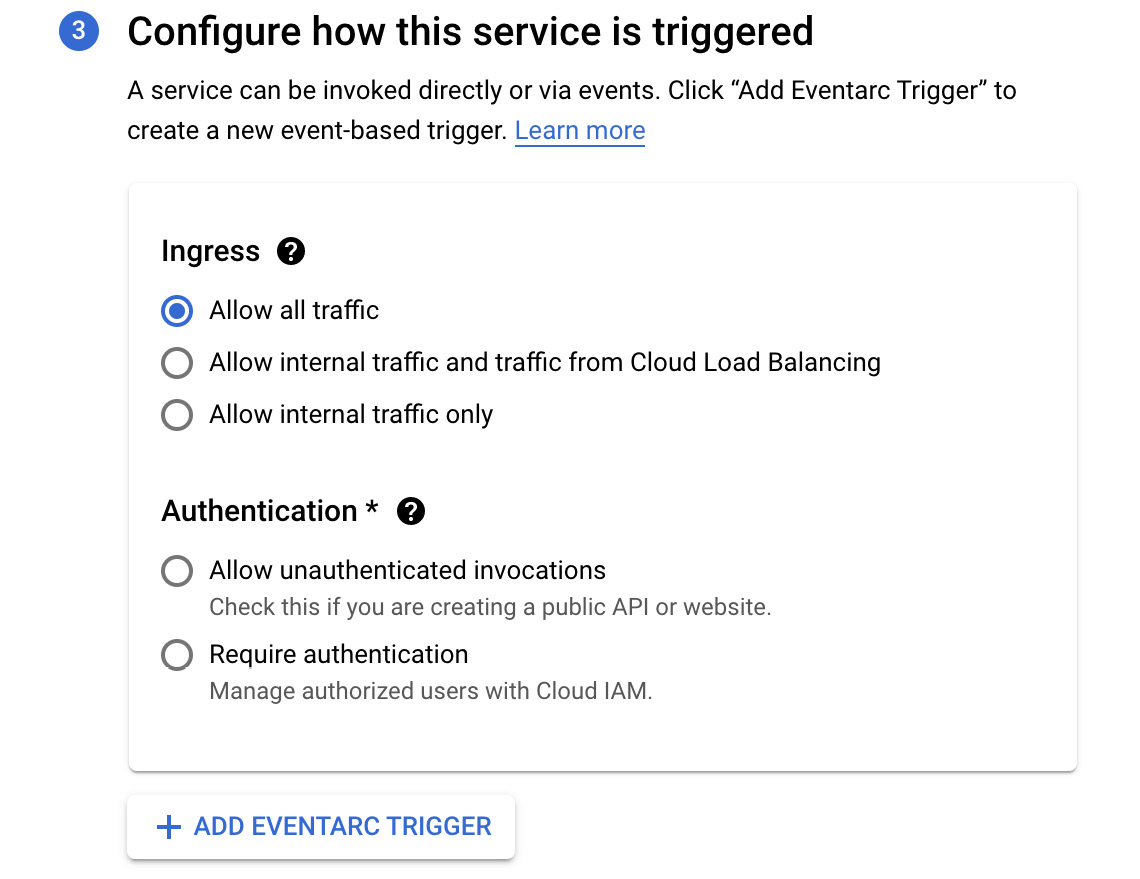
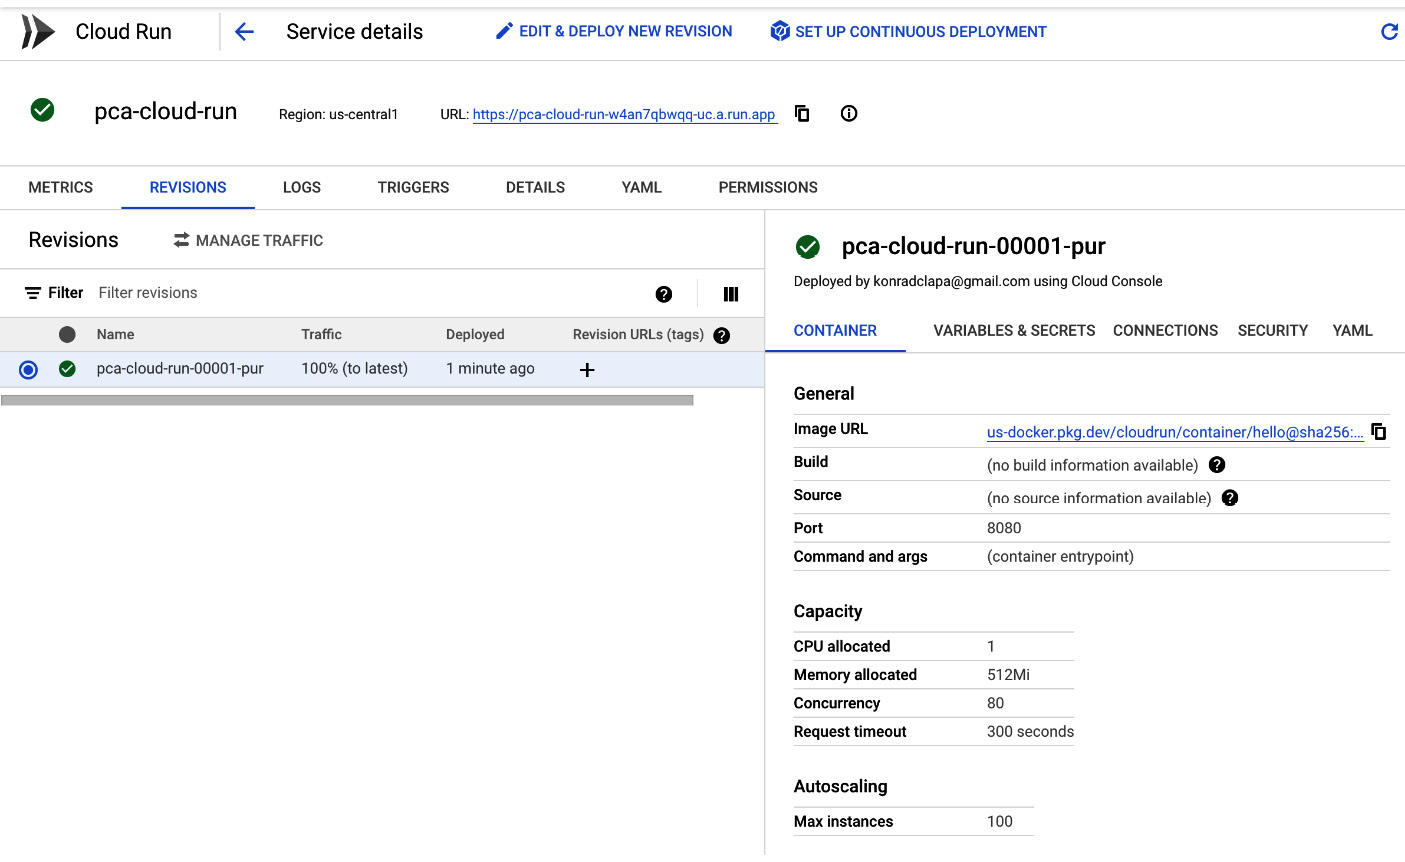
Figure 7.14 – Deployed Cloud Run service
As we can see, the application has been successfully deployed and can be accessed from the internet:
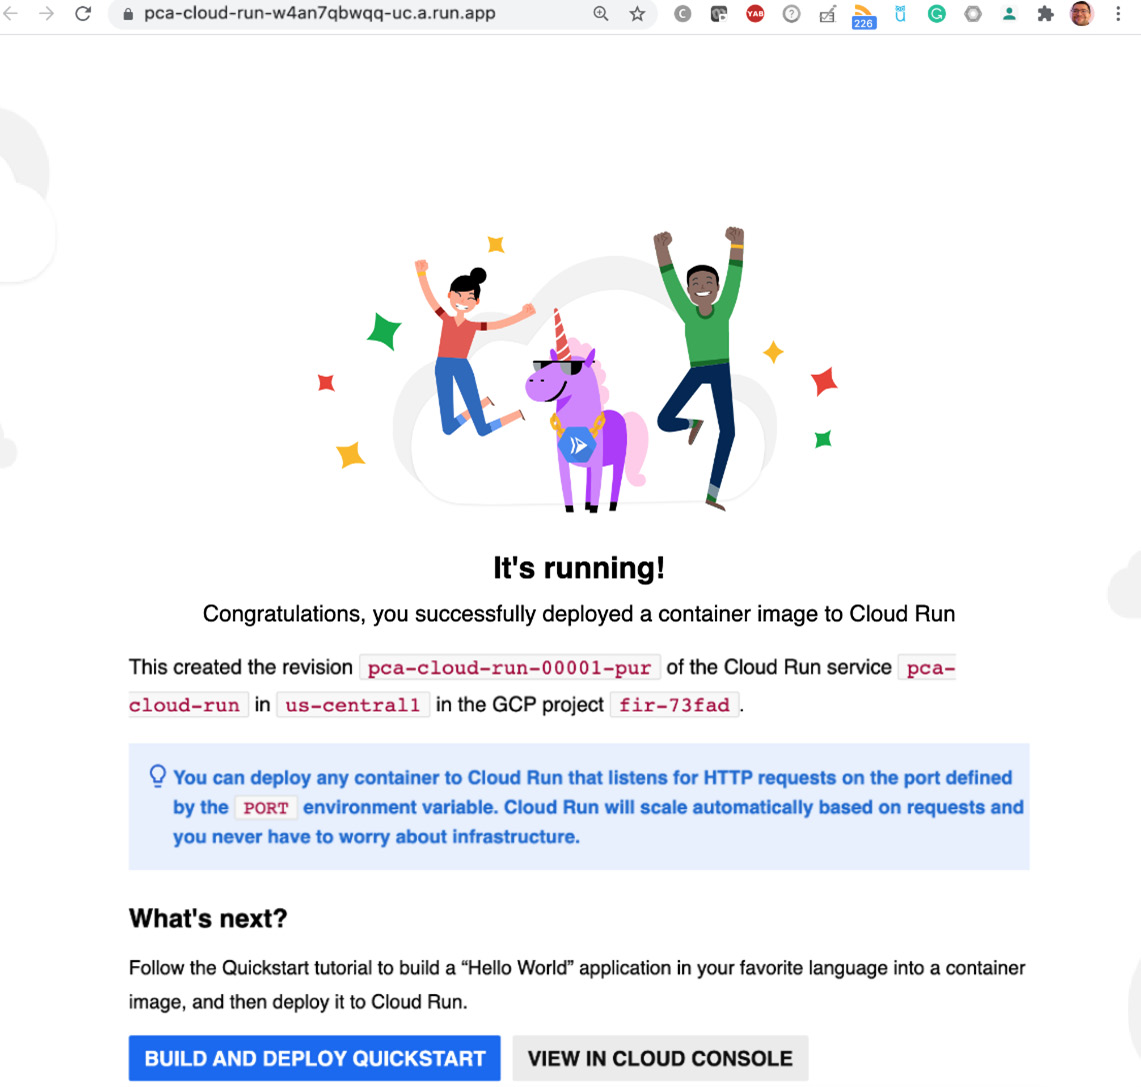
Figure 7.15 - Deployed Application
Congratulations – you have deployed your first Cloud Run service! Now, let's learn how to deploy a new revision of the application.
Deploying a new revision
To deploy a new revision of the application, return to the Cloud Run service details and follow these steps:
- Click on the EDIT & DEPLOY NEW REVISION button:

Figure 7.16 – EDIT & DEPLOY NEW REVISION
- Let's choose one of the Capacity parameters to change:

Figure 7.17 – Changing the capacity
- We will edit the Maximum requests per container attribute and change it from 80 to 1. This means that each container instance will only be able to serve a single request. By default, each container can serve 80 requests. We will leave the Serve this revision immediately option as is so that all the traffic will be directed to the new revision instead of using existing splits. Click on the DEPLOY button:
Exam Tip
Concurrency is one of the differentiators regarding Cloud Run and Cloud Functions. In Cloud Function, each function execution can only serve a single request.

Figure 7.18 – Maximum requests per container equals 1
- After waiting a couple of seconds, you will see that a new revision has been deployed. Note that 100% of the traffic is automatically routed to the new revision:

Figure 7.19 – New revision deployed
- If we click on the MANAGE TRAFFIC link, a menu will appear. In this menu, you can set a custom amount of percentage for traffic to a specific revision. This might be useful for performing tests and rollbacks. Set this as a 50:50 split and click the SAVE button:

Figure 7.20 – Manage traffic
- In the Service details section, we will see that the traffic has been split between two revisions:

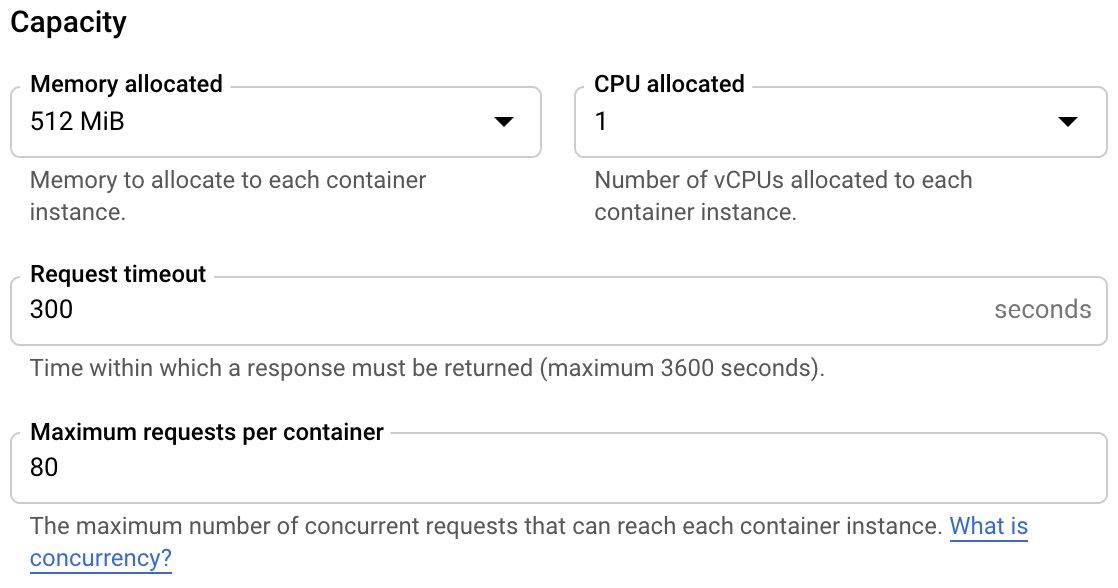
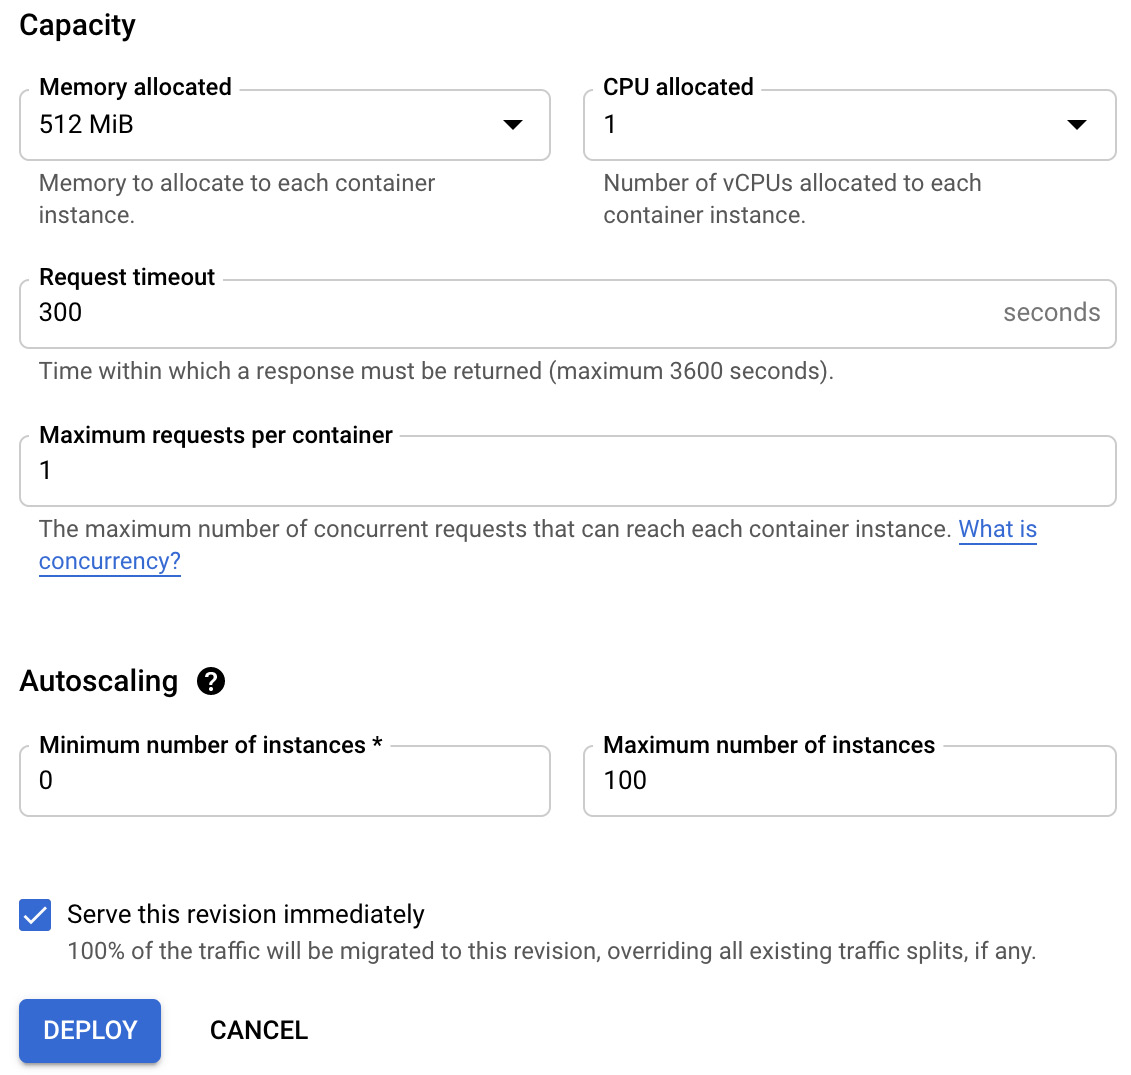

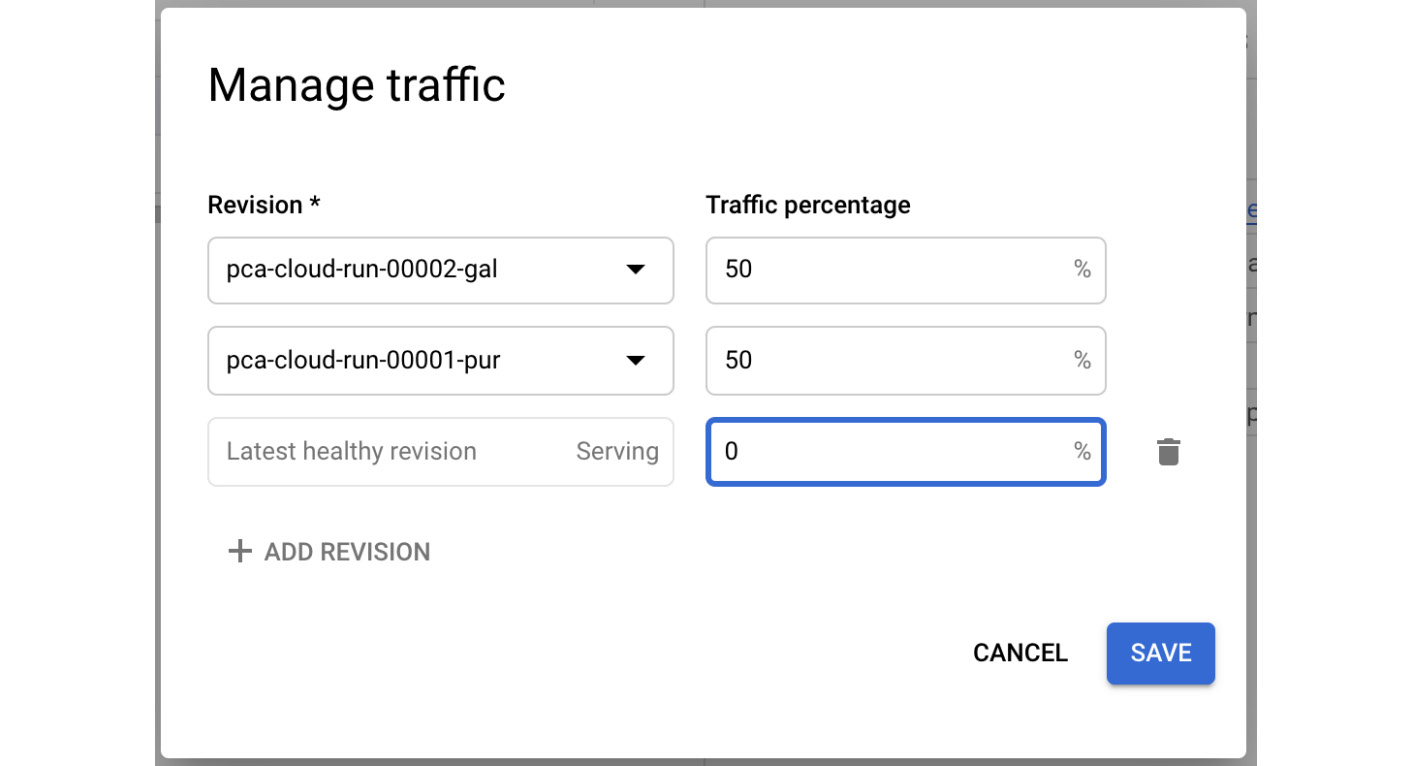
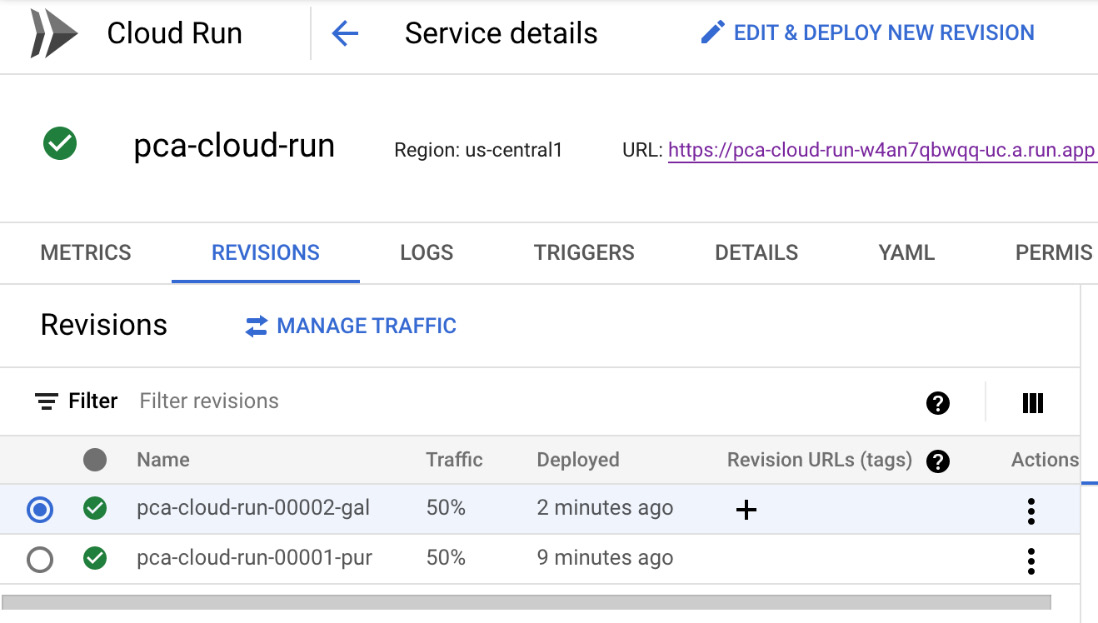
Figure 7.21 – Service details
With that, we have learned how to deploy new revisions of a Cloud Run service and how to manage the traffic to route a certain amount of traffic to a particular revision. This can, for example, help you run canary deployments on a small set of users. If you want to learn how to deploy a new revision using continuous deployment, visit Konrad's YouTube channel: https://www.youtube.com/watch?v=QjBbOKb9yns.
Mapping custom domains
As we saw in the previous sections, for each of the Cloud Run services that are deployed, an automatic URL is generated. You might want to map your domain instead of using the generated one. This is possible with the mapping custom domains feature. It requires that you do the following:
- Map a custom domain to a service.
- Add the DNS records to your domain registrar.
If you do not own a domain, you can register a domain with the Cloud Domains service directly from the Cloud Run console.
Note that this feature is only available in a few regions. To find the list of all the supported regions and see the step-by-step procedure for mapping the custom domains, check out https://cloud.google.com/run/docs/mapping-custom-domains.
IAM roles
Access to Cloud Run is secured with IAM. Let's have a look at a list of predefined roles, along with a short description of each:
- Cloud Run admin (roles/run.admin): Has the right to create, update, and delete services. You can also get and set IAM policies. Needs additional permission to deploy services.
- Cloud Run developer (roles/run.developer): Has the right to create, update, and delete services. Can also get but not set IAM policies.
- Cloud Run viewer (roles/run.viewer): Has the right to view services and get IAM policies.
- Cloud Run invoker (roles/run.invoker): Has the right to invoke services.
Quotas and limits
The list of quotas and limits for Cloud Run is quite long, so please consult https://cloud.google.com/run/quotas for a detailed list. For the exam, you might want to remember some of the most important ones.
Cloud Run comes with the following limits:
- 1,000 services per region
- 1,000 revisions per service
- 1,000 container instances per service (extendable)
- 8 GB memory per container instance
- 4 vCPUs per container instance
- 8 GB writable in-memory storage
- 60-minute maximum timeout
- 250 concurrent requests per container instance
Exam Tips
Remember that Cloud Run has a 60-minute timeout, while Cloud Function has a 9-minute (540s) timeout. This means that Cloud Run can be a solution for cases where Cloud Function would time out. However, keep the cost aspects of long-running container instances in mind. Also, Cloud Run can serve up to 250 concurrent requests while Cloud Function can only serve a single thread.
Pricing
As Cloud Run is a fully managed service, you are charged per use and do not have to worry about the underlying infrastructure. It is quite important to understand what this means as we have learned that containers are provisioned and de-provisioned as requests to access the applications are triggered. In the case of Cloud Run, the charge applies when the application is running, and you are billed to the nearest 100 milliseconds. A charge applies to the time when the following occurs:
- The container instance is starting.
- The container instance is shut down and it is handling the SIGTERM (https://cloud.google.com/blog/products/containers-kubernetes/kubernetes-best-practices-terminating-with-grace) signal.
- At least one instance is serving the request.
The active billable time begins with the start of the first request and ends at the end of the last request:
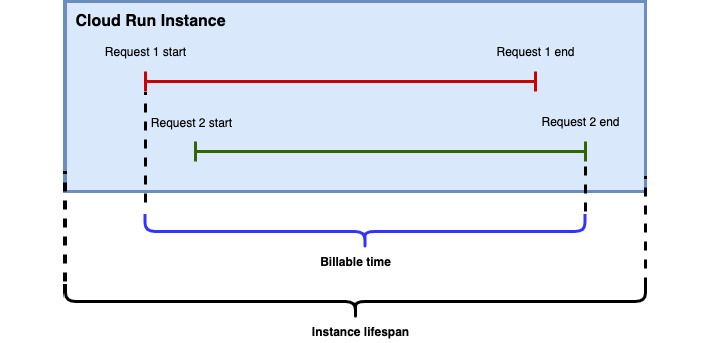
Figure 7.22 – Cloud Run billing time
Cloud Run comes with a free tier of 2 million requests and the first million have 180,000 vCPU per second and 360,000 GiB per second of memory. There is also a free egress of 1 GiB within North America.
Note that if you set a minimum number of container instances, you will be always billed for those running containers. By default, your Cloud Run service scales to zero and there is no charge for idle time.
Summary
In this article, we learned about Cloud Run, which is a service that allows you to run cloud-native workloads on Google Cloud serverlessly. Cloud Run abstracts all the implementation details of Kubernetes and Knative away from the developer and allows a seamless deployment experience. The developer does not need to understand the complex Kubernetes resource definitions to define how the application should behave under load. Scaling and load balancing are done under the hood based on the parameters that are defined during the deployment. Cloud Run integrates with many GCP services such as Cloud IAM and the Cloud operations suite for logging and monitoring.
We also deployed the Cloud Run service and learned how new revisions can be deployed. Finally, we learned how to control traffic between various revisions.
In the next blog, we will talk about Anthos, a GCP hybrid multi-cloud platform that allows you to manage cloud-native workloads both in the public cloud as well as in on-premises data centers.
Further reading
For more information on the topics that were covered in this post, take a look at the following resources:
- Overview: https://cloud.google.com/run/docs
- Developing the Cloud Run service: https://cloud.google.com/run/docs/developing
- Deploying to Cloud Run: https://cloud.google.com/run/docs/deploying
- Monitoring Cloud Run: https://cloud.google.com/run/docs/monitoring
- Cloud Run authentication: https://cloud.google.com/run/docs/authenticating/overview
- Limits and quotas: https://cloud.google.com/run/quotas
- Pricing: https://cloud.google.com/run/pricing