This article provides information and commands concerning the following topics:
EtherChannel
EtherChannel provides fault-tolerant, high-speed links between switches, routers, and servers. An EtherChannel consists of individual Fast Ethernet or Gigabit Ethernet links bundled into a single logical link. If a link within an EtherChannel fails, traffic previously carried over that failed link changes to the remaining links within the EtherChannel.
Interface Modes in EtherChannel
| Mode | Protocol | Description |
| On | None | Forces the interface into an EtherChannel without Port Aggregation Protocol (PAgP) or Link Aggregation Control Protocol (LACP). Channel only exists if connected to another interface group also in On mode |
| Auto | PAgP (Cisco) | Places the interface into a passive negotiating state (will respond to PAgP packets but will not initiate PAgP negotiation) |
| Desirable | PAgP (Cisco) | Places the interface into an active negotiating state (will send PAgP packets to start negotiations) |
| Passive | LACP (IEEE) | Places the interface into a passive negotiating state (will respond to LACP packets but will not initiate LACP negotiation) |
| Active | LACP (IEEE) | Places the interface into an active negotiating state (will send LACP packets to start negotiations) |
Default EtherChannel Configuration
| Feature | Default Setting |
| Channel groups | None assigned |
| Port-channel logical interface | None defined |
| PAgP mode | No default |
| PAgP learn method | Aggregate-port learning on all ports |
| PAgP priority | 128 on all ports |
| LACP mode | No default |
| LACP learn method | Aggregate-port learning on all ports |
| LACP port priority | 32768 on all ports |
| LACP system priority | 32768 |
| LACP system ID | LACP system priority and the switch (or switch stack) MAC address |
| Load balancing | Load distribution on the switch is based on the source MAC address of the incoming packet |
Guidelines for Configuring EtherChannel
PAgP is Cisco proprietary and not compatible with LACP.
LACP is defined in 802.3ad.
A maximum of 48 EtherChannels are supported on a switch or switch stack.
A single PAgP EtherChannel can be made by combining anywhere from two to eight parallel links.
A single LACP EtherChannel can be made by combining up to 16 Ethernet ports of the same type. Up to eight ports can be active and up to eight ports can be in standby mode.
All ports must be identical:
Same speed and duplex
Cannot mix Fast Ethernet and Gigabit Ethernet
Cannot mix PAgP and LACP in a single EtherChannel
Can have PAgP and LACP EtherChannels on the same switch, but each EtherChannel must be exclusively PAgP or LACP
Must all be VLAN trunk or nontrunk operational status
All links must be either Layer 2 or Layer 3 in a single channel group.
To create a channel in PAgP, sides must be set to one of the following:
Auto-Desirable
Desirable-Desirable
To create a channel in LACP, sides must be set to either:
Active-Active
Active-Passive
To create a channel without using PAgP or LACP, sides must be set to On-On.
Do not configure a GigaStack gigabit interface converter (GBIC) as part of an EtherChannel.
An interface that is already configured to be a Switched Port Analyzer (SPAN) destination port will not join an EtherChannel group until SPAN is disabled.
Do not configure a secure port as part of an EtherChannel.
Interfaces with different native VLANs cannot form an EtherChannel.
When using trunk links, ensure that all trunks are in the same mode—Inter-Switch Link (ISL) or dot1q.
When a group is first created, all ports follow the parameters set for the first port to be added to the group. If you change the configuration of one of the parameters, you must also make these changes to all ports in the group:
Allowed-VLAN list
Spanning-tree path cost for each VLAN
Spanning-tree port priority for each VLAN
Spanning-tree PortFast setting
Do not configure a port that is an active or a not-yet-active member of an EtherChannel as an IEEE 802.1X port. If you try to enable IEEE 802.1X on an EtherChannel port, an error message will appear, and IEEE 802.1X is not enabled.
For a Layer 3 EtherChannel, assign the Layer 3 address to the port-channel logical interface, not the physical ports in the channel.
Configuring Layer 2 EtherChannel
| Specifies the port-channel interface Once in the interface configuration mode, you can configure additional parameters |
Switch(config)# interface range fastethernet 0/1 - 4 | Moves to interface range config mode |
Switch(config-if-range)# channel-group 1 mode on | Creates channel group 1 as an EtherChannel and assigns interfaces 01 to 04 as part of it |
Switch(config-if-range)# channel-group 1 mode desirable | Creates channel group 1 as a PAgP channel and assigns interfaces 01 to 04 as part of it |
Switch(config-if-range)# channel-group 1 mode active | Creates channel group 1 as an LACP channel and assigns interfaces 01 to 04 as part of it |
Note
If you enter the channel-group command in the physical port interface mode without first setting a port channel command in global configuration mode, the port channel will automatically be created for you.
Configuring Layer 3 EtherChannel
L3Switch(config)# interface port-channel 1 | Creates the port-channel logical interface and moves to interface config mode. Valid channel numbers are 1 to 48 for a 3560 series. For a 2960 series switch with L3 capabilities, the valid channel numbers are 1 to 6 |
L3Switch(config-if)# no switchport | Puts the interface into Layer 3 mode |
L3Switch(config-if)# ip address 172.16.10.1 255.255.255.0 | Assigns the IP address and netmask |
L3Switch(config-if)# exit | Moves to global config mode |
L3Switch(config)# interface range fastethernet 0/20 - 24 | Moves to interface range config mode |
L3Switch(config-if)# no switchport | Puts the interface into Layer 3 mode |
L3Switch(config-if-range)# no ip address | Ensures that no IP addresses are assigned on the interfaces |
L3Switch(config-if-range)# channel-group 1 mode on | Creates channel group 1 as an EtherChannel and assigns interfaces 20 to 24 as part of it |
L3Switch(config-if-range)# channel-group 1 mode desirable | Creates channel group 1 as a PAgP channel and assigns interfaces 20 to 24 as part of it |
L3Switch(config-if-range)# channel-group 1 mode active | Creates channel group 1 as an LACP channel and assigns interfaces 20 to 24 as part of it Note The channel group number must match the port channel number |
Configuring EtherChannel Load Balancing
L3Switch(config)# port-channel load-balance src-mac | Configures an EtherChannel load-balancing method. The default is src-mac (specifies the source MAC address of the incoming packet |
| Select one of the following load-distribution methods | dst-ip—Specifies destination host IP address dst-mac—Specifies destination host MAC address of the incoming packet dst-mixed-ip-port—Specifies destination host IP address and the TCP/UDP port dst-port—Specifies destination TCP/UDP port extended—Specifies extended load-balance methods (combination of source and destination methods beyond those available with the standard command) ipv6-label—Specifies the IPv6 flow label l3-proto—Specifies the Layer 3 protocol src-dst-ip—Specifies the source and destination host IP address src-dst-mac—Specifies the source and destination host MAC address src-dst-mixed-ip-port—Specifies the source and destination host IP address and TCP/UDP port src-ip—Specifies source host IP address src-mac—Specifies source host MAC address (this is the default setting) dst-mixed-ip-port—Specifies the source host IP address and the TCP/UDP port src-port—Specifies the source TCP/UDP port |
Configuring LACP Hot-Standby Ports
When LACP is enabled, by default the software tries to configure the maximum number of LACP-compatible ports in a channel, up to a maximum of 16 ports. Only eight ports can be active at one time; the remaining eight links are placed into hot-standby mode. If one of the active links becomes inactive, a link in hot-standby mode becomes active in its place.
You can overwrite the default behavior by specifying the maximum number of active ports in a channel, in which case the remaining ports become hot-standby ports (if you specify only 5 active ports in a channel, the remaining 11 ports become hot-standby ports).
If you specify more than eight links for an EtherChannel group, the software automatically decides which of the hot-standby ports to make active based on LACP priority. For every link that operates in LACP, the software assigns a unique priority made up of the following (in priority order):
LACP system priority
System ID (the device MAC address)
LACP port priority
Port number
Tip
Lower numbers are better.
Switch(config)# interface port-channel 2 | Enters interface configuration mode for port channel 2. The range for port channels is 1 to 128 |
Switch(config-if)# lacp max-bundle 3 | Specifies the maximum number of LACP ports in the port-channel bundle. The range is 1 to 8 |
Switch(config-if)# port-channel min-links 3 | Specifies the minimum number of member ports (in this example, 3) that must be in the link-up state and bundled in the EtherChannel for the port-channel interface to transition to the link-up state. The range for this command is 2 to 8 |
Switch(config-if)# exit | Returns to global configuration mode |
Switch(config)# lacp system-priority 32000 | Configures the LACP system priority. The range is 1 to 65535. The default is 32768. The lower the value, the higher the system priority |
Switch(config)# interface gigabitethernet 1/0/2 | Moves to interface configuration mode |
Switch(config-if)# lacp port-priority 32000 | Configures the LACP port priority. The range is 1 to 65535. The default is 32768. The lower the value, the more likely that the port will be used for LACP transmission |
Switch(config-if)# end | Returns to privileged EXEC mode |
Monitoring and Verifying EtherChannel
Switch# show running-config | Displays a list of what is currently running on the device |
Switch# show running-config interface fastethernet 0/12 | Displays interface fastethernet 0/12 information |
Switch# show interfaces fastethernet 0/12 etherchannel | Displays EtherChannel information for specified interface |
Switch# show etherchannel | Displays all EtherChannel information |
Switch# show etherchannel 1 port-channel | Displays port channel information |
Switch# show etherchannel summary | Displays a summary of EtherChannel information |
Switch# show interface port-channel 1 | Displays the general status of EtherChannel 1 |
Switch# show lacp neighbor | Shows LACP neighbor information |
Switch# show pagp neighbor | Shows PAgP neighbor information |
Switch# clear pagp 1 counters | Clears PAgP channel group 1 information |
Switch# clear lacp 1 counters | Clears LACP channel group 1 information |
Configuration Example: EtherChannel
Figure 12-1 shows the network topology for the configuration that follows, which shows how to configure EtherChannel using commands covered in this post.
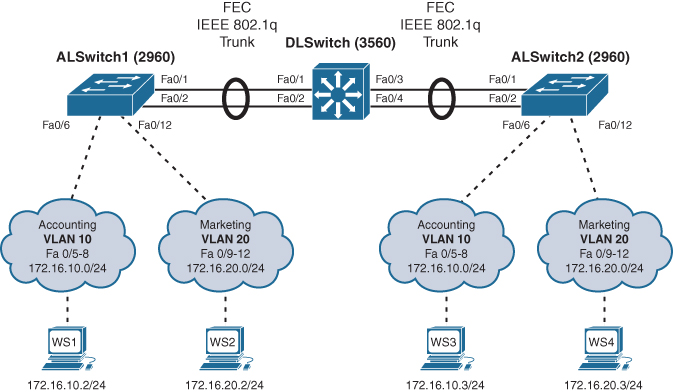
Figure 12-1 Network Topology for EtherChannel Configuration
DLSwitch (3560 or 9300)
Switch> enable | Moves to privileged EXEC mode |
Switch# configure terminal | Moves to global configuration mode |
Switch(config)# hostname DLSwitch | Sets the host name |
DLSwitch(config)# no ip domain-lookup | Turns off DNS queries so that spelling mistakes do not slow you down |
DLSwitch(config)# vtp mode server | Changes the switch to VTP server mode |
DLSwitch(config)# vtp domain testdomain | Configures the VTP domain name to testdomain |
DLSwitch(config)# vlan 10 | Creates VLAN 10 and enters VLAN config mode |
DLSwitch(config-vlan)# name Accounting | Assigns a name to the VLAN |
DLSwitch(config-vlan)# exit | Returns to global config mode |
DLSwitch(config)# vlan 20 | Creates VLAN 20 and enters VLAN config mode |
DLSwitch(config-vlan)# name Marketing | Assigns a name to the VLAN |
DLSwitch(config-vlan)# exit | Returns to global configuration mode |
DLSwitch(config)# interface range fastethernet 0/1 - 4 | Moves to interface range config mode |
DLSwitch(config-if)# switchport trunk encapsulation dot1q | Specifies 802.1Q tagging on the trunk link |
DLSwitch(config-if)# switchport mode trunk | Puts the interface into permanent trunking mode and negotiates to convert the link into a trunk link |
DLSwitch(config-if)# exit | Returns to global configuration mode |
DLSwitch(config)# interface range fastethernet 0/1 - 2 | Moves to interface range config mode |
DLSwitch(config-if)# channel-group 1 mode desirable | Creates channel group 1 and assigns interfaces 01 to 02 as part of it |
DLSwitch(config-if)# exit | Moves to global configuration mode |
DLSwitch(config)# interface range fastethernet 0/3 - 4 | Moves to interface range config mode |
DLSwitch(config-if)# channel-group 2 mode desirable | Creates channel group 2 and assigns interfaces 03 to 04 as part of it |
DLSwitch(config-if)# exit | Moves to global configuration mode |
DLSwitch(config)# port-channel load-balance dst-mac | Configures load balancing based on destination MAC address |
DLSwitch(config)# exit | Moves to privileged EXEC mode |
DLSwitch# copy running-config startup-config | Saves the configuration to NVRAM |
ALSwitch1 (2960 or 9200)
Switch> enable | Moves to privileged EXEC mode |
Switch# configure terminal | Moves to global configuration mode |
Switch(config)# hostname ALSwitch1 | Sets host name |
ALSwitch1(config)# no ip domain-lookup | Turns off DNS queries so that spelling mistakes do not slow you down |
ALSwitch1(config)# vtp mode client | Changes the switch to VTP client mode |
ALSwitch1(config)# vtp domain testdomain | Configures the VTP domain name to testdomain |
ALSwitch1(config)# interface range fastethernet 0/5 - 8 | Moves to interface range config mode |
ALSwitch1(config-if-range)# switchport mode access | Sets ports 05 to 08 as access ports |
ALSwitch1(config-if-range)# switchport access vlan 10 | Assigns ports to VLAN 10 |
ALSwitch1(config-if-range)# exit | Moves to global configuration mode |
ALSwitch1(config)# interface range fastethernet 0/9 - 12 | Moves to interface range config mode |
ALSwitch1(config-if-range)# switchport mode access | Sets ports 09 to 12 as access ports |
ALSwitch1(config-if-range)# switchport access vlan 20 | Assigns ports to VLAN 20 |
ALSwitch1(config-if-range)# exit | Moves to global configuration mode |
ALSwitch1(config)# interface range fastethernet 0/1 - 2 | Moves to interface range config mode |
ALSwitch1(config-if-range)# switchport mode trunk | Puts the interface into permanent trunking mode and negotiates to convert the link into a trunk link |
ALSwitch1(config-if-range)# channel-group 1 mode desirable | Creates channel group 1 and assigns interfaces 01 to 02 as part of it |
ALSwitch1(config-if-range)# exit | Moves to global configuration mode |
ALSwitch1(config)# exit | Moves to privileged EXEC mode |
ALSwitch1# copy running-config startup-config | Saves the configuration to NVRAM |
ALSwitch2 (2960 or 9200)
Switch> enable | Moves to privileged EXEC mode |
Switch# configure terminal | Moves to global configuration mode |
Switch(config)# hostname ALSwitch2 | Sets host name |
ALSwitch2(config)# no ip domain-lookup | Turns off DNS queries so that spelling mistakes do not slow you down |
ALSwitch2(config)# vtp mode client | Changes the switch to VTP client mode |
ALSwitch2(config)# vtp domain testdomain | Configures the VTP domain name to testdomain |
ALSwitch2(config)# interface range fastethernet 0/5 - 8 | Moves to interface range config mode |
ALSwitch2(config-if-range)# switchport mode access | Sets ports 05 to 08 as access ports |
ALSwitch2(config-if-range)# switchport access vlan 10 | Assigns ports to VLAN 10 |
ALSwitch2(config-if-range)# exit | Moves to global configuration mode |
ALSwitch2(config)# interface range fastethernet 0/9 - 12 | Moves to interface range config mode |
ALSwitch2(config-if-range)# switchport mode access | Sets ports 09 to 12 as access ports |
ALSwitch2(config-if-range)# switchport access vlan 20 | Assigns ports to VLAN 20 |
| ALSwitch2(config-if-range)# exit | Moves to global configuration mode |
ALSwitch2(config)# interface range fastethernet 0/1 - 2 | Moves to interface range config mode |
ALSwitch2(config-if-range)# switchport mode trunk | Puts the interface into permanent trunking mode and negotiates to convert the link into a trunk link |
ALSwitch2(config-if-range)# channel-group 2 mode desirable | Creates channel group 2 and assigns interfaces 01 to 02 as part of it Note Although the local channel group number does not have to match the channel group number on a neighboring switch, the numbers are often chosen to be the same for ease of management and documentation purposes. |
ALSwitch2(config-if-range)# exit | Moves to global configuration mode |
ALSwitch2(config)# exit | Moves to privileged EXEC mode |
ALSwitch2# copy running-config startup-config | Saves the configuration to NVRAM |