In the previous post, we took a deep dive into Google Compute Engine, which provides Infrastructure-as-a-Service (IaaS). In this article, we will look at a Container-as-a-Service (CaaS) offering. Google Kubernetes Engine (GKE) allows us to create managed Kubernetes clusters on demand. Before we start talking about GKE, we need to understand a few concepts, such as microservices, containers, and Kubernetes itself.
Exam Tips
GKE is heavily tested in the cloud architect exam. Make sure you understand the basic concepts of containers, microservices, Kubernetes, and GKE-specific topics. Pay special attention to the Kubernetes section. A lot of questions are related to Kubernetes rather than being GKE-specific. Make sure that you understand the Kubernetes architecture and resources, pay special attention to networking and services so that you know how the applications are accessed, understand how you can secure clusters with IAM and RBAC, and, finally, understand how you can manage, scale, and upgrade GKE clusters.
If you have never heard of these before, don't worry – we will take you through all the basic concepts. We will cover the following topics in this article:
- An introduction to microservices
- Containers
- Kubernetes
- Google Kubernetes Engine
An introduction to microservices
Let's start by going over the concept of microservices. In the legacy world, applications were delivered in a monolithic architecture. This meant that multiple services were hosted together on a single node. In the microservice architecture, the application is divided into several microservices, each hosted on a separate node, like so:
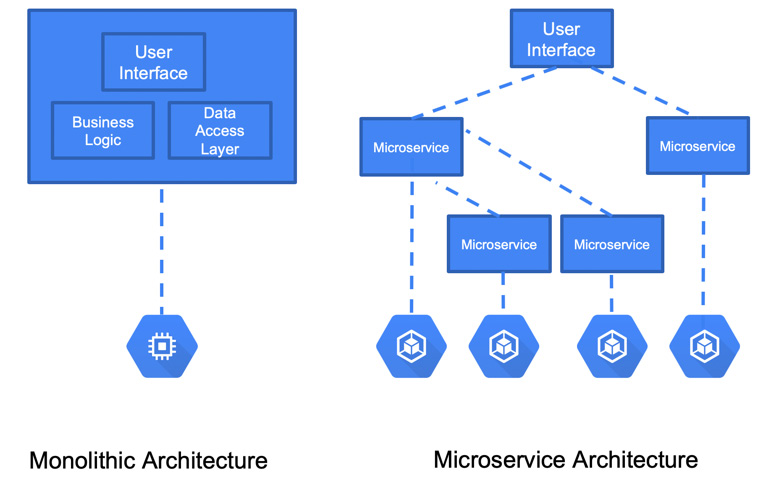
Figure 6.1 – Monolithic versus microservice
Each microservice is responsible for a single piece of functionality. The microservices are loosely coupled and can be developed and managed separately. They communicate with each other using APIs. Thanks to that, each microservice can even be developed in a different programming language. When you need to upgrade your application, you can upgrade a single service without affecting other components. By splitting the application into microservices, you also have control over how and when you scale your application. You can granularly scale the services that require scaling without touching the others. Finally, microservices allow you to embrace CI/CD and deliver functionalities faster as deployments can be rolled out in a very controlled way.
Important Note
Continuous integration and continuous delivery and/or continuous deployment (CI/CD) is a methodology of streamlining software delivery. Continuous integration is a practice where developers frequently submit code to a common repository. The code is reviewed and tested. After validation, automatic builds are triggered. Continuous delivery allows you to automate the release process so that the software can be deployed to the target environment at any point in time. In continuous deployment, any changes that are made by a developer that pass all the tests are automatically deployed to the production environment.
Containers
To understand containers, let's compare them to traditional virtual machines. While virtual machines virtualize hardware, containers virtualize the operating system. They abstract the application, along with all its dependencies, into one unit. Multiple containers can be hosted on one operating system running as an isolated process:
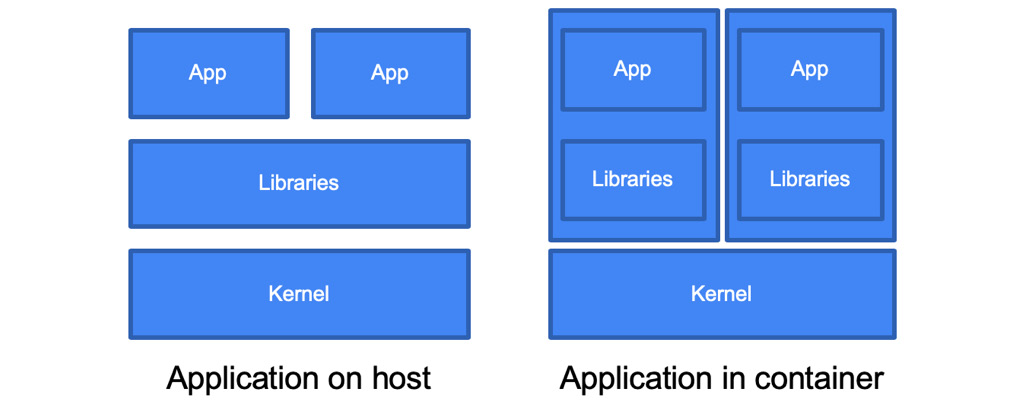
Figure 6.2 – Applications in containers
Containers bring the following advantages:
- Isolation: Applications can use their libraries without conflicting with libraries from other applications.
- Resource limitation: Applications can be limited to the resource's usage.
- Portability: Applications are self-contained with all their dependencies and are not tied to an OS or a cloud provider.
- Lightweight: The footprint of the application is much smaller as the containers share a common kernel.
The software that allows the containers to run is called the container runtime.
While there are many container runtimes available, Google recommends using containerd (https://containerd.io). For many years, the standard was the Docker runtime, but this has changed recently. Containerd was identified as the most secure and efficient and has become a new standard for Kubernetes and therefore also for GKE. If you are running your GKE nodes with Docker, Google recommends that you plan for a migration. Note that you can still build your containers using Docker as this is a separate process that happens outside of the Kubernetes cluster.
Kubernetes
Kubernetes, also known as K8s, is an open source container orchestrator that was initially developed by Google and donated to the Cloud Native Computing Foundation. It allows you to deploy, scale, and manage containerized applications. As an open source platform, it can run on multiple environments both on-premises as well as in the public cloud. It is suitable for both stateless as well as stateful applications.
Exam Tip
Kubernetes is an important exam topic. Fortunately, the exam does not require you to have in-depth knowledge of it. In this section, we will talk about both the management layer and Kubernetes objects. We want you to understand the management layer because it is necessary to understand GKE itself. When it comes to Kubernetes objects, make sure that you understand at least the ones mentioned in this blog, including Pods, Deployments, Services, and Namespaces. Kubernetes itself deserves its own book, and there are many available on the market. If you feel like you want to learn more, refer to the Further reading section.
Kubernetes architecture
In the following diagram, we can see the basic architecture of a Kubernetes cluster. The cluster consists of multiple nodes. At a high level, the master nodes are responsible for managing the cluster, while the worker nodes host the workloads. The worker nodes host so-called Pods, which are the most atomic units of Kubernetes. These Pods can contain one or more containers. Access to the containers in the Pods is provided using services. In the following diagram, we can see a Kubernetes cluster and the services that are hosted on each type of node:
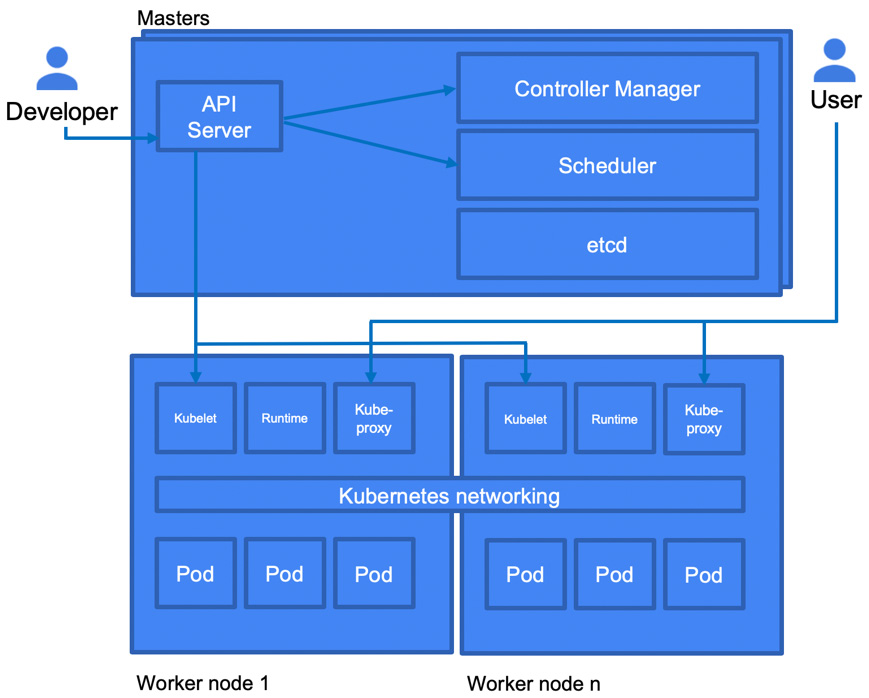
Figure 6.3 – Kubernetes architecture
Now, let's have a closer look at master and worker nodes.
The master nodes
The master node is a control plane that takes care of maintaining the desired state of the cluster. It monitors the Kubernetes object definitions (YAML files) and makes sure that they are scheduled on the worker nodes.
Important Note
YAML Ain't Markup Language (YAML) is a human-friendly data serialization standard, mainly used for configuration files. It is an alternative for formats such as XML or JSON.
It is essentially a control plane for the cluster. It works as follows:
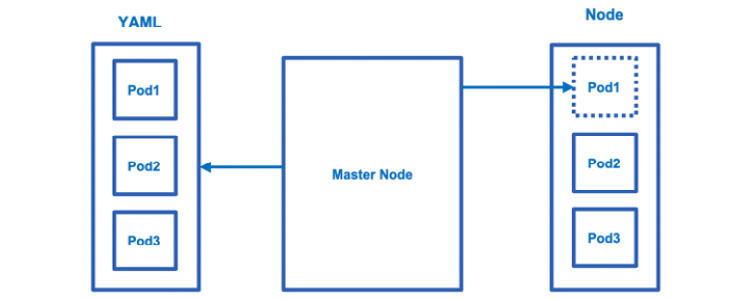
Figure 6.4 – Control plane
The master node runs multiple processes:
- API server: Exposes the Kubernetes API. It is the frontend of the control plane.
- Controller manager: Multiple controllers are responsible for the overall health of the cluster.
- etcd: A database that hosts the cluster state information.
- Scheduler: Responsible for placing the Pods across the nodes to balance resource consumption.
A cluster can run perfectly with just one master, but multiple nodes should be run for high availability and redundancy purposes. Without the master, the control plane is essentially down. All the cluster management operations you perform go through the master API. So, for production workloads, it is recommended that you have multiple master node configurations.
Worker nodes
A worker node can be a virtual machine or even a physical server. In the case of GKE, it is a GCE virtual machine instance. Worker nodes are responsible for running containerized applications. Worker nodes are managed by the master node. They run the following services:
- kubelet: This reads the Pod specification and makes sure that the right containers run in the Pods. It interacts directly with the master node.
- kube-proxy: This is a network proxy running on each node. It enables the usage of services (we will learn about services shortly).
- Container runtime: This is responsible for running containers.
Kubernetes objects
Kubernetes objects are records of intent that are defined in YAML format. They are declarative. Once created, Kubernetes will take care of keeping them in the state that's been declared in the definition file. Some examples of the most important objects are as follows:
- Pods
- ReplicaSets
- Replication controllers
- Deployments
- Namespaces
It would take hundreds of pages to describe all the available Kubernetes objects, so for the exam, we will concentrate on the preceding ones. Let's create an example definition.yaml file that contains the following content. This deployment will deploy two Pods with containers using the nginx image:
apiVersion: apps/v1
kind: Deployment
metadata:
name: nginx-deployment
labels:
app: nginx
spec:
replicas: 3
selector:
matchLabels:
app: nginx
template:
metadata:
labels:
app: nginx
spec:
containers:
- name: nginx
image: nginx:1.7.9
ports:
- containerPort: 80
No matter what kind of object we define, we need to have the following data in it:
- apiVersion: The version of the Kubernetes API we want to use
- kind: The kind of object to be created
- metadata: Data that helps uniquely identify the object, such as its name
- spec: The specification of the object, which depends on its type
To create or update an existing object, we can use the following command:
kubectl apply -f definition.yaml
Here, definition.yaml is the file that contains an object definition. To run our first deployment, we would have to save the preceding definition in the definition.yaml file and run the kubectl command.
There are multiple commands you can use to manage Kubernetes. kubectl is the most used as it allows us to create, delete, and update Kubernetes objects. Take a look at the following link to see what operations can be performed using kubectl: https://kubernetes.io/docs/reference/kubectl/overview/. Note that kubectl is installed in the GCP Cloud Shell console by default, but if you want to use it from any other machine, it needs to be installed.
Now, let's have a look at each object, starting with Pods.
Selectors and Labels
You will notice that Kubernetes objects have parameters called labels and selectors.
Those parameters are used to associate different objects with each other. Say you want to associate a Deployment with a Service. In the Deployment definition, you would use a property label such as app: myapp, while in the Service definition, you would use a selector such as app: myapp.
Pods
A Pod is an atomic unit of deployment in Kubernetes. A Pod contains one or more containers and storage resources. Usually, there would be a single container within a Pod. Additional containers can be added to the Pod when we need small helper services. Each Pod has a unique IP address that is shared with the containers inside it. Pods are ephemeral by nature and are recreated when they need to be rescheduled. If they use no persistent volumes, the volume's content vanishes when a Pod is recreated. To create a Pod, we can use a kind value of Pod and define what image we want to use, like so:
apiVersion: v1
kind: Pod
metadata:
name: my-pod
labels:
app: myapp
spec:
containers:
- name: my-container
image: nginx:1.7.9
Here, we can see a definition of a Pod with a container that's been deployed from an nginx image.
ReplicaSets
A ReplicaSet object is used to manage the number of Pods that are running at a given time. A ReplicaSet monitors how many Pods are running and deploys new ones to reach the desired number of replicas. To define a ReplicaSet, you can use a kind value of ReplicaSet. The number of Pods to run is defined under the replicas parameter:
apiVersion: apps/v1
kind: ReplicaSet
metadata:
name: frontend
labels:
app: guestbook
tier: frontend
spec:
# modify replicas according to your case
replicas: 3
selector:
matchLabels:
tier: frontend
template:
metadata:
labels:
tier: frontend
spec:
containers:
- name: php-redis
image: gcr.io/google_samples/gb-frontend:v3
ReplicaSets are successors of replication controller objects. It is not very common to create ReplicaSets. Instead, you should create Deployments, which we will have a look at in the next section.
Deployments
Deployments are used to deploy, update, and control Pods. These deployments create ReplicaSets without the need to define them separately. By stating how many replicas are needed, the appropriate ReplicaSet object will be created for you. By changing the image in the container, we can update the application to a new version. Deployment objects support both canary and Blue/Green deployment methods.
Important Note
In a canary deployment, we deploy a new version of the application to a subset of users. Once we are sure that the new version works properly, the application is updated for all the users. In a blue/green deployment, we use two environments, with only one active at a time. After updating the inactive one to a new version and testing it, we switch the traffic and make it the active one.
To create a deployment object, use a kind value of Deployment, like so:
apiVersion: apps/v1
kind: Deployment
metadata:
name: deployment-demo
labels:
app: nginx
spec:
replicas: 3
selector:
matchLabels:
app: nginx
template:
metadata:
labels:
app: nginx
spec:
containers:
- name: nginx
image: nginx:1.7.9
ports:
- containerPort: 80
In the preceding example, we created a deployment with three replicas from the nginx:1.7.9 image. The deployment object will make sure that three replicas will be running at all times.
Namespaces
Namespaces are essentially virtual clusters within a Kubernetes cluster. In big environments, there can be multiple teams developing an application. By creating namespaces, users are allowed to reuse the names of resources. These names need to be unique within the namespaces but not across the cluster. By default, a Kubernetes cluster comes with three predefined namespaces:
- default: A default namespace for objects with no other namespace
- kube-system: Used for resources that are created by Kubernetes
- kube-public: Reserved for future use:
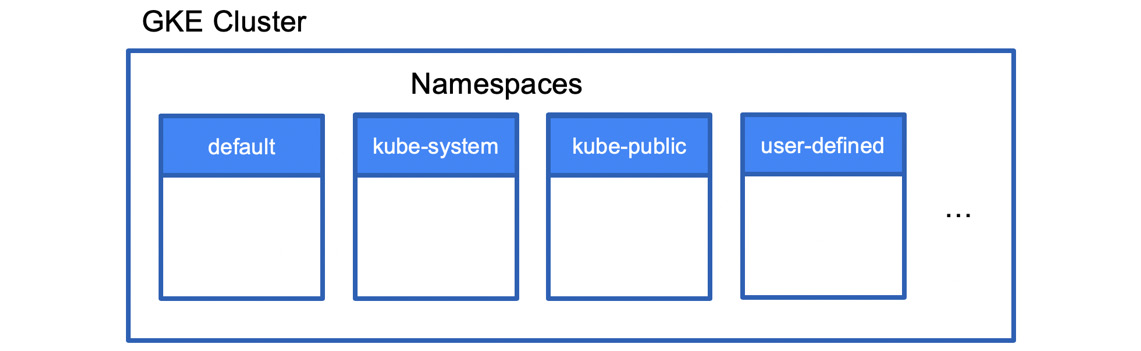
Figure 6.5 – Namespaces
Additional namespaces can be created as needed by running the following command:
kubectl create namespace <namespace-name>
Here, <namespace-name> is the name of the new namespace.
To deploy to the new namespace, you should use the –-namespace flag, like so:
kubectl --namespace=<namespace-name> run nginx --image=nginx
Alternatively, you can define the namespace attribute in the object definition.
Namespaces can be isolated from each other using network policies. To learn more about network policies, check the Further reading section of this blog. You can also limit the resources that are available to a namespace by using resource quotas. The following quota requests/reserves a total of 1 CPU and 1 GB of memory. It also limits the CPU to 2 and the memory to 2 GB:
apiVersion: v1
kind: ResourceQuota
metadata:
name: quota-demo
spec:
hard:
requests.cpu: "1"
requests.memory: 1Gi
limits.cpu: "2"
limits.memory: 2Gi
As you can see, namespaces are a good way of separating your environment. Before you decide to deploy a new Kubernetes cluster, you might want to have a look at creating a new namespace instead.
Services
Services are used to group Pods into a single endpoint. As we know, Pods come and go. A service has a stable IP address, so requests can be sent to it and forwarded to a Pod. What algorithm is used to perform the forwarding depends on the type of service. We will have a look at each type of service in the next section. Let's take a look at a simple definition of a service. Here, we are using a kind value of Service.
As we mentioned previously, you can use a selector in the service definition and a label in the Pod definition to assign the Pod to a service.
The following is a simple service definition:
apiVersion: v1
kind: Service
metadata:
name: service-demo
spec:
selector:
app: myapp
ports:
- protocol: TCP
port: 80
targetPort: 9376
Let's take a look at the types of services.
Types of services
In this section, we will have a look at the most important service types. Services differ by how they handle traffic and whether they expose Pods externally or internally. The services we will discuss are as follows:
- ClusterIP
- NodePort
- LoadBalancer
- ExternalName
Let's discuss each service in detail:
- ClusterIP: This is a default service that uses an internal ClusterIP to expose Pods. This means that services are not available from outside the cluster. The use case for ClusterIP is internal communication between the microservices within the cluster:
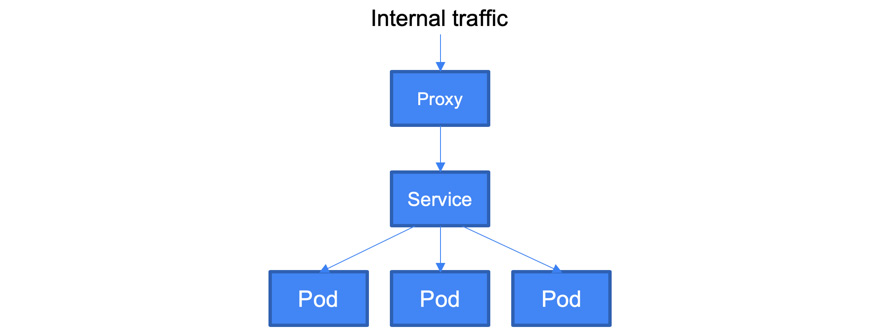
Figure 6.6 – The ClusterIPservice type
The following is a sample definition of a Service of the ClusterIP type:
apiVersion: v1
kind: Service
metadata:
name: clusterip-demo
spec:
selector:
app: myapp
type: ClusterIP
ports:
- name: http
port: 80
targetPort: 80
protocol: TCP
- NodePort: This simply exposes each node outside of the cluster. The Pods can be accessed using <NodeIP>:<NodePort>. If there are multiple nodes, then multiple IP addresses with the same port will be exposed:
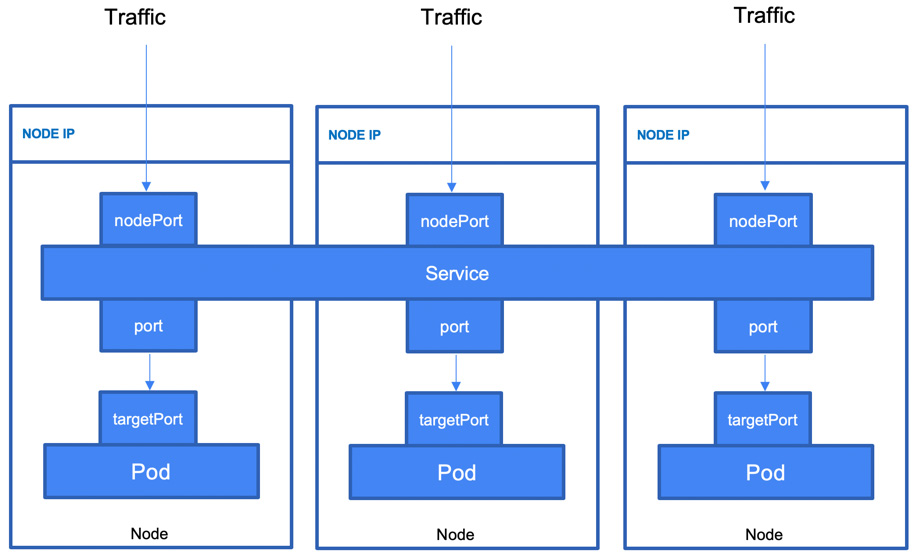
Figure 6.7 – The NodePort service type
The following is a sample definition of a Service of the NodePort type:
apiVersion: v1
kind: Service
metadata:
name: nodeport-demo
spec:
selector:
app: myapp
type: NodePort
ports:
- name: http
port: 80
targetPort: 80
nodePort: 30080
protocol: TCP
- LoadBalancer: This will dynamically create a provider load balancer. In the case of GCP, a network load balancer is created for you. Remember that it uses objects from outside of Kubernetes and generates additional costs:
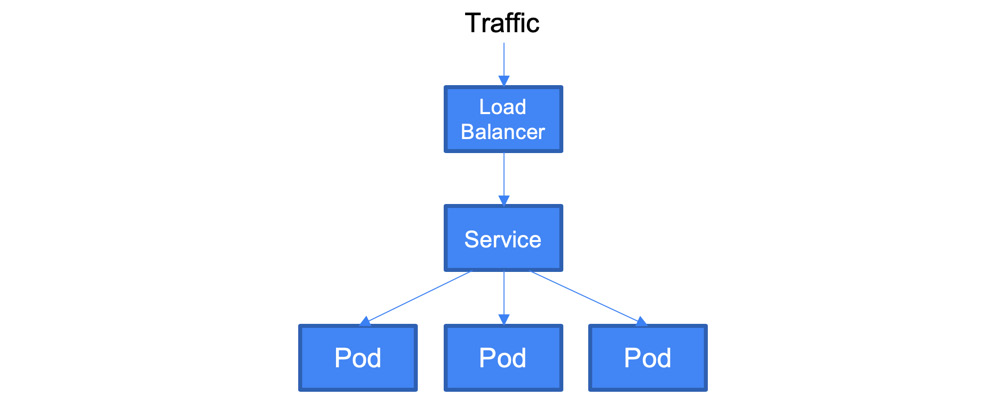
Figure 6.8 – The LoadBalancer service type
The following is a sample definition of a Service of the LoadBalancer type:
kind: Service
apiVersion: v1
metadata:
name: loadbalancer-demo
spec:
selector:
app: myapp
ports:
- protocol: TCP
port: 80
targetPort: 9376
clusterIP: 10.115.240.5
loadBalancerIP: 70.10.10.19
type: LoadBalancer
status:
loadBalancer:
ingress:
- ip: 160.160.160.155
- ExternalName: This service is exposed using a DNS name specified in the ExternalName spec. The following is a sample definition of a Service of the ExternalName type:
kind: Service
apiVersion: v1
metadata:
name: externalname-demo
spec:
type: ExternalName
externalName: my.app.example.com
- Ingress: This is an object that allows HTTP(S) traffic to be routed according to the defined rules (paths). It can be associated with one or more Service objects. These services are further associated with Pods. In the case of GCP, the ingress controller creates HTTP(S) load balancers. These load balancers are configured automatically using the definition in the Ingress object:
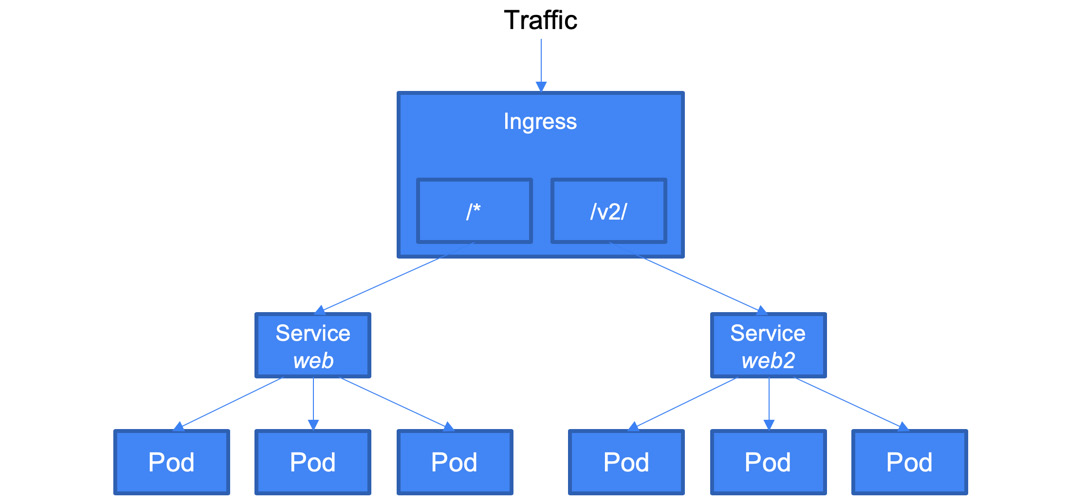
Figure 6.9 – Ingress diagram
Let's have a look at the YAML definition. The ingress is defined with a kind value of Ingress. From here, you define rules. Depending on the path, you direct the traffic to the associated service. In the following example, /* traffic is directed to the web if /v2/* traffic is directed to the web2 service:
apiVersion: networking.k8s.io/v1
kind: Ingress
metadata:
name: example-ingress
spec:
rules:
- http:
paths:
- path: /*
pathType: Prefix
backend:
service:
name: web
port:
number: 8080
- path: /v2/*
pathType: Prefix
backend:
service:
name: web2
port:
number: 8080
This sums up the list of the most important Kubernetes objects. In the next section, we will have a closer look at GKE.
Exam Tip
In specialization exams such as Google Cloud Certified Developer, you can expect more deep-dive questions on Kubernetes. You might see questions about resources such as StatefulSets https://kubernetes.io/docs/concepts/workloads/controllers/statefulset) or DeamonSets https://kubernetes.io/docs/concepts/workloads/controllers/daemonset). Although we do not expect such questions in the PCA exam, we encourage you to have a look at the official Kubernetes documentation.
Google Kubernetes Engine
GKE is a fully managed service that allows us to provision Kubernetes clusters on demand. It offloads the burden of deploying clusters manually and provides managed master nodes. It also comes with several benefits that manual deployment does not offer, such as the following:
- Automated cluster provisioning
- Automated cluster scaling
- Automated upgrades
- Auto-repair
- Integrated load balancing
- Node pools
- Integration with the Google Cloud operations suite for monitoring and logging
A GKE cluster can be deployed in two modes: zonal or regional. In a zonal deployment, only one master node is deployed. In a regional deployment, three masters are deployed in different zones. This is shown in the following diagram:

Figure 6.10 – GKE clusters
To be provided with a higher availability SLA and have zero downtime when upgrading the management plane, you should deploy regional clusters. In this setup, the masters can be upgraded one by one so that the management plane is functional during the upgrade period.
GKE Autopilot
GKE Autopilot is a new mode of operation for GKE clusters next to the standard one. This is Google's attempt to provide the customer with an even wider scope of services than GKE standard mode does. In the case of GKE Autopilot, it is GKE itself that provisions and manages the cluster, nodes, and node pools, providing you with an optimized cluster and a fully managed experience. You no longer need to worry about the health of your nodes or Pods. Those are monitored and managed by Google. The SLA covers both the control plane as well as the Pods. Another important aspect is you don't need to worry about the capacity required to host your Pods as this is taken care of for you by the service.
With GKE Autopilot, you pay for the CPU, memory, and storage that your Pods request while they are running not for the GKE cluster itself. You can learn more about GKE Autopilot here: https://cloud.google.com/kubernetes-engine/docs/concepts/autopilot-overview.
Node pools
Node pools are used to put worker nodes into groups with the same configuration. When you create your first cluster, all the nodes are put into the default node pool. You might want to have multiple node pools if you want to have groups with specific characteristics, such as local SSDs, minimum CPU, a specific node image, or using a preemptible instance:
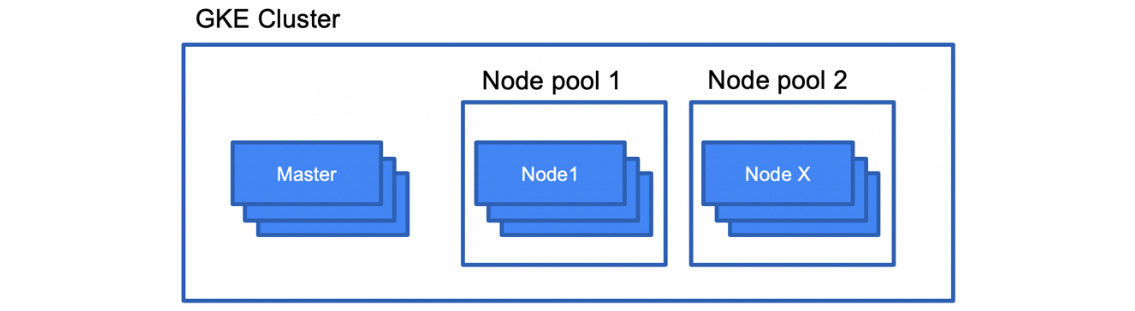
Figure 6.11 – Node pools
Node pools might be useful if your workloads have special resource requirements. You can use the concept of node taints and Pod tolerances to allow your workload to be scheduled on a particular node. In the Further reading section, you will find a link to documentation on how to use node taints.
Exam Tip
Pay special attention to taints and tolerances as this is a topic that might pop up in the exam. Understand how you allow Pods to run on a particular node.
Node pools are managed with the gcloud container node-pools command.
We will have a look at how we can use this command to scale our node pools later, in the Resizing the cluster section.
Container-Optimized OS (COS)
By default, nodes in your Kubernetes Engine use Google's Container-Optimized OS. It is a locked-down version of Chromium OS that runs containerized applications. Images are maintained and updated by Google. Updates are downloaded automatically in the background. As it is stripped of unnecessary features, the attack surface is smaller than in the case of other Linux distributions.
Note that this OS is not good for running non-containerized applications or when you need enterprise support from a Linux provider. Use Container-Optimized OS for nodes unless you have a very good reason to use another Linux distribution. While there are still images with Docker runtimes, Google suggests using the ones that run the containerd runtime instead.
Storage
The easiest way to use persistent storage in GKE is to use GCP services such as Cloud SQL, Datastore, or Cloud Storage. However, you can also expose storage directly to your Pods using Kubernetes abstraction layers. Storage is delivered to Pod containers using volumes. These volumes can be backed either by ephemeral or durable storage. While ephemeral storage is good for scratch space, to persist the state, durable storage is needed:

Figure 6.12 – Kubernetes storage
When a Pod crashes and is redeployed, the files that are stored on a Pod's local disk will be lost. To keep the state, you need to use external storage outside of the Pod. To do this, you can use PersistentVolumes (PVs), whose lifespans are not bound to the Pod's lifespan. In GKE, those volumes are usually backed by Google Cloud Computer Engine Persistent Disks and can be provisioned dynamically by using a PersistentVolumeClaim (PVC). An example of a claim is shown here. Here, we are requesting a volume of 20 GB, with the access mode allowing us to attach it to one node:
apiVersion: v1
kind: PersistentVolumeClaim
metadata:
name: claim-demo
spec:
accessModes:
- ReadWriteOnce
resources:
requests:
storage: 20Gi
To use this claim as a volume for the Pod, you need to refer to the claim in the Pod definition:
apiVersion: v1
kind: Pod
metadata:
name: mypod
spec:
containers:
- name: myfrontend
image: nginx
volumeMounts:
- mountPath: "/var/www/html"
name: mypd
volumes:
- name: mypd
persistentVolumeClaim:
claimName: claim-demo
To learn more about PersistentVolumes, refer to the Further reading section.
GKE cluster management
We have finally gone through the theory that's needed to understand GKE. Now, let's have a look at some practical examples of managing a GKE cluster. We will start by deploying a cluster and then look at the operations for scaling and upgrading.
There are a couple of tools you can use to manage a cluster, including the following:
- Google Cloud Console
- The gcloud command-line interface
- The REST API
For exam purposes, we will concentrate on the first two tools. Let's get to work!
Creating a GKE cluster
The simplest way to deploy a cluster is to use the Google Cloud Console. This is also a good way to see all the available options without having to read the command-line reference. Let's get started:
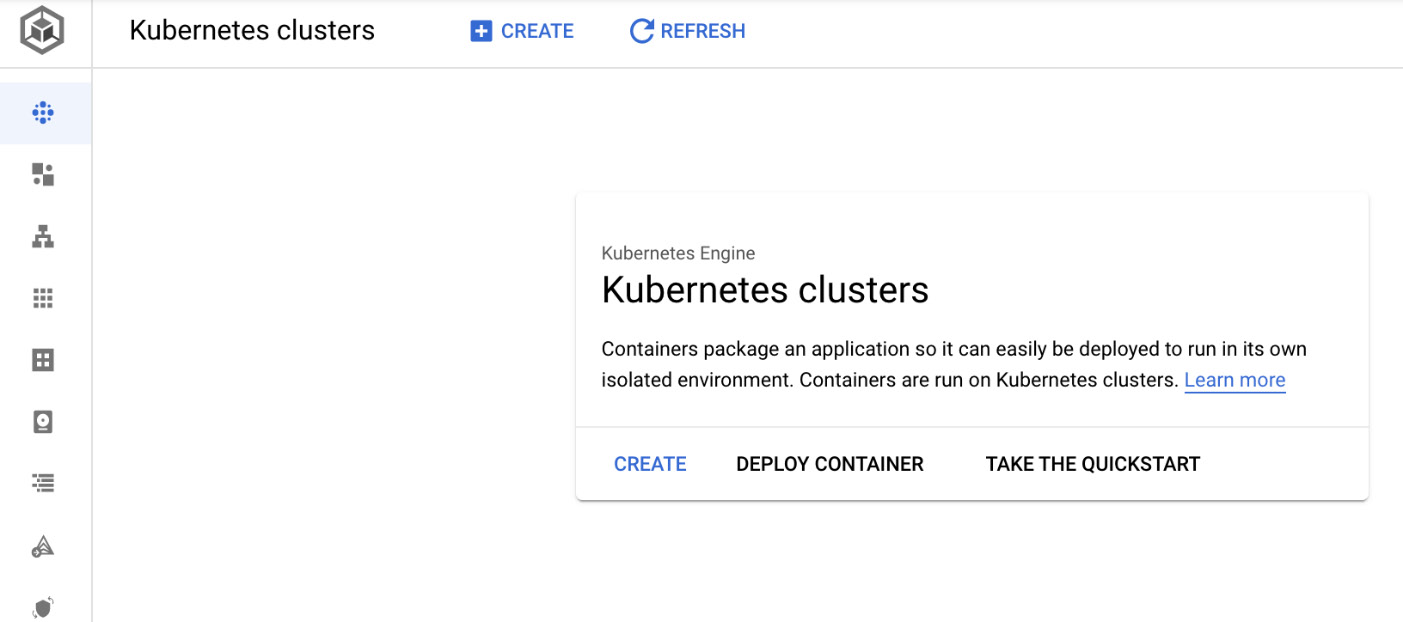
- From the hamburger menu, choose Kubernetes Engine | Clusters. From the pop-up window, click on the CREATE button, as shown in the following screenshot:
Important Note
If you are using the GKE for the first time, you need to enable the Kubernetes API.

Figure 6.13 – Creating a Kubernetes cluster
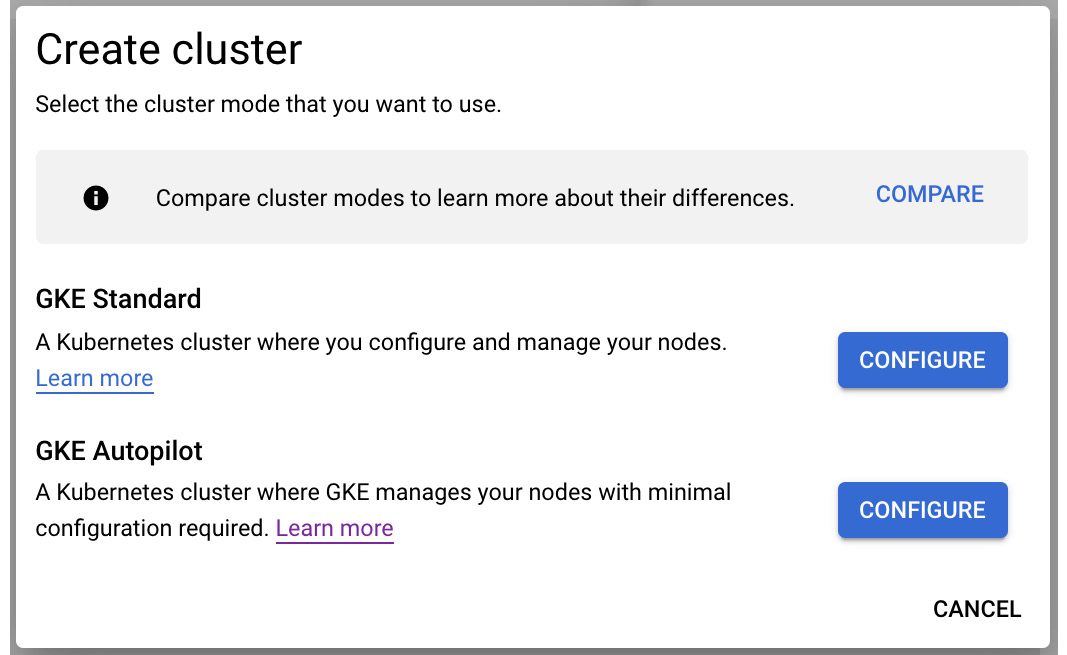
- Click on Create cluster. You will be able to choose the mode. We will go with Standard mode as this gives you more options to choose from and will help you understand GKE better. Click on CONFIGURE next to the GKE Standard section:

Figure 6.14 – Creating a cluster
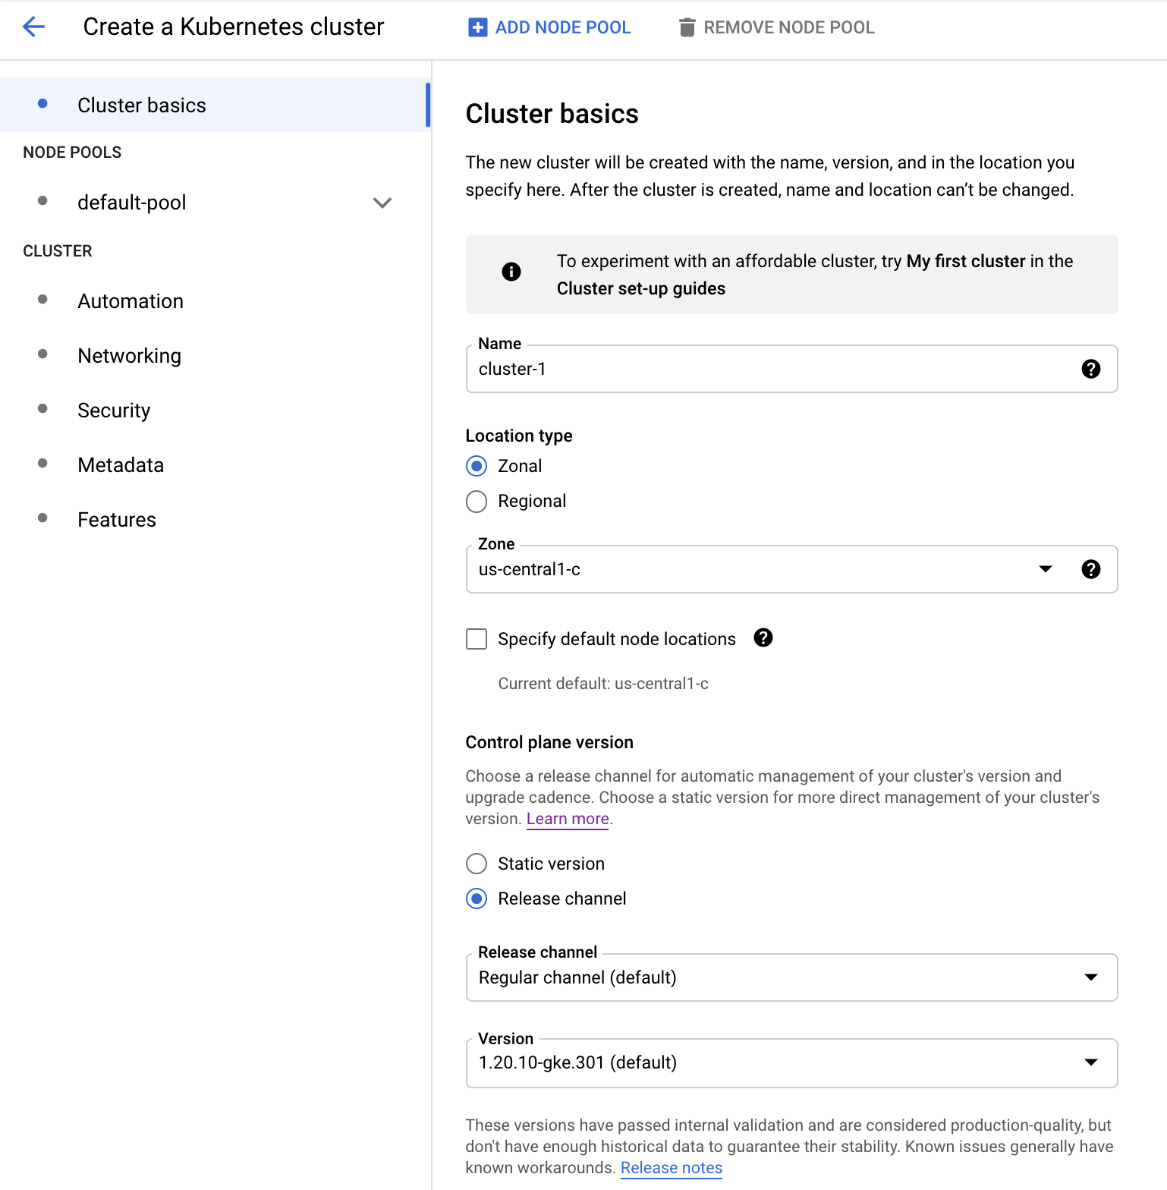
- In the following pane, you can choose a template for your cluster, depending on the workload type. We will go with Standard cluster as we want to deploy a simple web application. On the right-hand side, we can choose more detailed settings for the cluster. Let's have a closer look at the available options:

Figure 6.15 – Cluster basics
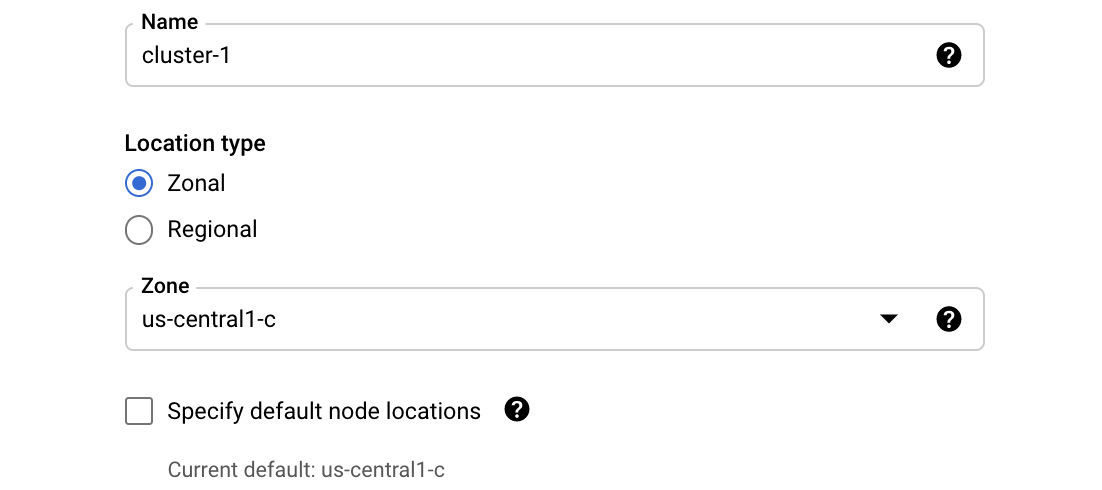
- First, choose the name of your cluster. Next, decide whether you want the cluster to be Zonal or Regional. If we choose Zonal, we will see that we are asked for a Zone to deploy to, as shown in the following screenshot:

Figure 6.16 – Zonal cluster
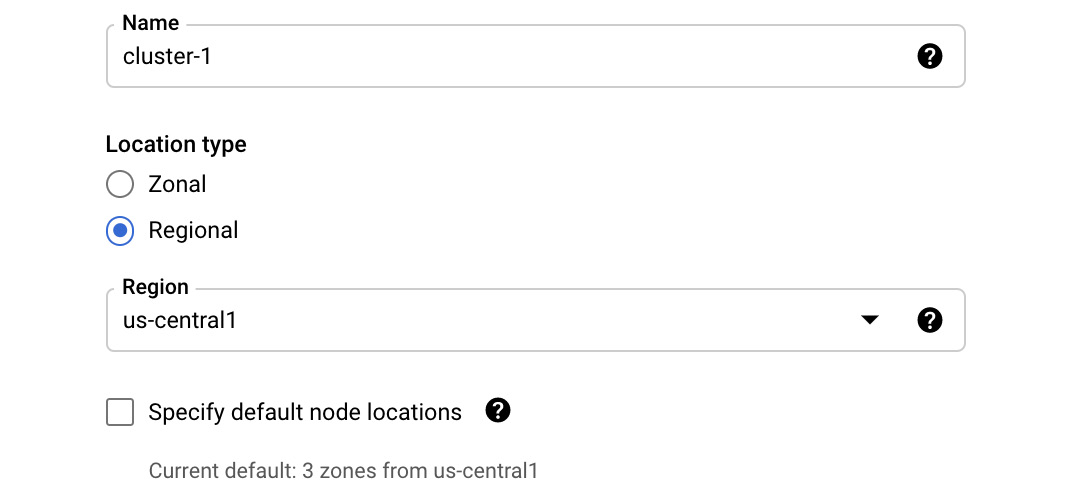
- If we choose Regional, we will have to choose a region, as shown in the following screenshot:

Figure 6.17 – Regional cluster
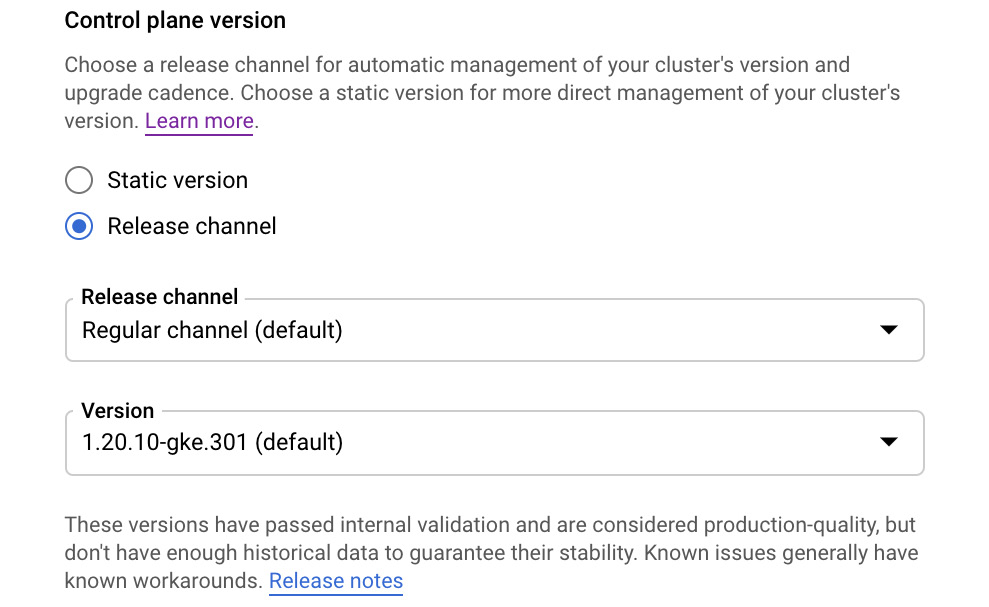
- No matter which Location type we select, we need to choose a Master version. By default, the most stable version is selected. We will keep the default value as-is:

Figure 6.18 – Control plane version
In this window, you can also choose the release channel. Here, you have three options:
- Rapid channel: Used by early adopters. Allows you to use the newest features in a couple of weeks from the General Availability (GA) release of the Kubernetes minor version. Note that Google does not provide any SLA for this option.
- Regular channel: Provides a compromise between the reliability and available features. Available after 2-3 months after the rapid channel's release.
- Stable channel: This is the most stable and well tested. Available after 2-3 months after the regular channel's release. Use this version when reliability is a priority for you.
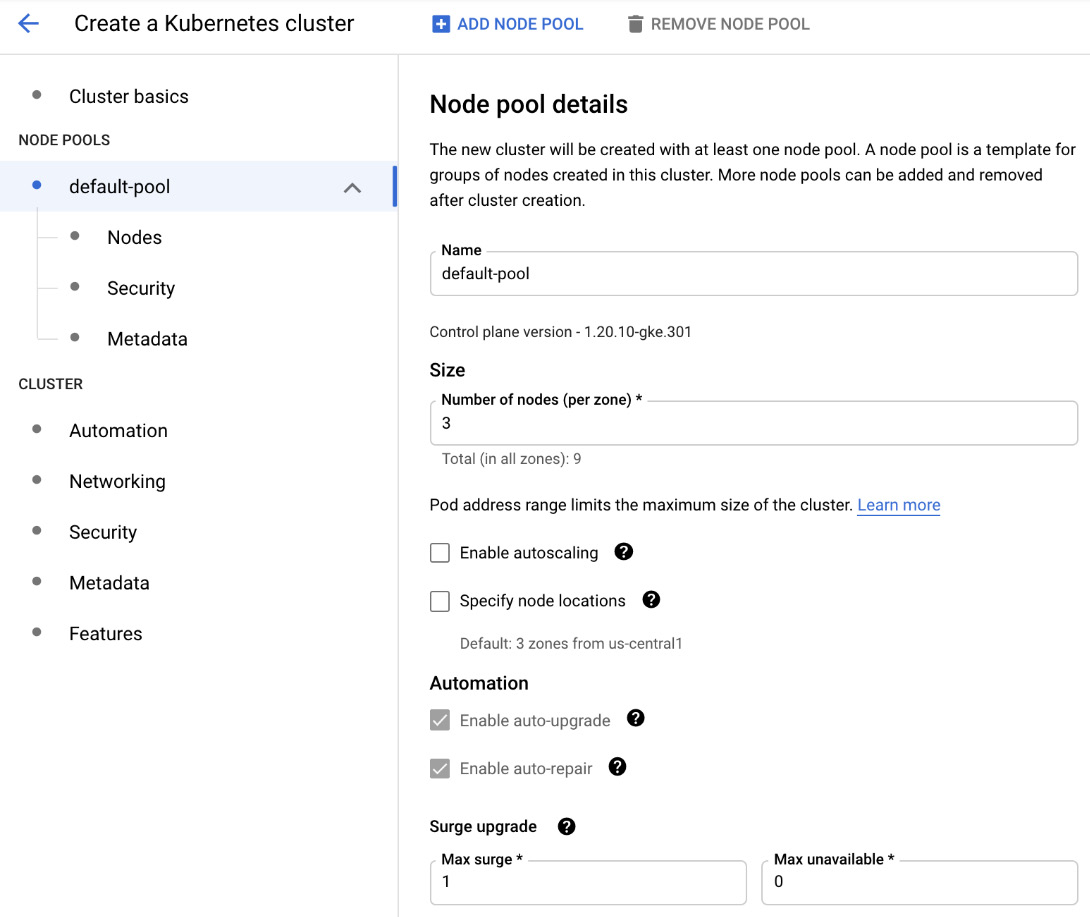
- Click on default-pool in the left-hand menu to configure the node pool's settings. Remember that there can be one or more pools in a cluster. As we mentioned previously, pools group nodes with the same characteristics. In this section, we can choose the Name parameter for the pool, its Size, and define some characteristics such as auto-scaling and node locations. By default, the auto-repair and auto-upgrade options are enabled. Finally, you can define the maximum surge (number of nodes) and maximum unavailable nodes during the upgrade. We will learn more about these options later in this article:

Figure 6.19 – Node pool details
- When we click on the Nodes menu, we are presented with more settings. Here, we can choose the image for the nodes and the type of machines that will be used.
If we choose several vCPUs, then the memory amount will be automatically filled in for us. Furthermore, we can choose the node's disk type and size. We can encrypt the boot disk with the Customer-Managed Encryption Key and we are given an option to use the preemptible nodes. Finally, we can set a maximum number of Pods per node and assign network tags to control access to nodes using firewalls:
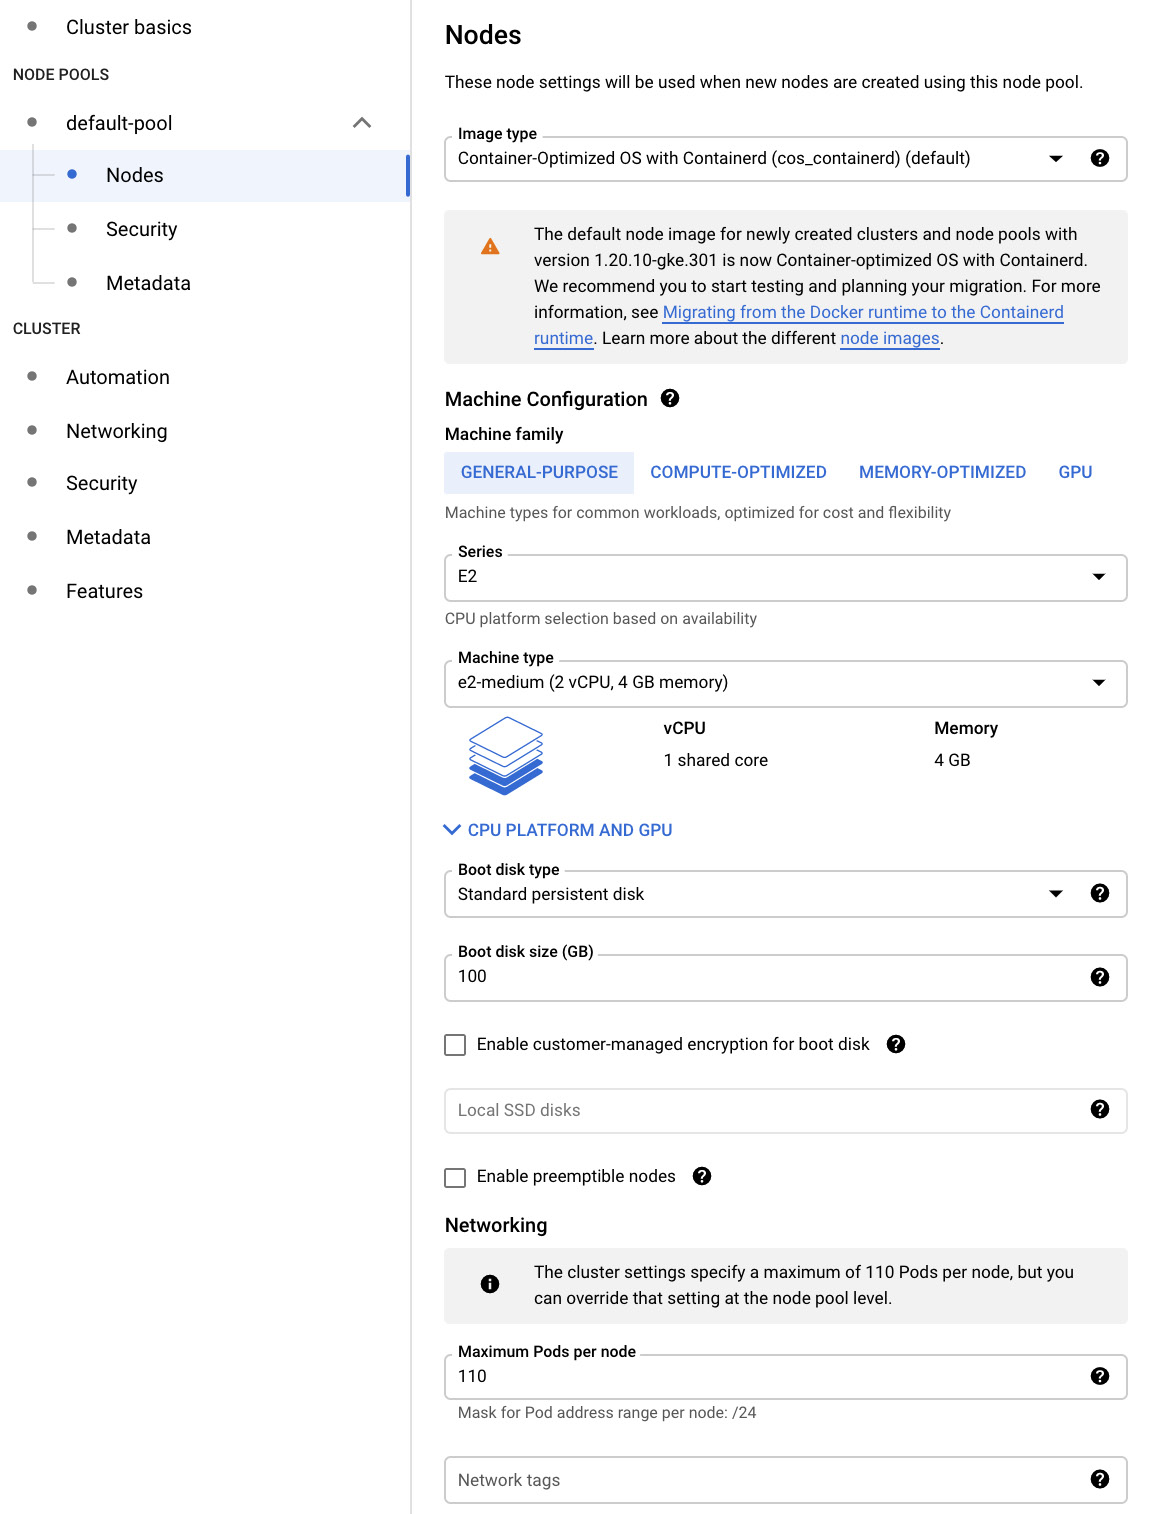
Figure 6.20 – Nodes
Click on the Security section. Here, we can see that the service account that's being used is the Compute Engine default service account. This is very similar to how the GCE security settings work. However, note that this account will be used by the workloads that have been deployed to the node pool. Remember to use the least privileges principle:
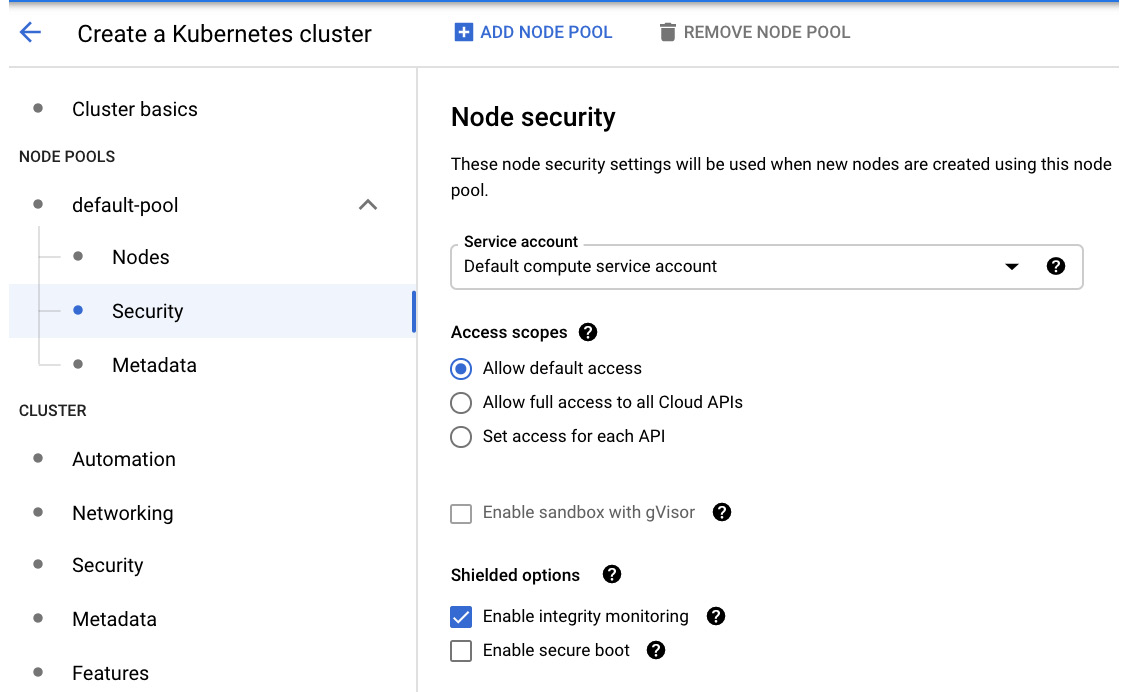
Figure 6.21 – Node security
We are also given the option to enable sandboxing with gVisor (https://github.com/google/gvisor) and options for Shielded nodes.
In the Metadata section, we can set Kubernetes labels and Node taints, as well as the metadata for the node's GCE instances:
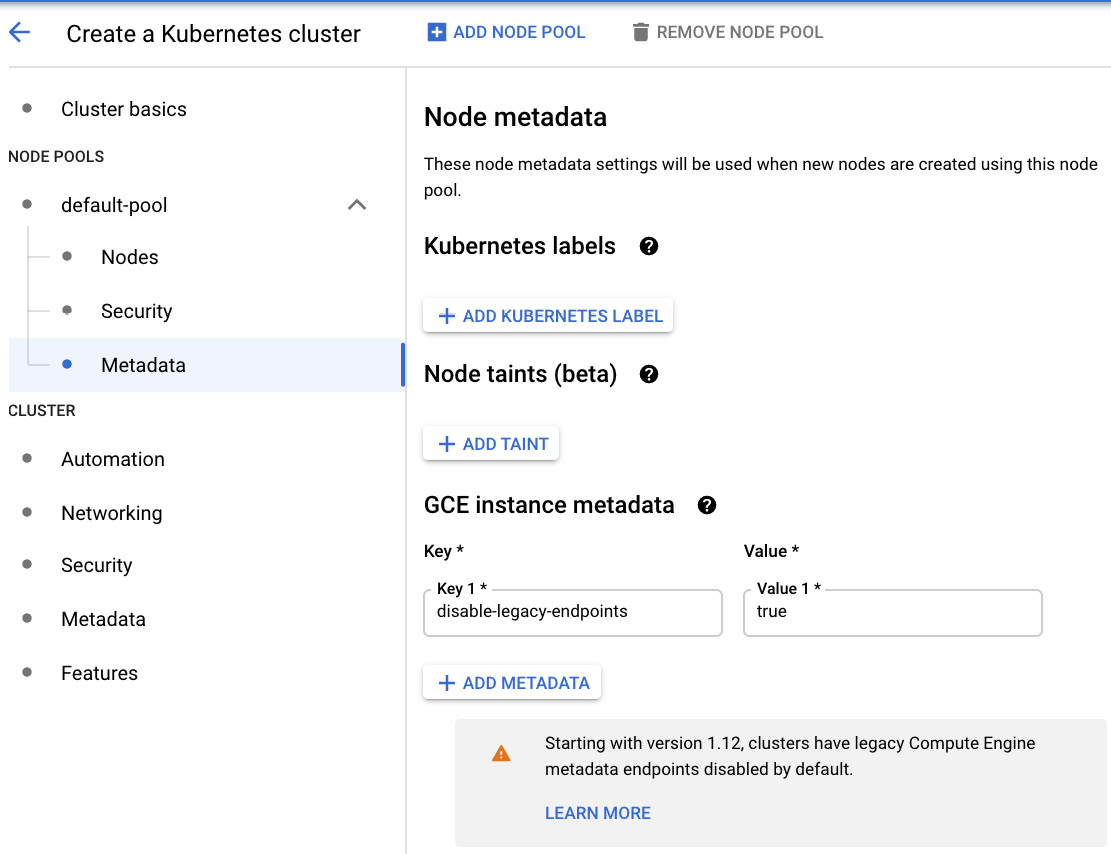
Figure 6.22 – Kubernetes labels and Node taints
With that, we have finished configuring the first node pool. If additional node pools are required, they can be created by clicking the ADD NODE POOL link on top of the screen. The new node pool will be listed under the NODE POOLS section. In this tutorial, we will continue using a single node pool. The following screenshot only shows what happens when you decide to add a new node pool:
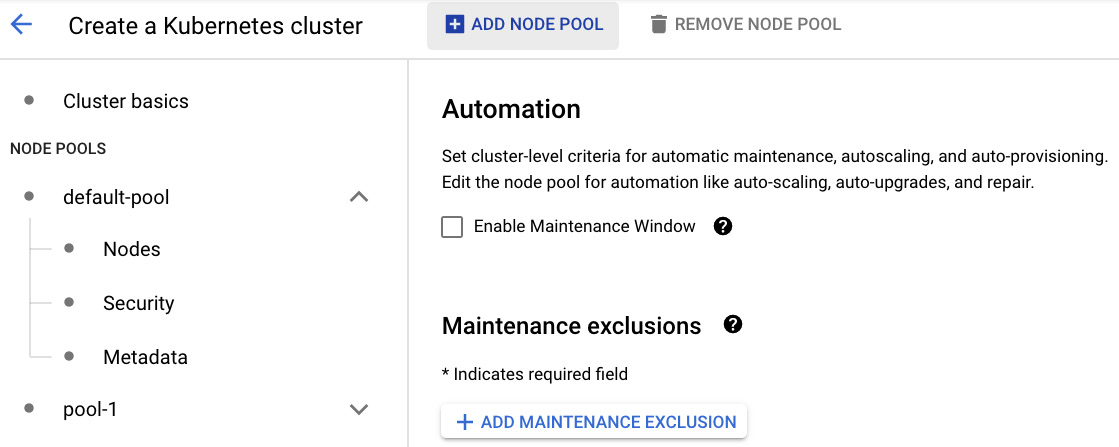
Figure 6.23 – Adding node pools
Let's move on to the Automation section. Here, you can set a maintenance window for the cluster, which will define when your clusters can be upgraded by Google. You can also enable notifications for upgrades, Vertical Pod Autoscaling, and Node auto-provisioning. For the auto-scaling profile, you can change from the standard Balanced mode to Optimized, which aggressively removes your nodes (this is optimized for batch workloads that are not sensitive to startup latency):
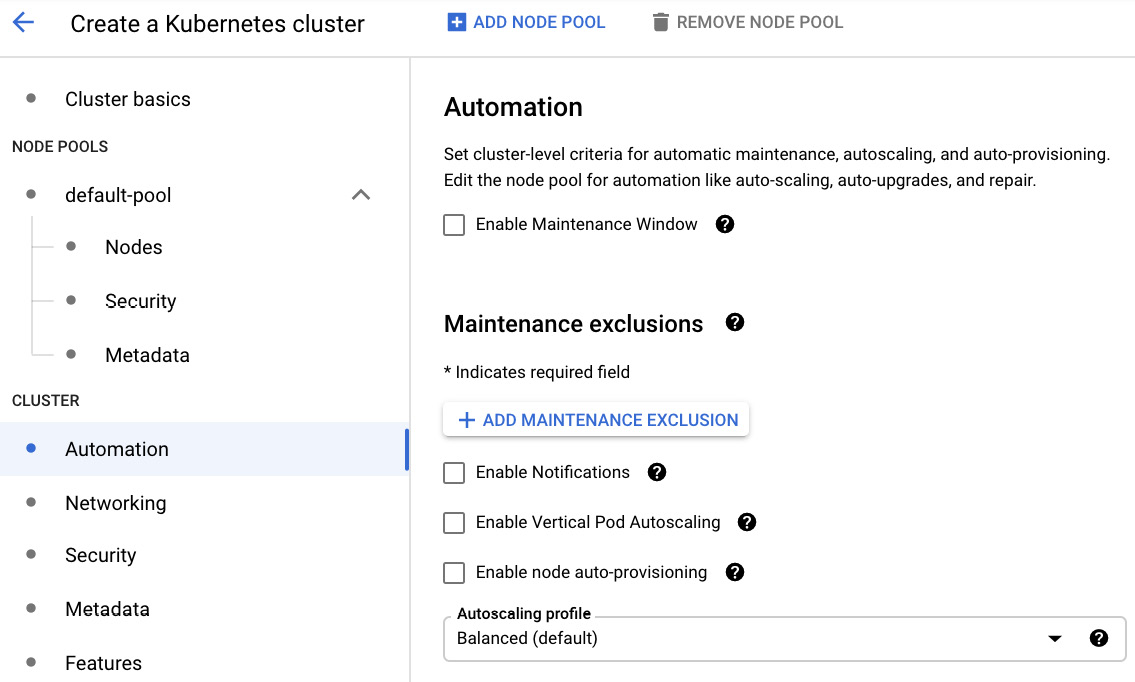
Figure 6.24 – Automation
Next, let's look at the Networking section.
Networking
Here, we can choose whether we want to use a VPC from the project or use a shared VPC. Let's get started:
Important Note
In this case, we have a service project that uses a shared VPC.
- First, we must choose the subnet from the VPC that will be used by the nodes:

Figure 6.25 – Networking
- Next, we will be presented with the option of using a public or private cluster. Private means that the nodes will have private IP addresses only. You can also uncheck Access the control plane using external IP address to disallow connecting to the control plane from the internet. If you check the Enable control plane global access box, this will allow you to access the control plan from any GCP region or on-premises. For Control Plane IP range, fill in the IP range you want to use for the control plane:

Figure 6.26 – Private cluster
Important Note
If you plan to use privately used public IPs (https://cloud.google.com/architecture/configuring-privately-used-public-ips-for-GKE), you need to check the Disable Default SNAT option.
- Keep Public cluster selected and move to the Advanced networking options section. If we stay with the default VPC-native traffic routing, we will be able to use alias IP ranges from the shared VPC. This is Google's recommended best practice setup. We choose the provided Pod and service IP ranges and leave the default maximum Pods as-is per node number:

Figure 6.27 – Advanced networking options
- To be able to use a Kubernetes ingress resource, we must keep HTTP load balancing enabled:

Figure 6.28 – HTTP load balancing
As you can see, there are a couple of interesting features you can enable in this section, as follows:
- Enable Kubernetes Network Policy: This allows you to allow or disallow network traffic within the cluster.
- Enable Intranode visibility: This allows you to gain insight into the network flows between the nodes.
- Enable control plane authorized networks: This allows you to define which networks you can connect to your control plane from.
Now, we will have a look at the Security options.
- In the Security section, we have a couple of authentication and authorization settings that are disabled by default:

Figure 6.29 – Security
You can enable a couple of very useful services here, as follows:
- Binary Authorization: Disallows running unsigned images on your cluster
- Shielded GKE Nodes: Provides a strong cryptographic identity for nodes in the cluster
- Confidential GKE nodes: Encrypts the memory of your nodes with keys that Google does not have access to
- Application-layer Secrets Encryption: Uses Cloud KMS to encrypt secrets stored in etcd databases
- Workload Identity: Allows you to use your workloads to access the Google API securely by mapping Kubernetes service accounts to Google service accounts
- Google Groups for RBAC: Maps the Google Groups to the roles and cluster roles in your cluster
There are also some legacy security options that you should not use unless you have a special use case and you are confident with the security tradeoffs.
In the Metadata section, you can put some optional descriptions and labels in your cluster:

Figure 6.30 – Metadata
- In the Features section, we can enable new GKE monitoring functionality that is available for your Kubernetes version. You will learn more about GKE monitoring in This Post, Monitoring Your Infrastructure:

Figure 6.31 – Monitoring
- We will leave the system and workload logging and monitoring options as-is. Besides monitoring, there are some interesting features such as Cloud Run for Anthos and Config Connector (we will learn more about these in This Article, Managing Cloud-Native Workloads with Anthos). For exam purposes, have a look at the Exam Tip box to understand the most important ones:

Figure 6.32 – Features
Exam Tip
It might be worth remembering that we can do the following:
Enable Cloud TPU: We will discuss this in This Post, Putting Machine Learning to Work.
Enable Istio (beta): This is a service mesh product that allows us to control and observe network traffic.
- Now that we have populated all the settings, we can create the cluster by clicking on the Create button. Alternatively, we can generate a REST API call or command line by clicking on the respective hyperlinks:

Figure 6.33 – REST or command line
- Before clicking on Create, let's have a look at the command line by clicking on the command line link. As usual, you can just copy this into Cloud Shell and execute it. In the following code, you can see that we used some features that are available in beta mode, such as the gcloud beta container command:
gcloud beta container --project "prj-bu1-d-sample-base-6159" clusters create "standard-cluster-1" --zone "us-central1-c" --no-enable-basic-auth --cluster-version "1.19.9-gke.1900" --release-channel "regular" --machine-type "e2-medium" --image-type "COS_CONTAINERD" --disk-type "pd-standard" --disk-size "100" --metadata disable-legacy-endpoints=true --scopes "https://www.googleapis.com/auth/devstorage.read_only","https://www.googleapis.com/auth/logging.write","https://www.googleapis.com/auth/monitoring","https://www.googleapis.com/auth/servicecontrol","https://www.googleapis.com/auth/service.management.readonly","https://www.googleapis.com/auth/trace.append" --num-nodes "3" --enable-stackdriver-kubernetes --no-enable-ip-alias --network "projects/prj-d-shared-base-de39/global/networks/vpc-d-shared-base" --subnetwork "projects/prj-d-shared-base-de39/regions/us-central1/subnetworks/sb-d-shared-base-us-central1" --no-enable-intra-node-visibility --no-enable-master-authorized-networks --addons HorizontalPodAutoscaling,HttpLoadBalancing,GcePersistentDiskCsiDriver --enable-autoupgrade --enable-autorepair --max-surge-upgrade 1 --max-unavailable-upgrade 0 --enable-shielded-nodes --node-locations "us-central1-c"
Important Note
This code is an example and may differ slightly if you play with the deployment yourself.
- Now, we can click on Create and wait until the cluster is created. Once this has happened, we will see a green tick next to the cluster's name:

Figure 6.34 – Provisioned cluster
- After clicking on the three dots symbol and the Connect option, we will be presented with information regarding how to connect to the cluster:

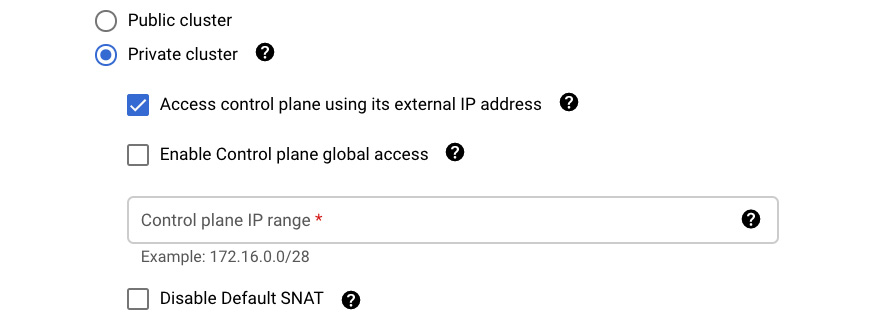
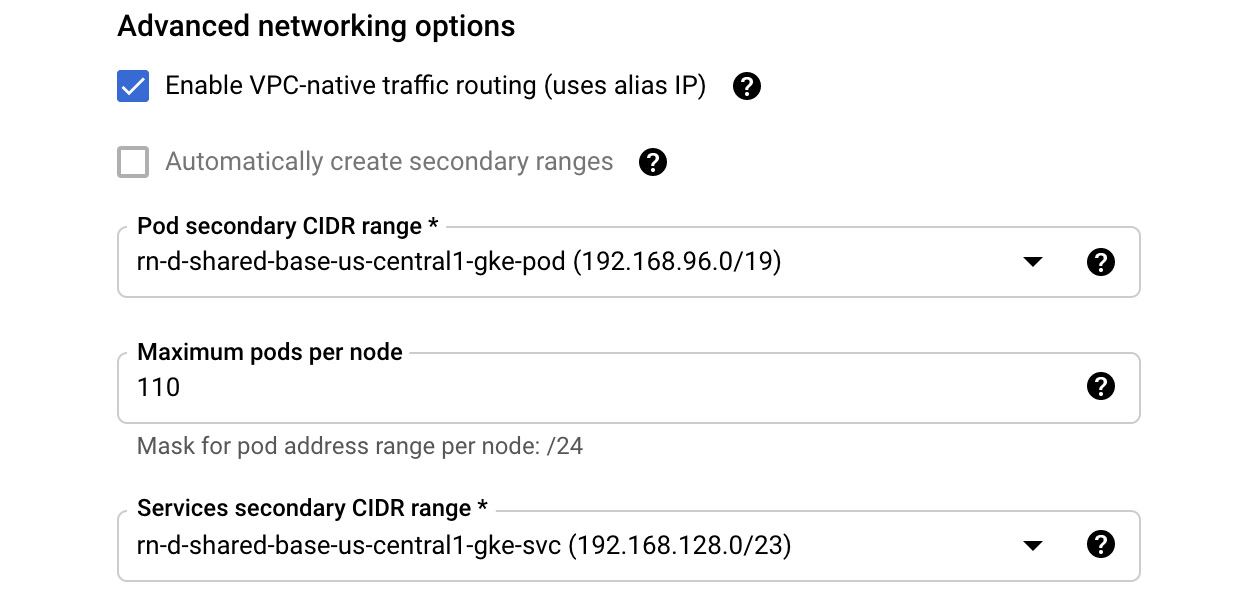
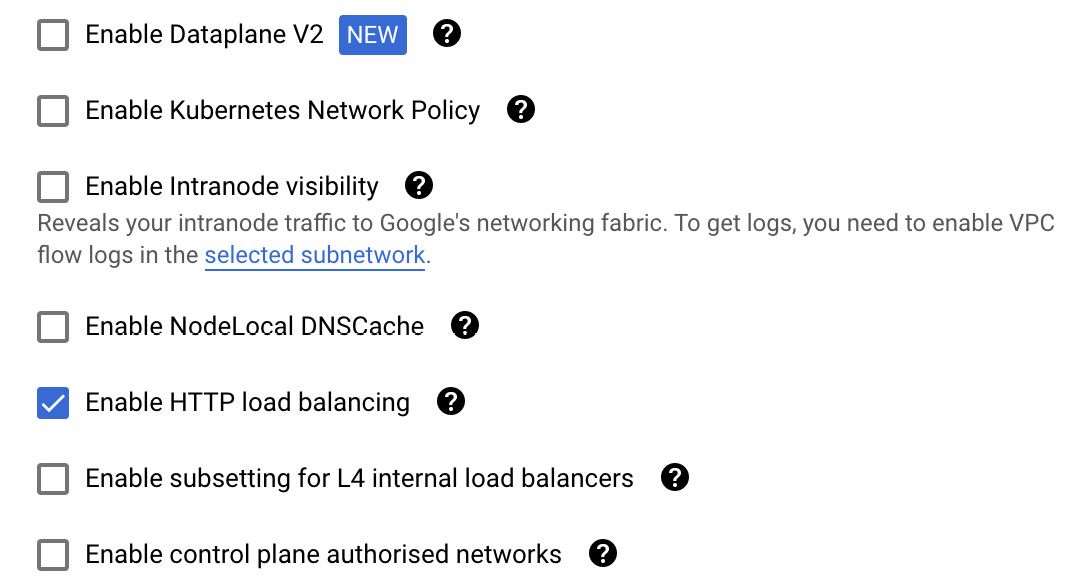
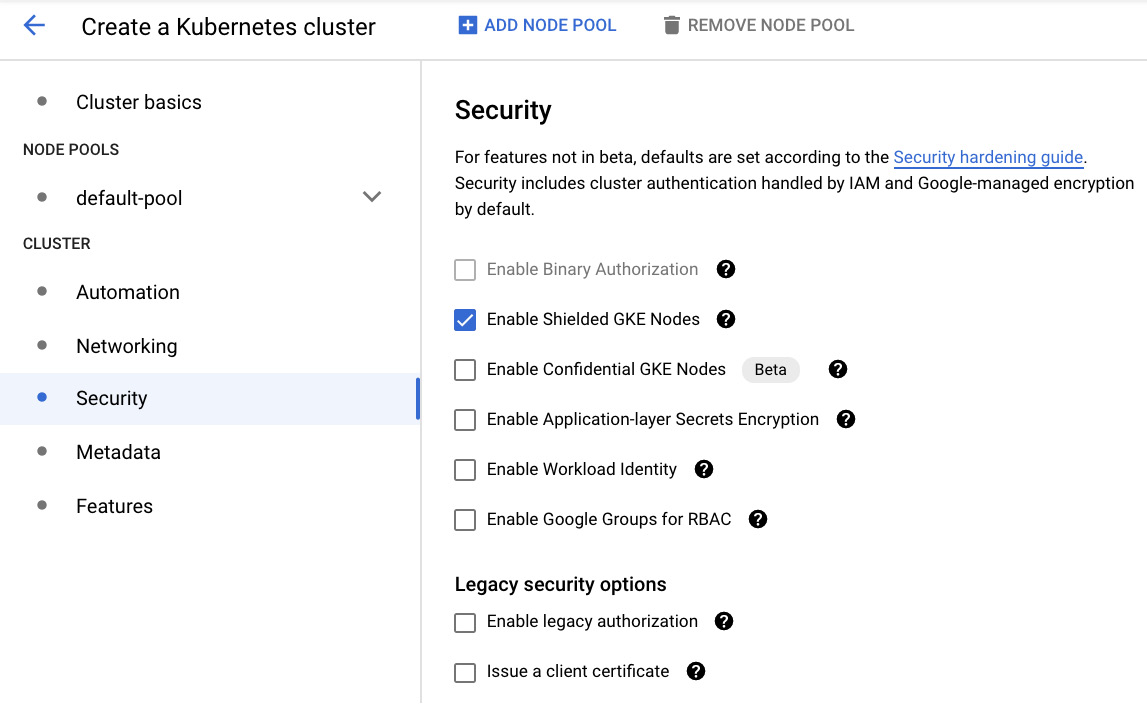
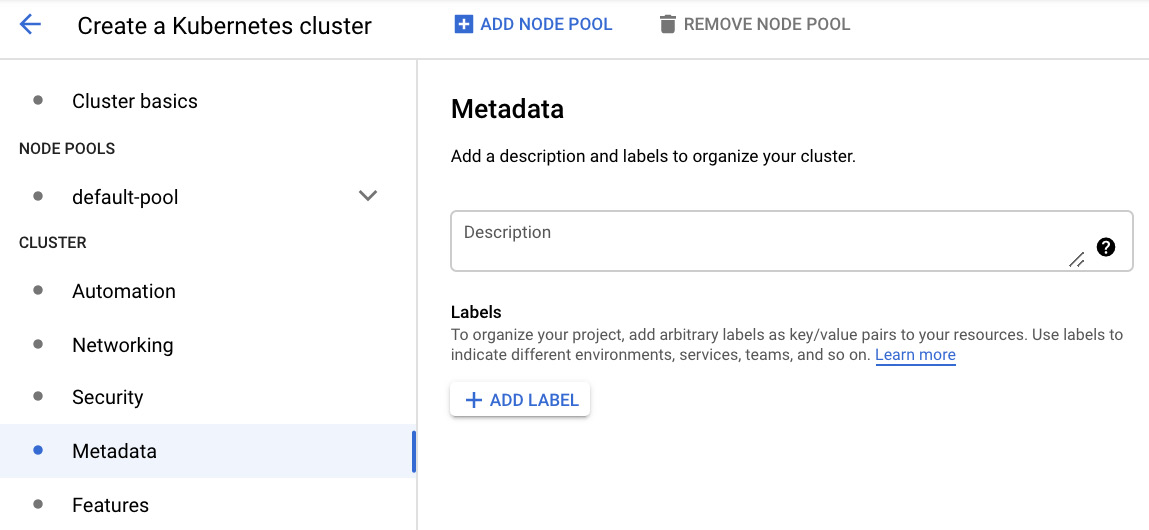
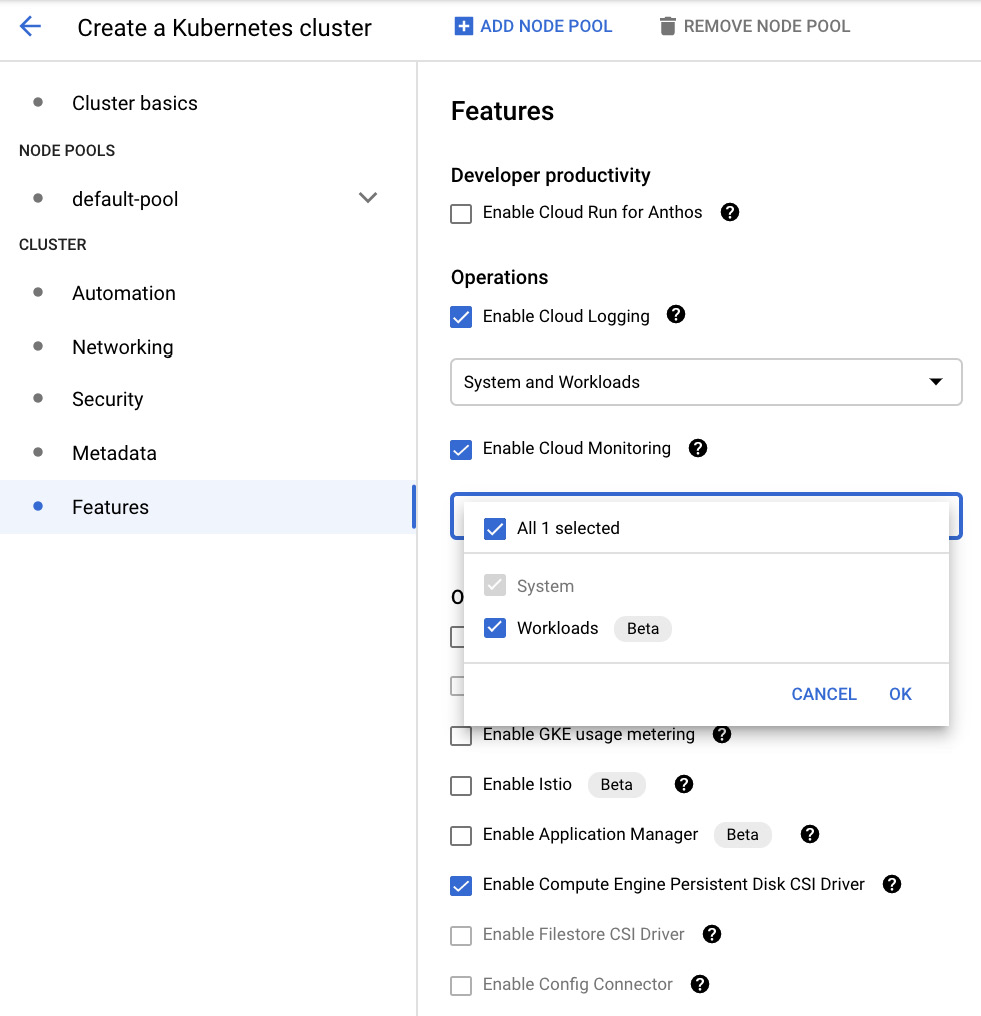
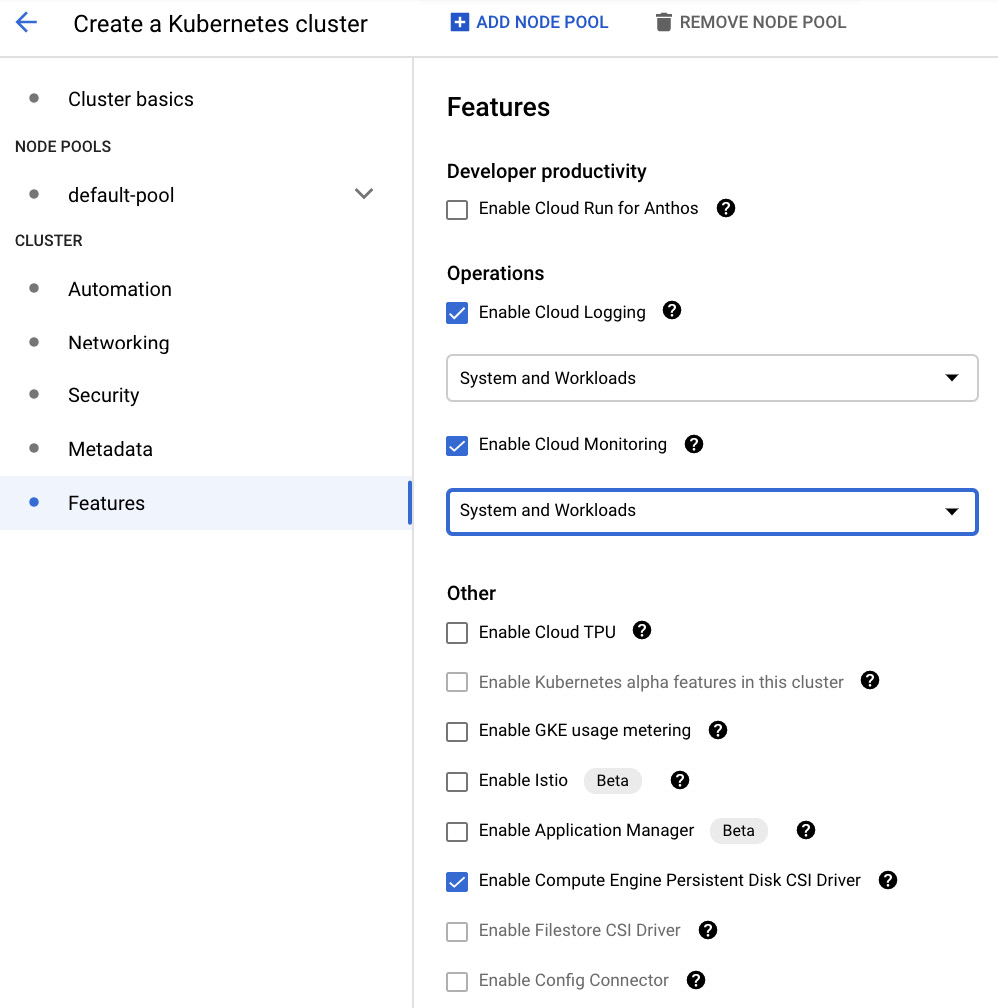

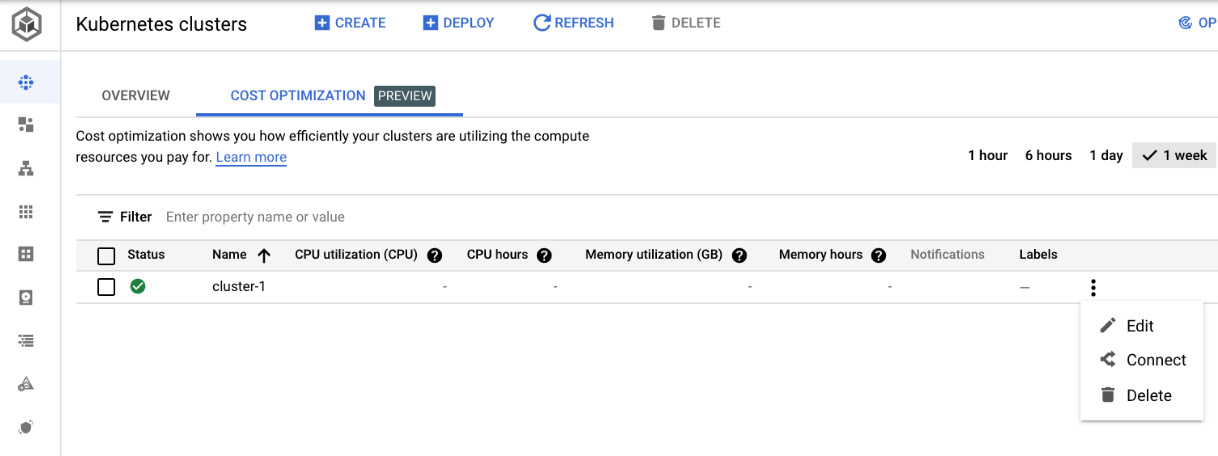
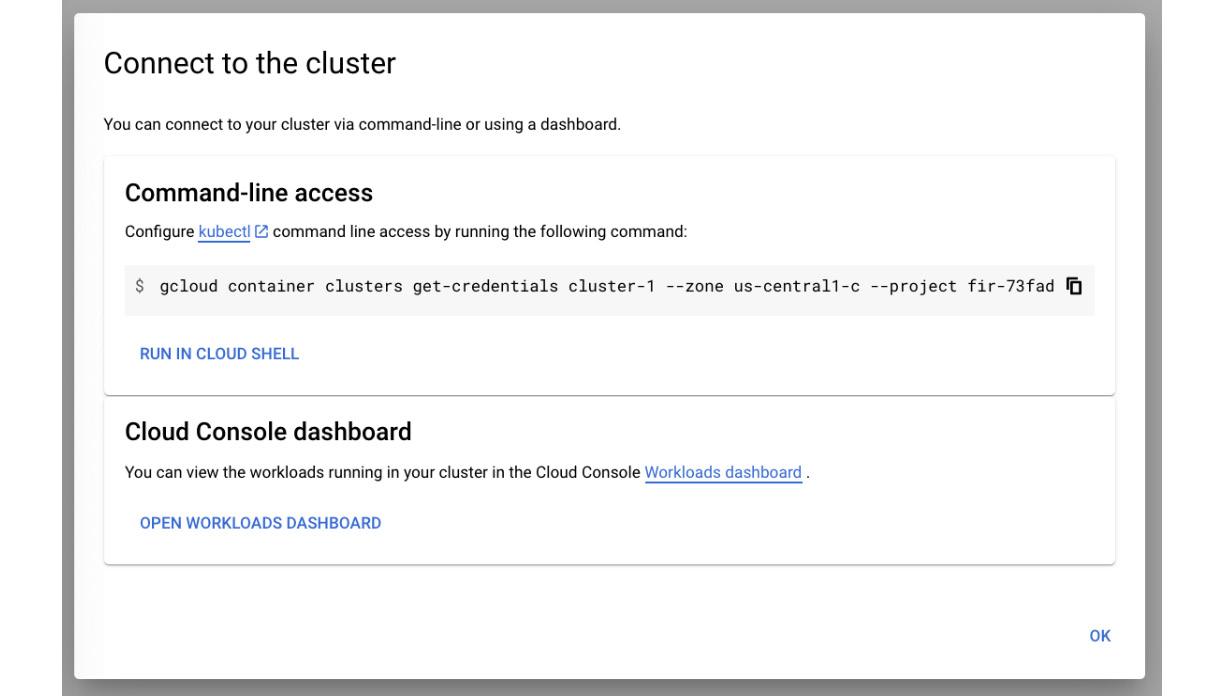
Figure 6.35 – Connect to the cluster
This information can be copied to Google Cloud Shell so that we can authenticate it against the newly created cluster. In the next section, we will use it and deploy our first application.
Deploying our first application
Now that we have created a cluster, we can deploy our first application. We will provision a simple NGINX web server using three Pods. For this purpose, we will use the Deployment object. Then, we will expose the application using the Service object.
To demonstrate different ways of creating Kubernetes objects, we will use both kubectl and the Google Cloud Console. Once they have been successfully deployed, we will check their connectivity. Let's get started:
Exam Tip
Expect to see questions on GKE and Kubernetes command-line tools. Remember that gcloud is used to manage the GKE cluster, while kubectl is a native Kubernetes tool. So, as an example, if you want to scale a GKE cluster, you would use gcloud, while to scale a deployment, you would use kubectl.
- Let's open Cloud Shell and run the following command, which we copied from the Google Cloud Console:
gcloud container clusters get-credentials standard-cluster-1 --zone us-central1-a --project qwiklabs-gcp-21ec218e55edd052
Important Note
You need to adjust the cluster name and the project ID so that they match your environment.
When you are asked for authorization, confirm it. This will configure the credentials for kubectl. Now, we can deploy Kubernetes resources to the cluster.
- Now, let's open Cloud Shell in editor mode and create a deploy.yaml file with the sample Deployment definition. You can find a similar example in the official Kubernetes documentation: https://kubernetes.io/docs/concepts/workloads/controllers/deployment/#creating-a-deployment. Save it and run the kubectl apply -f deploy.yaml file:

Figure 6.36 – The deploy.yaml file
- To verify that the Pods have been created, we can use the kubectl get pods command:

Figure 6.37 – Pods
- Now, we need to go back to the console and check the Workloads menu. We will see that nginx-deployment is present. Click on Name to see details about it, as shown in the following screenshot:

Figure 6.38 – Workloads
- Click on the nginx-deployment link in the Name column to move to a detailed view. At the top of the detailed view, we will be asked if we want to expose the service. Click on the Expose button, as shown in the following screenshot:

Figure 6.39 – Exposing a Deployment
- Now, we can choose a Port and a Target port, a Protocol, and the most important type of Service. We will choose a Load balancer. If you click on View YAML, you will see a definition of the service. You could copy it and use kubectl to deploy it from the shell. Instead, we will click on the Expose button to see how this is done from the GUI:

Figure 6.40 – Service settings
- It will take a couple of seconds to deploy the service. Once deployed, it will be visible in Services, under the Kubernetes Engine menu. Find the nginx-deployment-services service and click on its name to see the following details. Find the Load balancer IP value and copy it:

Figure 6.41 – Service details
- Paste the IP into your web browser or click on the link next to the External endpoints key. You will see the following NGINX welcome message:
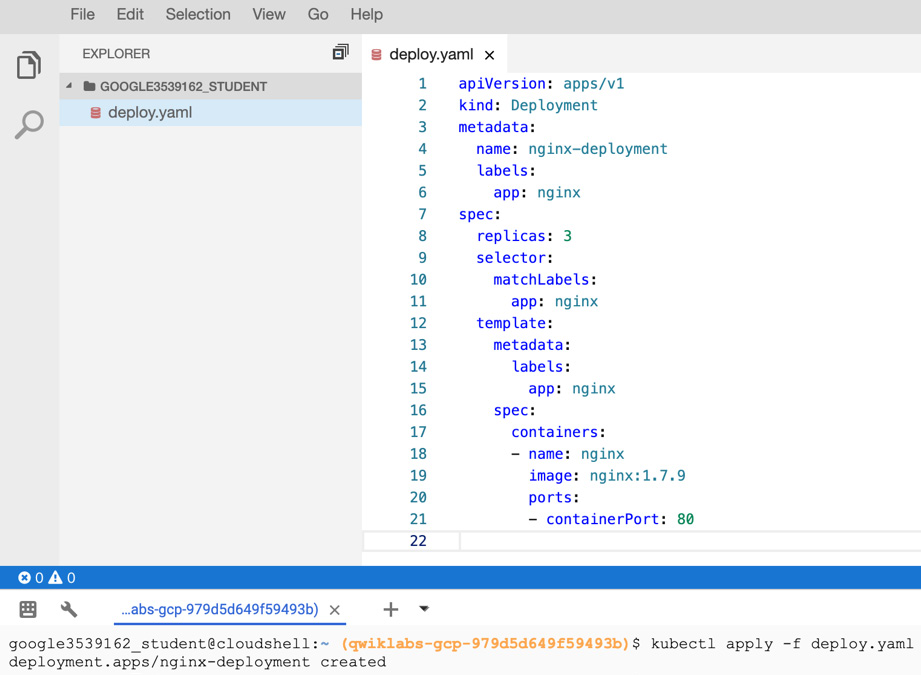

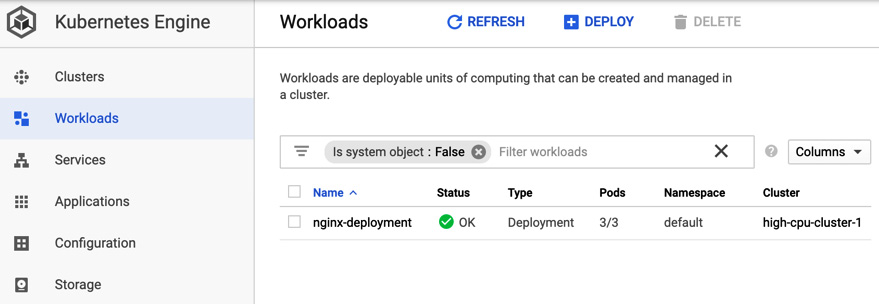

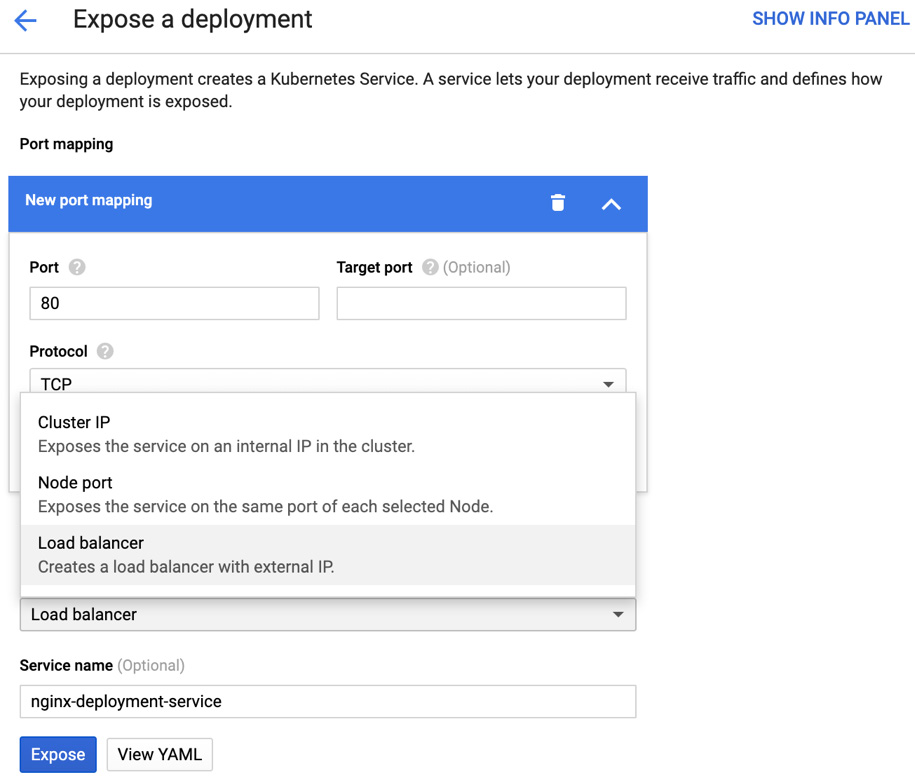
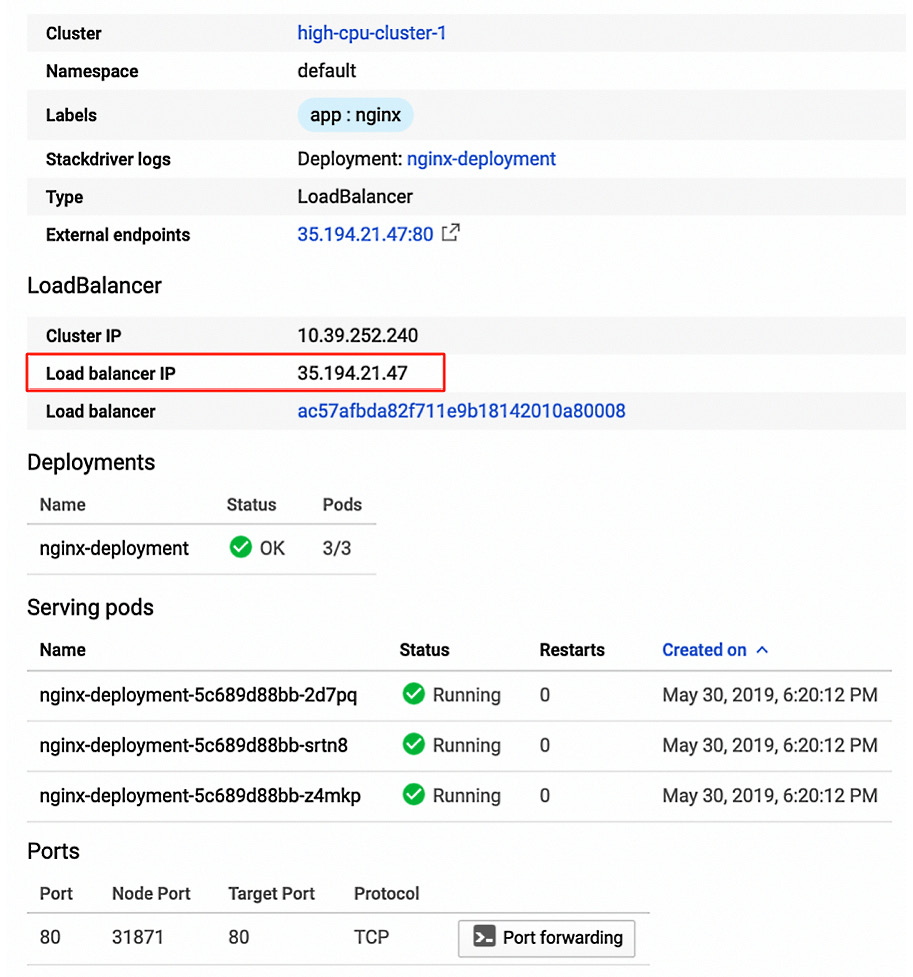

Figure 6.42 – Accessing the application
With that, we have successfully deployed our first application to a GKE cluster. As you have seen, you can do this by using either the GUI or the command line. The Google Cloud Console allows you to deploy Kubernetes objects without having to define the YAML files manually. It also visualizes the most useful ones and their relationships. With the GUI, you can also perform some second-day operations. At this point, we encourage you to get some hands-on experience and play around with deploying your applications using either of these methods.
Cluster second-day operations
So far, we have created a cluster and our first application has been deployed. Everything is up and running. Now, let's have a look at second-day operations such as upgrades and scaling. As you already know, these operations can be quite time-consuming if you deploy a cluster manually. When you use GKE, it takes care of automating those tasks for you. All you need to do is initiate this or even allow GKE to decide when the actions should be triggered. Let's start with upgrades.
Upgrading the cluster
Google Kubernetes allows us to simply upgrade cluster components without having to install anything manually. The master and the nodes are upgraded separately. Remember that masters can only work with nodes up to two minor versions older than their version. Let's get started:
- Before you start running any commands, set the default zone by running the following command:
gcloud config set compute/zone us-central1-a
- To check the current version of the master and the nodes, use the following command:
gcloud container clusters describe $CLUSTER_NAME
- Google upgrades masters automatically but you can also trigger upgrades for the master manually by running the following command:
gcloud container clusters upgrade $CLUSTER_NAME --master
- Once your master has been upgraded, you can upgrade the nodes by running the following command:
gcloud container clusters upgrade $CLUSTER_NAME
GKE will attempt to reschedule the Pods from the node being upgraded. The node will be replaced with the new one with the desired version. When the nodes register with the master, they are marked as schedulable.
Important Note
Although you can downgrade your node, Google does not recommend this. You can downgrade your nodes to one patch version lower than the master.
Auto-upgrades
Auto-upgrade is enabled by default for newly created clusters. The nodes are upgraded so that they can keep up with the master's version. The upgrade takes place during a chosen maintenance window. Only one node is upgraded at a time, and only within one node pool of the cluster. During the upgrade, the Pods residing in the node being upgraded are rescheduled. If it isn't possible to reschedule, the Pod goes into pending mode. To enable auto-upgrade, use the --enable-autoupgrade flag when creating or updating your cluster.
Auto-repair
The auto-repair option allows you to keep the nodes of a cluster healthy. It monitors the state of the nodes' health and recreates them when needed. Recreation is triggered when the node reports NotReady or does not report at all for approximately 10 minutes. This will also trigger if the node is out of boot disk space for approximately 30 minutes. Before recreating, the node is drained. This might be unsuccessful if it is unresponsive. To enable auto-repair, use the --enable-autorepair flag when creating or updating your cluster.
Resizing the cluster
The GKE cluster can be resized by increasing or decreasing the number of nodes in a node pool. To perform a resize, use the following command:
gcloud container clusters resize $CLUSTER_NAME --node-pool $POOL_NAME –num-nodes $NUM_NODES
Here, we have the following options:
- $CLUSTER_NAME: The cluster's name
- $POOL_NAME: The name of the node pool to resize
- $NUM_NODES: The number of nodes to run in the pool
When you increase the size of the cluster, new Pods might be scheduled on new nodes, but the old Pods will not be migrated. When you decrease the size of the cluster, the Pods hosted on the removed nodes will be deleted. They will only be recreated on other nodes if they are managed by the replication controller. To drain the nodes before removal, you can use the beta command:
gcloud beta container clusters resize $CLUSTER_NAME --node-pool $POOL_NAME –num-nodes $NUM_NODES
Autoscaling a cluster
You can also set your cluster to autoscale. This scaling event can be triggered by changes in workloads and resource usage. Autoscaling monitors your nodes and checks whether they should be increased or decreased. The maximum and the minimum number of nodes to run in the cluster are defined in the following command:
gcloud container clusters create $CLUSTER_NAME --num-nodes $NUM --enable-autoscaling --min-nodes $MIN_NODES --max-nodes $MAX_NODES --zone $COMPUTE_ZONE
Here, we have the following options:
- $CLUSTER_NAME: The cluster's name
- $NUM: The initial number of nodes
- $MIN_NODES: The minimum number of nodes
- $MAX_NODES: The maximum number of nodes
You can also change the autoscaling settings using the following command:
gcloud container clusters update $CLUSTER_NAME --enable-autoscaling --min-nodes $MIN_NODES --max-nodes $MAX_NODES --zone $COMPUTE_ZONE --node-pool default-pool
Here, we have the following options:
- $CLUSTER_NAME: The cluster's name
- $MIN_NODES: The minimum number of nodes
- $MAX_NODES: The maximum number of nodes
To disable autoscaling for a particular node, use the following --no-enable-autoscaling flag:
gcloud container clusters update $CLUSTER_NAME --no-enable-autoscaling
IAM
Access to GKE is secured with IAM. Let's have a look at a list of predefined roles, along with a short description of each:
- Kubernetes Engine Admin: Has the right to access the management of clusters and their Kubernetes API objects
- Kubernetes Engine Cluster Admin: Has the right to access the management of clusters
- Kubernetes Engine Cluster Viewer: Has read-only access to clusters
- Kubernetes Engine Developer: Has full access to Kubernetes API objects inside clusters
- Kubernetes Engine Host Service Agent User: Has access to the GKE Host Service Agent
- Kubernetes Engine Viewer: Has read-only access to GKE resources
Kubernetes role-based access control
Native Kubernetes role-based access control (RBAC) can be used in combination with Cloud IAM. While Cloud IAM works at a project level, RBAC grants permissions to Kubernetes resources. Privileges are granted at the cluster or namespace level. The following is an example of a Role object that grants read access to all the Pods in a mynamespace namespace:
kind: Role
apiVersion: rbac.authorization.k8s.io/v1
metadata:
namespace: mynamespace
name: pod-reader
rules:
- apiGroups: [""] # "" indicates the core API group
resources: ["pods"]
verbs: ["get", "watch", "list"]
Now, let's discuss Artifact Registry.
Artifact Registry
The container images that we use for application deployments to Kubernetes are stored in container repositories. Docker Hub (hub.docker.com) is a public image repository. We can use it to pull public images. But what if we want a local repository where we want to store our images? Google Cloud Platform comes with a service called Artifact Registry (the evolution of Google Container Registry). This is essentially a single place where you can store, perform vulnerability scans on, and control access to your images. As it is hosted on GCP, it is also faster to use than Docker Hub. GKE clusters can access the registry that resides in the same project by default.
To run images that are stored in Artifact Registry, use the following command:
kubectl run $NAME --image=$LOCATION-docker.pkg.dev/$PROJECT-ID/$REPOSITORY/$IMAGE:$TAG
Here, we have the following options:
- $NAME: Pod name
- $LOCATION: The regional or multi-regional location (https://cloud.google.com/artifact-registry/docs/repo-organize#locations) of the repository
- $REPOSITORY: The image repository's name
- $PROJECT-ID: The ID of the GCP project
- $IMAGE: The image we will use as part of the deployment
- $TAG: The image's tag
You can also use $LOCATION-docker.pkg.dev/$PROJECT-ID/$REPOSITORY /$IMAGE:$TAG in the Kubernetes YAML definition as the image parameter.
Cloud Build
Cloud Build is a service that originates from Container Builder. It was initially used to build container images. Google created this service to evolve it into a CI/CD service. When the service was rebranded, additional functionalities were introduced. Cloud Build runs one or more build steps to produce artifacts. These build steps use so-called Cloud Builders, which are containers with a particular command-line tool installed on them. These include git, docker, kubectl, maven, gcloud, gsutil, and many others. These build steps are defined in YAML configuration files. The following YAML configuration file uses the Docker Cloud Builder to build a container image and then push it to Artifact Registry:
steps:
- name: 'gcr.io/cloud-builders/docker'
args: ['build', '-t', 'us-central1-docker.pkg.dev/ my-project/my-image', '.']
- name: 'gcr.io/cloud-builders/docker'
args: ['push', 'us-central1-docker.pkg.dev/ my-project/my-image']
If standard builders are not enough, you can either search for a community cloud builder or create one of your own. This means that you can use whatever tools you need. To learn more about custom Cloud Builders, have a look at the Further reading section.
The build can either be run manually or triggered by a code repository. Cloud Build integrates with common code repositories such as Cloud Source Repository, GitHub, and Bitbucket.
Best practices for building containers
Google has defined a set of best practices for building the containers, which results in a shorter time build, as well as smaller and more secure images. The full list of those recommendations can be found here: https://cloud.google.com/architecture/best-practices-for-building-containers. For the exam, you should know about those with the highest importance. These recommendations have been categorized according to their importance in the following lists:
- High importance:
- Package a single app per container.
- Properly handle PID 1, signal handling, and zombie processes.
- Optimize for the Docker build cache.
- Medium importance:
- Remove unnecessary tools.
- Build the smallest image possible.
- Scan images for vulnerabilities.
- Properly tag your images.
The details for each of these recommendations can be found in the documentation at the aforementioned link.
Quotas and limits
GKE comes with the following limits:
- A maximum of 50 clusters per zone, plus 50 regional clusters per region
- A maximum of 15,000 nodes per cluster
- A maximum of 1,000 nodes per cluster if you use the GKE ingress controller
- A maximum of 1,000 nodes per node pool zone
- 110 Pods per node
Note that GKE uses Compute Engine to host nodes, so Compute Engine quotas also apply.
Additionally, there are resource quotas for the cluster itself. To view the quotas, use the kubectl get resourcequota gke-resource-quotas -o yaml command. Note that the quotas cannot be removed as they are there to protect the stability of the cluster.
Pricing
Under the hood, Kubernetes Engine uses Compute Engine services. You are billed for every virtual machine instance that is running as a node of the cluster. Because Kubernetes Engine abstracts master machines, you are not charged for them. You pay a monthly fee for the control plane. You will also be charged for the load balancers that are backing your Service and Ingress resources.
Exam Tip
Make sure you know the pricing model for the exam. Remember that you pay for the nodes and the control plan fee.
Summary
In this blog, we learned about GKE, as well as microservices and containers. We went through basic Kubernetes concepts and described the most important Kubernetes objects. We also looked at the advantages of using GKE, including automated deployment, autoscaling, and auto-upgrades. We deployed a cluster and looked at second-day operations. We also looked at how to connect to a cluster with the kubectl command. If you feel like doing some additional reading, have a look at the links that are provided in the Further reading section.
In Next Post, we will talk about the Cloud Run service, which allows you to run cloud-native workloads without having to provision GKE clusters.
Further reading
To learn more about the topics that were covered in this post, take a look at the following resources:
- Kubernetes: https://kubernetes.io
- Microservices: https://microservices.io/
- Kubernetes tale: https://www.youtube.com/watch?v=4ht22ReBjno&t=31s
- kubectl: https://kubernetes.io/docs/reference/kubectl/overview/
- Network Overview: https://cloud.google.com/kubernetes-engine/docs/concepts/network-overview
- Services: https://cloud.google.com/kubernetes-engine/docs/concepts/service
- Ingress: https://cloud.google.com/kubernetes-engine/docs/concepts/ingress
- Node pools: https://cloud.google.com/kubernetes-engine/docs/concepts/node-pools
- Node taints: https://cloud.google.com/kubernetes-engine/docs/how-to/node-taints
- Autoscaler: https://cloud.google.com/kubernetes-engine/docs/concepts/cluster-autoscaler
- Upgrading a cluster: https://cloud.google.com/kubernetes-engine/docs/how-to/upgrading-a-cluster
- PersistentVolumes: https://kubernetes.io/docs/concepts/storage/persistent-volumes/
- Network Policies: https://kubernetes.io/docs/concepts/services-networking/network-policies/
- Quotas: https://cloud.google.com/kubernetes-engine/quotas
- Container Registry: https://cloud.google.com/container-registry/docs/overview
- Cloud Build: https://cloud.google.com/cloud-build/docs/configuring-builds/create-basic-configuration
- Cloud builders: https://cloud.google.com/cloud-build/docs/cloud-builders
- Kubernetes RBAC: https://kubernetes.io/docs/reference/access-authn-authz/rbac/