As we have already mentioned, machine learning (ML) is one of the differentiators of the Google Cloud Platform (GCP). You should pay special attention to this article, as you will be learning that you don't actually need to be a data scientist to leverage ML in your applications. Google has options for both beginners and highly experienced consumers. ML can be quite an intimidating topic for many people but, hopefully, we will be able to explain the basic underlying concepts by means of easy examples. Having that understanding, we will then be able to look at the ML services that we can use in GCP. Hopefully, you are as excited about this blog as we were when writing it.
In this post, we will cover the following topics:
- An introduction to AI and ML
- The seven steps of ML
- Learning models
- GCP ML options
- TensorFlow
- Vertex AI
- Pretrained ML models
- Dialogflow
- AutoML
Exam Tip
Interestingly, the topic of ML has been significantly reduced in the exam. There is a new exam that was introduced in 2020, Professional Machine Learning Engineer, that requires a deep knowledge of Google ML services. We still feel the topic is very important and would like you to understand the basics.
As a cloud architect, you should be able to differentiate between different GCP ML services and identify the proper one for your use case. It may be the case that two services satisfy requirements, but which of them will entail less effort when it comes to their use? Remember what types of ML models there are and understand the differences. And don't be scared – no one will ask you to develop your own model!
An introduction to AI and ML
Artificial Intelligence (AI) is described as the ability of a digital computer to perform tasks that intelligent human beings can perform. ML is a subset of AI. It is used by machines to make decisions based on data without getting specific programmed instructions. It can be used, for example, to indicate whether an email that's been received is spam, to recognize objects, or to make smart predictions. The ML concept is illustrated in the following diagram:

Figure 14.1 – ML flow
As we can see, ML models rely on mathematical models that have been created from an analysis of samples called training data. The process of developing the model is called model training. The purpose of the model is to answer our question with the highest possible degree of accuracy. The better the accuracy, the better the model. You may be confused as to how this model is created. We will look at this in the following section.
The seven steps of ML
Google indicates that there are seven steps of ML:
- Gathering the data
- Preparing the data
- Choosing a model
- Training
- Evaluation
- Hyperparameter tuning
- Prediction
Let's go through each of the steps with an example. Let's say we are training the model to check whether a piece of fruit is an apple or a lemon. We need to choose the features that we will use to train our model. There are lots of possible alternatives, including shape, color, taste, and skin smoothness:

Figure 14.2 – Objects for the ML experiment
For this particular training, we will use color and sugar content. The second measurement is probably not the simplest one to obtain, but for this test, let's assume that we have the proper equipment to do so.
Gathering and preparing the data
Let's start gathering data by buying multiple apples and lemons. We will start with the creation of tables with two features – color and sugar content.
Important Note
Color is described in terms of wavelength interval in nanometers (nm).
This is an example involving a couple of fruits, but we need far more samples in order to obtain accurate predictions:

At this stage, we should try to visualize the data to make sure we haven't collected too many fruits of one kind; otherwise, the model will be biased toward that fruit.
Now, we need to split the data into training and evaluation data. The data that's used for training should not be used for evaluation if our model is correct as we will always get good results. A good rule of thumb is that we should use 80% of the data for training and the remaining 20% as evaluation data. Once we have this division, additional steps may be required to prepare the data, such as normalization and deduplication. In our case, these are not required.
Choosing a model
Now, we need to establish which model we want to use. There are thousands of models that have been developed that we can choose from. They can be suitable for images, text, or numerical-based data. The model should be chosen according to the use case. Since we have only two features in our case, the model can be a simple linear model.
Training
Now, we'll get to the heart of ML: the actual training. Let's look at the model we have chosen for training. Here, we have X = W x Y + b, where W is weight and b is bias, while X and Y are the features. During training, we will manipulate the W and b values and use the training data to verify whether we are getting correct predictions. Each of these manipulations is referred to as a training step:

Figure 14.3 – ML training
While at the outset we may obtain poor results, gradually, we will get accurate predictions for the W and b values. If we are not getting the results we anticipated, we may need to choose a more complex model:

Figure 14.4 – Adjusting weight and bias
In the preceding plots, we can see how the line changes when we manipulate W and b. In the beginning, we may get results that do not appear to be fit for purpose, but eventually, we achieve values with satisfying results.
Evaluation
Once the training is complete, it is time to evaluate the model. This is where our validation data will be used. You will test this data against your trained model and see how correct it is:

Figure 14.5 – ML evaluation
This is supposed to simulate how the model would work with real-world data.
Hyperparameter tuning
When we were training our models, we made some assumptions regarding parameters. Those parameters are so-called hyperparameters. By tuning them, we can get higher accuracy rates. For example, we can use learning rate parameters, which indicate the extent of the changes made to W and b. If these parameters are too small, it can take a long time for our model to converge. If these parameters are too big, our model may never converge, thereby missing the ideal state. The other parameter we might want to tune is how many times we run through the training process. By changing it, we could potentially obtain higher accuracy.
Keep in mind that this process is rather experimental and requires some experience to get it set right. Have a look at the Further reading section for more information on hyperparameter tuning.
Prediction
Finally, it is time to use our model to evaluate whether a given fruit is an apple or a lemon based on sugar content and color. There are a couple of ways in which we can do this. As you will see in the Vertex AI section of this article, we can host our model on GCP and access it via an API whenever we need to make a prediction.
Of course, this is a very simple example, but it should be good enough for you to grasp the idea of how ML works.
Learning models
Now that we have a basic understanding of ML and how to train a model, let's have a look at three types of ML learning. These are as follows:
- Supervised learning
- Unsupervised learning
- Semi-supervised ML
The preceding three types of ML are defined as follows:
- Supervised learning: Supervised learning is the most common model. It is used when the training data and validation data are labeled. What the model does is learn how to set a label for input data. It does this based on what it has learned from some labeled training data. We can further classify supervised learning into the following categories:
- Unsupervised learning: Unsupervised learning is used when the training data is not labeled. The model attempts to learn the structure of the data and export information or features that might be useful for classification. Since the data isn't labeled, the accuracy cannot be measured. As an example, the model can be used on data that consists of attributes such as weight and height for people of different genders. The height and weight information can be extracted from the data to perform classification into groups. If you draw a plot from the data, you may observe that the data can be used to create patterns and groups.
Again, as the labels are not known, we cannot explicitly say which group represents which gender, but we can presume that one of the groups can be represented by males and the other by females. We can further classify unsupervised learning into the following categories:
- Semi-supervised ML: Semi-supervised training occurs when part of the training data is labeled and part of it isn't. You can use a mix of both of the preceding methods. Unsupervised learning can be used to structure the data. Supervised learning can be used to label unlabeled data.
GCP ML options
With GCP, you have multiple options when it comes to leveraging ML. Which one you choose largely depends on your use case and how knowledgeable you are on the topic. The following options are available:
- TensorFlow (for a data scientist): This is an option for those who want to work with ML from scratch. It is a software library that's developed and open-sourced by Google. There are more libraries on the market, but this one is the most popular and is used by other cloud providers for their managed ML services.
- Vertex AI (for a data scientist): This is an option for those who want to train their own models but who use Google for training and predictions. It is a managed TensorFlow/Kubeflow service that offloads all infrastructure and software bits from users.
- Pretrained ML models (for a developer): This is an option for those who want to leverage ML without having any knowledge of it. It allows Google-developed models to be used to perform predictions.
- AutoML (for a developer): This is an option for those who want to leverage ML without having any knowledge of it and where the pretrained models are not fit for purpose. It allows models to be trained by supporting labeled data.
TensorFlow
TensorFlow is the most popular open source ML library in the world for developing and training ML models. As a library, it is now part of the GCP offering and can be used on different platforms. For the development phase, you can use your laptop. For the run phase, you can still use your laptop, a public cloud, or even a mobile device.
As you know, Google has the biggest datasets in the world. For this reason, it developed TensorFlow to be highly scalable. Google uses it for services such as Gmail, Google Search, and Photos. You can have a look at how TensorFlow works using TensorFlow Playground, which is available at the following link: https://playground.tensorflow.org:
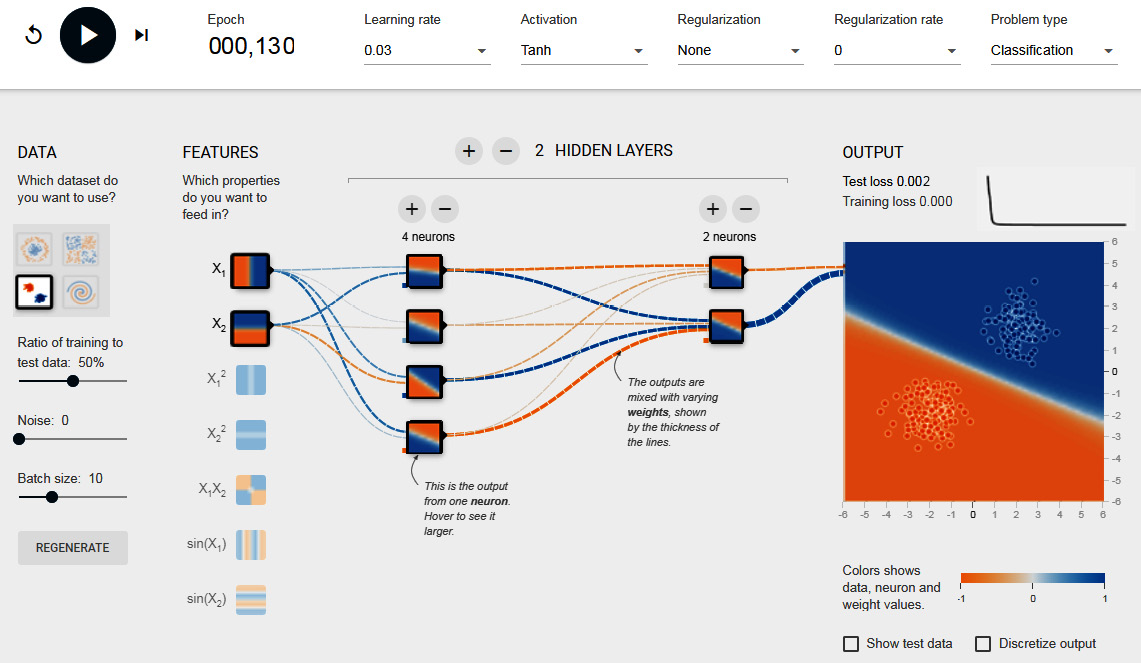
Figure 14.6 – TensorFlow Playground
As you can see, it allows you to choose the type of dataset you want to analyze, and you can experiment with all of the parameters we discussed in the Seven steps of ML section. Visualization of the process allows you to understand how changes in parameters affect the final output.
Exam Tip
For the exam, you don't really need to have an in-depth knowledge of TensorFlow. Just be aware of what it is and what it is used for. However, it may be an idea to test TensorFlow Playground.
Even if it is not tested as part of the exam, you may want to have a look at an example of TensorFlow usage. The following video demonstrates how to classify clothing images: https://www.youtube.com/watch?v=FiNglI1wRNk.
Cloud Vertex AI
Vertex AI is a Google Cloud AI platform service that allows you to build, deploy and scale ML models with a pretrained or custom tool without worrying about the underlying infrastructure. It is an evolution of the AI Platform service and introduced integration with AutoML.
Exam Tip
Vertex AI was announced at the Google I/O conference in 2021. Lots of Vertex AI features are still in preview at the time of writing this blog. We don't anticipate that you will get a question on this in the PCA exam. We still feel this topic is very exciting. If you want to learn more about Vertex AI, check the documentation: https://cloud.google.com/vertex-ai/docs/start.
You can accelerate the learning process, since a range of CPU, GPU, and Tensor Processing Unit (TPU) nodes are supported. It works with multiple frameworks, but the most popular is TensorFlow. As TensorFlow is open source, it allows for portability. Models can be trained locally on limited data and then sent to GCP to train at scale. Vertex AI integrates with other GCP services, such as Cloud Storage for data storage and Cloud Dataflow for data processing.
Using Vertex AI
The following diagram should give you an idea of where Vertex AI fits into the process of developing, deploying, and monitoring your ML model:

Figure 14.7 – Vertex AI workflow
Now, think about the seven steps we discussed previously. You can see that Vertex AI will allow you to progress from training your model to deploying it in production. From there, the model can be consumed. You will also be able to version your models to see how well each version works.
Cloud TPUs
In this section, we will explain what TPUs are. They are Google's custom-developed Application-Specific Integrated Circuits (ASICs), which are used to speed up ML workloads.
They enhance the performance of linear algebra computation, which is used heavily in ML applications. TPUs facilitate a reduction in model training time from weeks to hours. In the following figure, we can see a rack of servers using TPUs, which was presented at the Google Next conference:
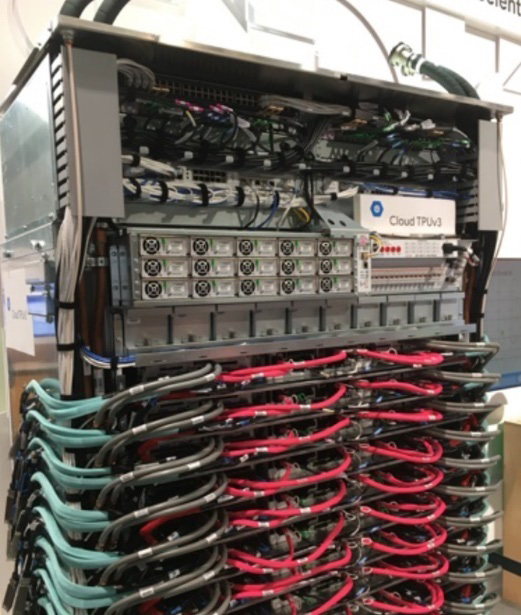
Figure 14.8 – Cloud TPU v3 pod
As indicated by Google, the following factors make your model suitable for being trained with TPUs:
- Models using matrix computations
- Models without custom TensorFlow operations inside the main training loop
- Models that take a long time to train, for example, weeks
- Models with very large batch sizes
In other cases, you may consider using CPUs or GPUs.
Pretrained ML models
Google's pretrained models can be used to perform predictions without us needing any knowledge of how ML works. All of the models are accessible using APIs and can be directly consumed from your application. The data for prediction is delivered using a JSON file or is stored on Cloud Storage. There are currently a number of models available, as follows:
- The Cloud Speech-to-Text API
- The Cloud Text-to-Speech API
- The Cloud Translation API
- The Cloud Natural Language API
- The Cloud Vision API
- The Cloud Video Intelligence API
Let's have a quick look at each of them.
The Cloud Speech-to-Text API
The Cloud Speech-to-Text API empowers developers with the ability to turn speech into text. This API accepts received audio and returns a text transcription. This API can be used synchronously, asynchronously, or in a streaming model. Many languages and dialects are supported. For a full list, check the Further reading section.
The Cloud Text-to-Speech API
The Cloud Text-to-Speech API empowers developers with the ability to transform text into a form of Speech Synthesis Markup Language (SSML) input into audio data of natural human speech. Many languages are supported, with multiple voices available per language. There are two types of voice to choose from, Standard and WaveNet, the latter constituting an advanced module that narrows the gap to human speech.
The Cloud Translation API
The Cloud Translation API enables the translation of hundreds of languages. If the language is unknown, the service can auto-detect it. Cloud Translation comes with libraries for the most popular languages, so you can use it directly in your code without using the REST API.
The Cloud Natural Language API
The Cloud Natural Language API allows you to leverage the deep learning models that Google uses for its search engine to analyze text. It is also leveraged by Google Assistant.
It is able to perform the following operations:
- Extract information regarding entities, including places, people, and events
- Categorize the entities
- Perform sentiment analysis
- Perform syntax analysis
Exam Tip
Expect to see questions on the Natural Language API in the exam. Remember that it is an easy way to analyze natural human language. It is quicker to use this than to develop your own model. Keep the preceding capabilities in mind so that you can adapt them to the use case you are given in the exam.
In view of the preceding capabilities, this API can be used for the following use cases.
It can be leveraged to analyze documents, news, social media, or blog posts. In combination with the Speech-to-Text API, it can analyze customer satisfaction from a call center call. Be aware that a limited number of languages are supported. If your language is not supported, you can use the Translation API to convert the text into a supported language.
Let's put this into practice! The API can be accessed both through the REST API and the gcloud ml language command, and the text can be provided as a parameter or uploaded from Cloud Storage. For better visualization, we will use a GUI tool provided by Google (https://cloud.google.com/natural-language) to analyze some sample text:
Looking at Entities, we can see that five entities have been found. Each entity comes with a Salience attribute (ranging from 0–1), which stipulates how important that entity is in the sentence. The higher the value, the more salient it is. For some entities, you also get a Wikipedia link so that you can obtain further information:

Figure 14.9 – Natural Language API – Entities
For sentiment analysis, we see two Sentiment attributes:
- Score: Ranging from -1 (very negative) to 1 (very positive)
- Magnitude: Ranging from 0 to infinity, showing the strength of the statement:

Figure 14.10 – Natural Language API – Sentiment
Now, we change the preceding sentence to the following:
We can see that both Score and Magnitude have dropped to 0 for the second sentence:
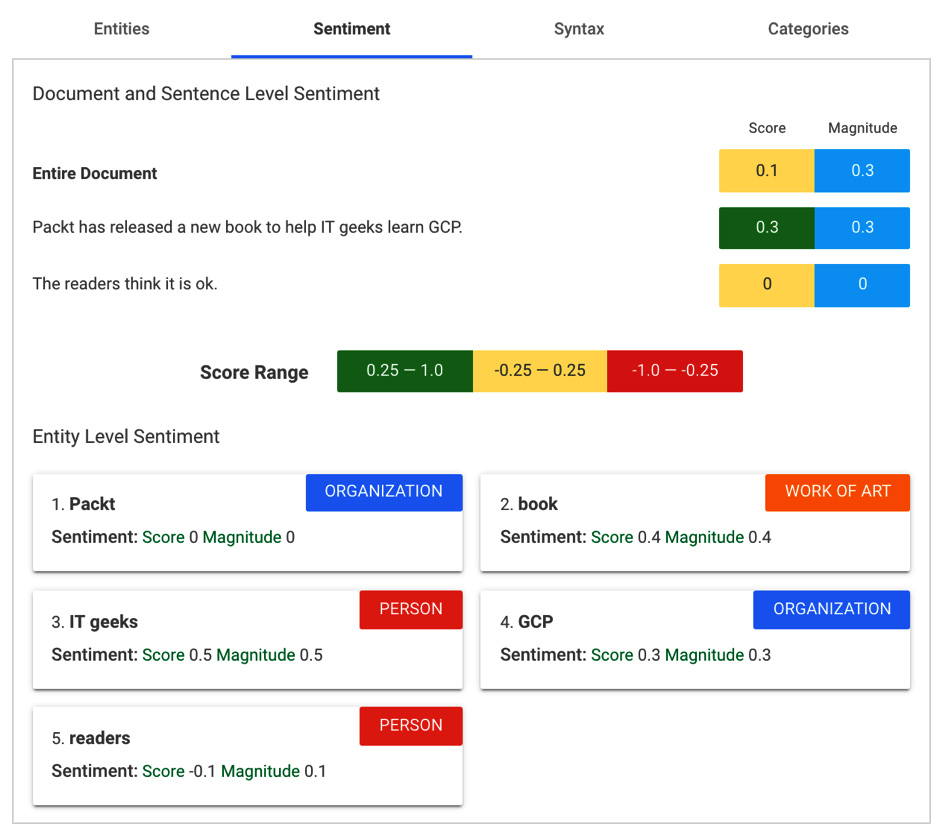
Figure 14.11 – Natural Language API – Sentiment change
The Syntax tab shows detailed syntax information:

Figure 14.12 – Natural Language API – Syntax
Finally, the text was categorized as Computer & Electronics with a Confidence value of 0.67:

Figure 14.13 – Natural Language API – Categories
As you can see, this is a very powerful API that can help you perform a deep analysis of text.
Remember that this is still under development and that new features will be added over time.
The Cloud Vision API
The Cloud Vision API provides vision detection features, including the following:
- Image labeling
- Face and landmark detection
- Optical Character Recognition (OCR)
- Tagging explicit content
You can test this API using https://cloud.google.com/vision/. You simply upload the image and see what analysis is possible.
If we look at the Faces tab, we can see that a face and a hat were detected correctly. The service was also able to detect the feeling of joy, which I can confirm, as it is me in the photograph having a lot of fun:

Figure 14.14 – Vision AI – Faces
In the Objects tab, we can see that most of the objects have been identified correctly, although I don't remember wearing a skirt that day:

Figure 14.15 – Vision AI – Objects
The Labels tab reveals the analysis of how the image is to be labeled. Again, most of the labels make sense, with the exception of the tennis racket:
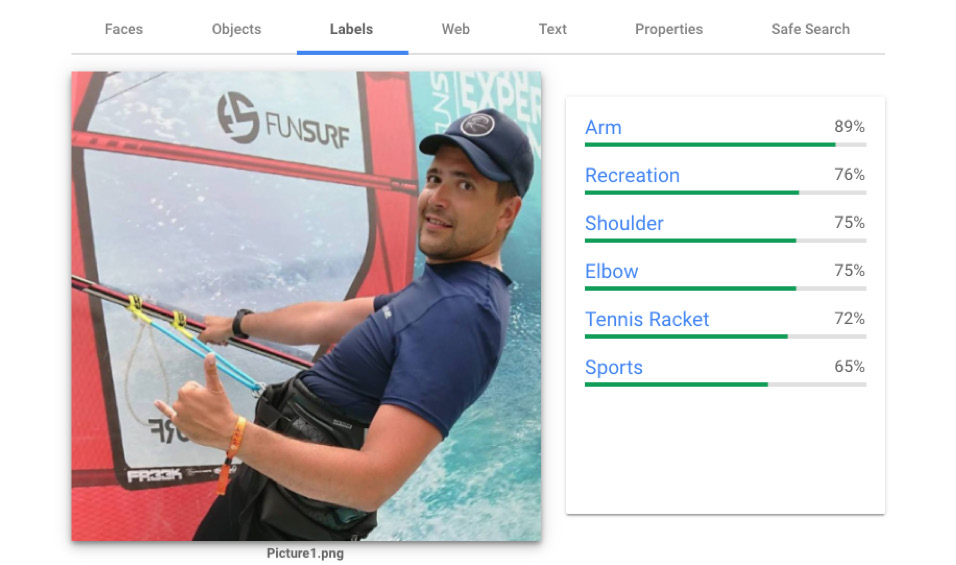
Figure 14.16 – Vision AI – Labels
When we look at the OCR capabilities, there is some good analysis, especially when we look at +Block 3, where the API has detected an S from the logo with an odd font:

Figure 14.17 – Vision AI – Text
Finally, if we expand the Show JSON link under the image, we can also see how the REST API's call and response would appear:
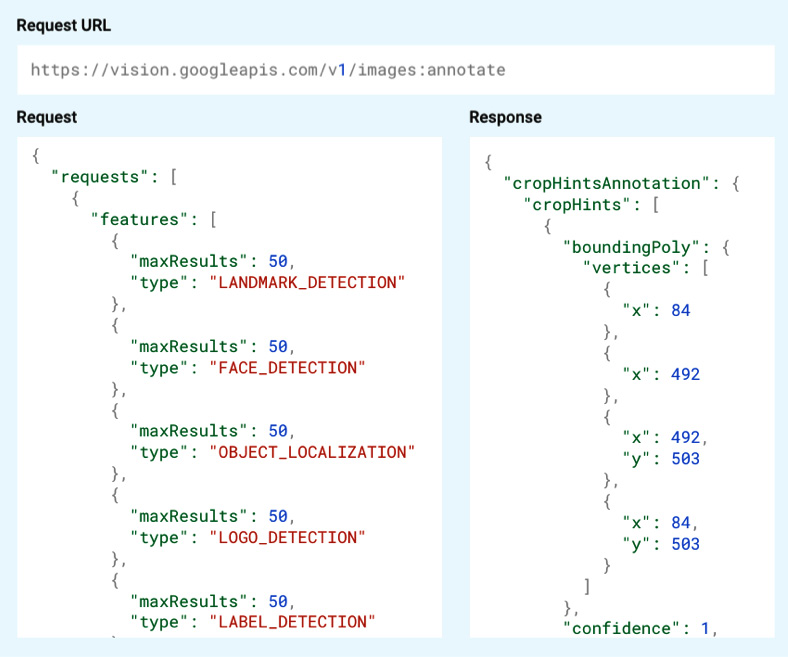
Figure 14.18 – Vision AI – JSON response
As we can see in the preceding screenshot, we get the response in JSON format. This allows us to easily parse it and use the results of the query in the code of the application.
The Cloud Video Intelligence API
Google Cloud Video Intelligence allows you to analyze video that's been uploaded to Cloud Storage.
Currently, the following features are available:
- Labels: These detect and label entities, such as animals, plants, and people.
- Shots: These detect scene changes within the video and label them.
- Explicit content: These are explicit content annotations for pornography.
This can have a number of use cases. Video metadata can be created with labels that describe its content to allow improved searching in media libraries. In addition, videos with inappropriate content can be identified and removed from general access.
Dialogflow
This is actually a tool outside of GCP and has its origins in a product called Api.ai. It was developed to perform human-to-computer interaction using natural language processing.
It allows you to create so-called agents and intents that have definite possible conversation scenarios. Dialogflow is able to train itself on possible variations of phrases that the user uses to demonstrate particular intent. The more phrases that are provided, the better it can learn to trigger the intent:

Figure 14.19 – Dialogflow (Source: https://cloud.google.com/dialogflow/docs/intents-overview. License: https://creativecommons.org/licenses/by/4.0/)
When a user calls an intent, the agent can answer with a simple response, or more advanced actions can take place. For example, an intent can be analyzed in relation to defined parameters.
The parameters can get extracted and passed to so-called fulfillment, which is basically Firebase functions. The developer can produce Node.js code to integrate with third-party systems outside Dataflow. This can be used to retrieve information or be asked to perform specific actions. As an example, a call can be made to a weather service to get a forecast for a particular location, or a smart home system can be called to turn off the light in the living room. Dialogflow can integrate with your application or website using the REST API, or you can use one of the one-click integrations for applications such as the following:
- Google Assistant
- Slack
- Facebook Messenger
- Skype
- Amazon Alexa
- Microsoft Cortana
Dialogflow comes with three flavors of agents. Which one you choose depends on how advanced your design is:
- Dialogflow ES: A standard agent suitable for small-to-medium and simple-to-moderate solutions.
- Dialogflow CX: An advanced agent suitable for large and complex solutions.
- Dialogflow Trial: This provides features of Dialogflow ES with limited quotas. It is suitable for experimenting.
You can find a detailed comparison of those three agent editions by accessing this link: https://cloud.google.com/dialogflow/docs/editions.
AutoML
AutoML comes into play when pretrained models are not fit for purpose. As an example, the Vision API can recognize a sofa, but what if we want to recognize a particular sofa that our company produces? The Vision API cannot do that for us.
In such a case, we need to use AutoML or train our own model. As you have probably already guessed, the former is a much easier method. AutoML takes datasets from you, trains and deploys the model, and then serves it through the REST API. This sounds a little bit like magic, right? Take a look at the following diagram:

Figure 14.20 – AutoML
Note that there are five services available that allow you to train your custom model:
- AutoML Vision: This classifies your images according to your own defined labels.
- AutoML Translation: This performs translation queries, returning results specific to your domain.
- AutoML Natural Language: This classifies English-language content into a custom set of categories.
- AutoML Tables: This turns structured data into predictive insights.
- AutoML Video Intelligence: This allows you to classify segments of video.
Let's have a look at an example. See how you would actually use AutoML, using the example of the Vision API, to recognize a table that your company produces. In short, what you would do is the following:
- Take multiple photos of your table.
- Upload it to Cloud Storage.
- Create a CSV file with a label for your photos.
- Provide the CSV file to AutoML to train the model.
Once the model has been trained, you can access the model through the REST API, as you would with any other pretrained model. Quite amazing, right? Check the AI adventures video in the Further reading section if you want to see AutoML Vision in action.
Summary
In this post, we learned about the ML services offered by GCP. We started with the theory of ML to introduce basic concepts and nomenclature to better understand the actual services. We learned that, depending on your role and use case, you need to make the correct choice as to which service will be the most effective for you to use. One goal can sometimes be achieved using two or more different services. We also learned that you don't need to be a data scientist to leverage ML. Those of you who have very limited knowledge can use pretrained models. If those models are not good enough for your use case, you can try AutoML, which allows new models to be created without us having to develop the model ourselves. We just need to deliver proper datasets to GCP.
Finally, for those of you who have the knowledge and are capable of developing your own models, Vertex AI is the service you can use to develop and host your models.
In the next Article, we will have a closer look at how to secure our environment in GCP.
Further reading
Read the following articles for more information regarding what was covered in this post:
- ML building blocks: https://cloud.google.com/products/ai/
- Dialogflow: https://cloud.google.com/dialogflow/docs/
- ML Engine: https://cloud.google.com/ml-engine/docs/
- Cloud AutoML: https://cloud.google.com/automl/docs/
- TensorFlow: https://www.tensorflow.org/
- AI adventures video: https://www.youtube.com/watch?v=nKW8Ndu7Mjw
- Speech-to-Text: https://cloud.google.com/speech-to-text/docs/basics
- Vertex AI: https://cloud.google.com/vertex-ai/docs