
You follow the same steps in performing VLSM as you did when performing classical subnetting.
Note
Throughout this blog, I use serial links between routers to help differentiate these networks from Ethernet networks where hosts usually reside. In today’s more modern networks, Ethernet links are used almost exclusively between routers, and serial links are rapidly becoming obsolete. However, using serial links is a very cost-effective way to set up a testing lab for learning purposes; I have seen home labs, school labs, and corporate training labs use serial links for this reason. Even though a simple Ethernet link (10 Mbps) is faster than a serial link (1.544 Mbps), I use serial links in all of my Portable Command Guides to show the difference between an Ethernet link and a point-to-point link to another router.
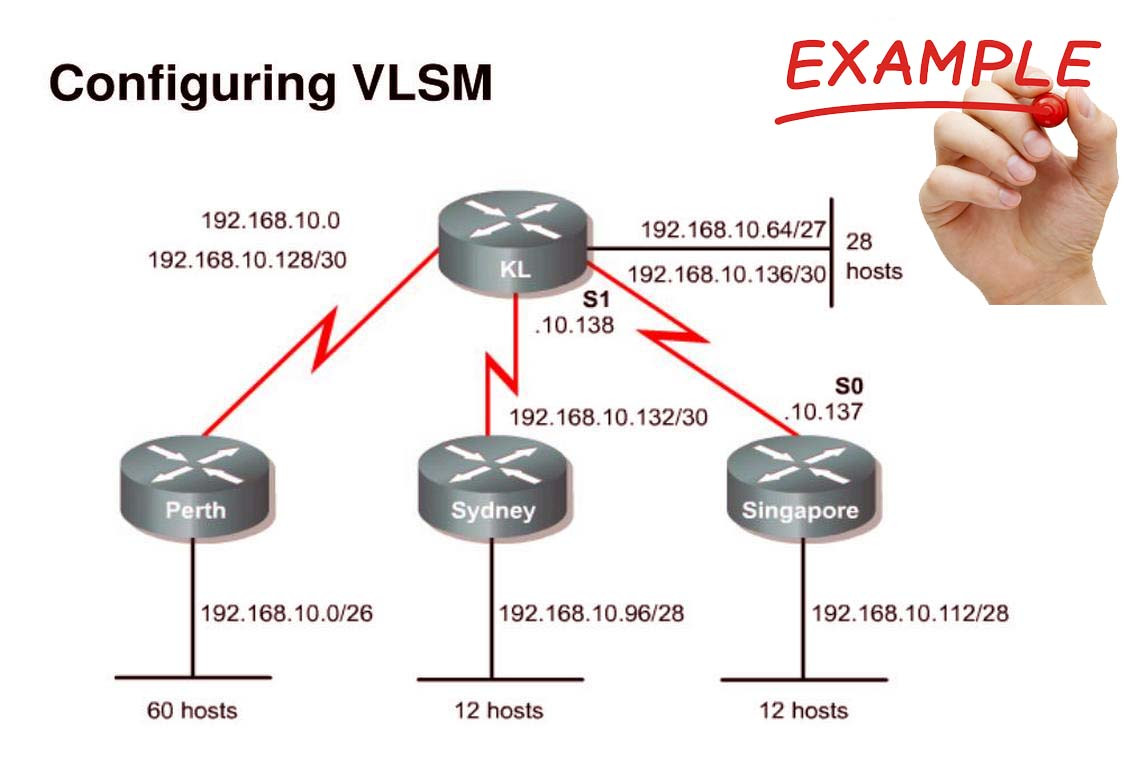
Consider Figure 1 as you work through an example.

Figure 1 Sample Network Needing a VLSM Address Plan
A Class C network—192.168.100.0/24—is assigned. You need to create an IP plan for this network using VLSM.
Once again, you cannot use the N bits—192.168.100. You can use only the H bits. Therefore, ignore the N bits because they cannot change!
The steps to create an IP plan using VLSM for the network illustrated in Figure 1 are as follows:
- Step 1. Determine how many H bits will be needed to satisfy the largest network.
- Step 2. Pick a subnet for the largest network to use.
- Step 3. Pick the next largest network to work with.
- Step 4. Pick the third largest network to work with.
- Step 5. Determine network numbers for serial links.
The remainder of the chapter details what is involved with each step of the process.
Step 1: Determine How Many H Bits Will Be Needed to Satisfy the Largest Network
Network A is the largest network with 50 hosts. Therefore, you need to know how many H bits will be needed:
If 2H – 2 = Number of valid hosts per subnet
Then 2H – 2 ≥ 50
Therefore H = 6 (6 is the smallest valid value for H)
You need 6 H bits to satisfy the requirements of Network A.
If you need 6 H bits and you started with 8 N bits, you are left with 8 – 6 = 2 N bits to create subnets:
Started with: NNNNNNNN (these are the 8 bits in the fourth octet)
Now have: NNHHHHHH
All subnetting will now have to start at this reference point to satisfy the requirements of Network A.
Step 2: Pick a Subnet for the Largest Network to Use
You have 2 N bits to work with, leaving you with 2N or 22 or 4 subnets to work with:
NN = 00HHHHHH (The Hs = The 6 H bits you need for Network A)
01HHHHHH
10HHHHHH
11HHHHHH
If you add all 0s to the H bits, you are left with the network numbers for the four subnets:
00000000 = .0
01000000 = .64
10000000 = .128
11000000 = .192
All of these subnets will have the same subnet mask, just like in classful subnetting.
Two borrowed H bits means a subnet mask of
11111111.11111111.11111111.11000000
or
255.255.255.192
or
/26
The /x notation represents how to show different subnet masks when using VLSM.
/8 means that the first 8 bits of the address are network; the remaining 24 bits are H bits.
/24 means that the first 24 bits are network; the last 8 are host. This is either a traditional default Class C address, a traditional Class A network that has borrowed 16 bits, or even a traditional Class B network that has borrowed 8 bits!
Pick one of these subnets to use for Network A. The rest of the networks will have to use the other three subnets.
For purposes of this example, pick the .64 network.
00000000 = | .0 | |
01000000 = | .64 | Network A |
10000000 = | .128 | |
11000000 = | .192 |
Step 3: Pick the Next Largest Network to Work With
Network B = 27 hosts
Determine the number of H bits needed for this network:
2H – 2 ≥ 27
H = 5
You need 5 H bits to satisfy the requirements of Network B.
You started with a pattern of 2 N bits and 6 H bits for Network A. You have to maintain that pattern.
Pick one of the remaining /26 networks to work with Network B.
For the purposes of this example, select the .128/26 network:
10000000
But you need only 5 H bits, not 6. Therefore, you are left with
10N00000
where
10 represents the original pattern of subnetting.
N represents the extra bit.
00000 represents the 5 H bits you need for Network B.
Because you have this extra bit, you can create two smaller subnets from the original subnet:
10000000
10100000
Converted to decimal, these subnets are as follows:
10000000 =.128
10100000 =.160
You have now subnetted a subnet! This is the basis of VLSM.
Each of these sub-subnets will have a new subnet mask. The original subnet mask of /24 was changed into /26 for Network A. You then take one of these /26 networks and break it into two /27 networks:
10000000 and 10100000 both have 3 N bits and 5 H bits.
The mask now equals:
11111111.11111111.11111111.11100000
or
255.255.255.224
or
/27
Pick one of these new sub-subnets for Network B:
10000000 /27 = Network B
Use the remaining sub-subnet for future growth, or you can break it down further if needed.
You want to make sure the addresses are not overlapping with each other. So go back to the original table.
00000000 = | .0/26 | |
01000000 = | .64/26 | Network A |
10000000 = | .128/26 | |
11000000 = | .192/26 |
You can now break the .128/26 network into two smaller /27 networks and assign Network B.
00000000 = | .0/26 | |
01000000 = | .64/26 | Network A |
10000000 = | .128/26 | Cannot use because it has been subnetted |
10000000 = | .128/27 | Network B |
10100000 = | .160/27 | |
11000000 = | .192/26 |
The remaining networks are still available to be assigned to networks or subnetted further for better efficiency.
Step 4: Pick the Third Largest Network to Work With
Networks C and Network D = 12 hosts each
Determine the number of H bits needed for these networks:
2H – 2 ≥ 12
H = 4
You need 4 H bits to satisfy the requirements of Network C and Network D.
You started with a pattern of 2 N bits and 6 H bits for Network A. You have to maintain that pattern.
You now have a choice as to where to put these networks. You could go to a different /26 network, or you could go to a /27 network and try to fit them into there.
For the purposes of this example, select the other /27 network—.160/27:
10100000 (The 1 in the third bit place is no longer bold because it is part of the N bits.)
But you only need 4 H bits, not 5. Therefore, you are left with
101N0000
where
10 represents the original pattern of subnetting.
N represents the extra bit you have.
00000 represents the 5 H bits you need for Networks C and D.
Because you have this extra bit, you can create two smaller subnets from the original subnet:
10100000
10110000
Converted to decimal, these subnets are as follows:
10100000 = .160
10110000 = .176
These new sub-subnets will now have new subnet masks. Each sub-subnet now has 4 N bits and 4 H bits, so their new masks will be
11111111.11111111.11111111.11110000
or
255.255.255.240
or
/28
Pick one of these new sub-subnets for Network C and one for Network D.
00000000 = | .0/26 | |
01000000 = | .64/26 | Network A |
10000000 = | .128/26 | Cannot use because it has been subnetted |
10000000 = | .128/27 | Network B |
10100000 = | .160/27 | Cannot use because it has been subnetted |
10100000 | .160/28 | Network C |
10110000 | .176/28 | Network D |
11000000 = | .192/26 |
You have now used two of the original four subnets to satisfy the requirements of four networks. Now all you need to do is determine the network numbers for the serial links between the routers.
Step 5: Determine Network Numbers for Serial Links
All serial links between routers have the same property in that they only need two addresses in a network—one for each router interface.
Determine the number of H bits needed for these networks:
2H – 2 ≥ 2
H = 2
You need 2 H bits to satisfy the requirements of Networks E, F, G, and H.
You have two of the original subnets left to work with.
For the purposes of this example, select the .0/26 network:
00000000
But you need only 2 H bits, not 6. Therefore, you are left with
00NNNN00
where
00 represents the original pattern of subnetting.
NNNN represents the extra bits you have.
00 represents the 2 H bits you need for the serial links.
Because you have 4 N bits, you can create 16 sub-subnets from the original subnet:
00000000 = .0/30
00000100 = .4/30
00001000 = .8/30
00001100 = .12/30
00010000 = .16/30
…
00111000 = .56/30
00111100 = .60/30
You need only four of them. You can hold the rest for future expansion or recombine them for a new, larger subnet:
00010000 = .16/30
00010100 = .20/30
00011000 = .24/30
00011100 = .32/30
…
00111000 = .56/30
00111100 = .60/30
The first four of these can be combined into the following:
00010000 = .16/28
The rest of the /30 subnets can be combined into two /28 networks:
00100000 = .32/28
00110000 = .48/28
Or these two subnets can be combined into one larger /27 network:
00010000 = .32/27
Going back to the original table, you now have the following:
00000000 = | .0/26 | Cannot use because it has been subnetted |
00000000 = | .0/30 | Network E |
00000100 = | .4/30 | Network F |
00001000 = | .8/30 | Network G |
00001100 = | .12/30 | Network H |
00010000 = | .16/28 | Future growth |
00100000 = | .32/27 | Future growth |
01000000 = | .64/26 | Network A |
10000000 = | .128/26 | Cannot use because it has been subnetted |
10000000 = | .128/27 | Network B |
10100000 = | .160/27 | Cannot use because it has been subnetted |
10100000 | .160/28 | Network C |
10110000 | .176/28 | Network D |
11000000 = | .192/26 | Future growth |
Looking at the plan, you can see that no number is used twice. You have now created an IP plan for the network and have made the plan as efficient as possible, wasting no addresses in the serial links and leaving room for future growth. This is the power of VLSM!