We already know that compute is the most fundamental cloud feature. But even if we are able to do the computation without connecting to our resources, we get no value. Networking covers many types of connections. We need to be able to connect to the Google Cloud Console and the Google Cloud Platform (GCP) API. We may want to connect our on-premises data center to GCP either through a Virtual Private Network (VPN) or through a high bandwidth interconnect. Finally, we might need to have load-balanced connectivity to Virtual Machine (VM) instances. GCP networking will help us with all of that.
In this article, we will go through all the theory that we need to know so that we understand how workloads communicate internally and externally with GCP. We will also have a look at all the basic networking services.
We will cover the following topics:
- Exploring GCP networking
- Understanding Virtual Private Clouds
- Load balancing
- Network Address Translation (NAT)
- Hybrid connectivity
- DNS
- Firewall rules
- Private access
Exploring GCP networking
The Google network is something that differs from other clouds. To understand the huge amount of investment Google has made in networking, we should have a look at the following map (https://cloud.google.com/about/locations/#network-tab). This map shows hundreds of thousands of fiber optic cables running between 85 zones and 146 points of presence (PoP). Keep in mind that this view is from October 2021 and that it is still growing:
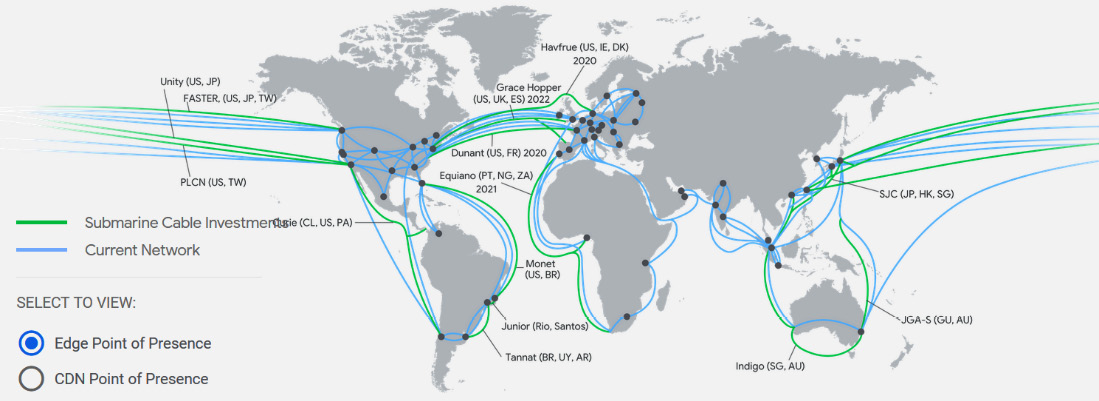
Figure 10.1 – Network .ocations (Source: https://cloud.google.com/about/locations/#network-tab. License: https://creativecommons.org/licenses/by/4.0/legalcode)
Having such a massive network infrastructure allows you to connect GCP at a location very close to your Internet Service Provider (ISP). In fact, GCP offers two network service tiers, as follows:
- Premium: The Premium Tier provides high-performance routing. On top of that, it offers global load balancing and a Content Delivery Network (CDN) service. It is aimed at use cases where global presence is required and has the best user experience in mind. This tier comes with Service-Level Agreements (SLAs).
- Standard: The Standard Tier is a lower performance network with no SLAs attached. The CDN service is not available and load balancers are regional. It is aimed at use cases where cost is the main deciding factor. The GCP networking that's exposed to the user is based on a Software-Defined Network (SDN) called Andromeda. This platform is an orchestration point for all network services in GCP. Fortunately, this is abstracted from the user and there is no need to understand how Andromeda works itself.
Exam Tip
Interestingly enough, networking is not the key topic of the exam; however, there is a GCP Certified Network Engineer exam that will test your GCP networking knowledge thoroughly. It is impossible to understand other GCP services without understanding the basics of networking. Therefore, in this blog, you will learn about Google's global network and GCP's networking services.
Understanding Virtual Private Clouds
The fundamental concept of the GCP network is a Virtual Private Cloud (VPC), which is also simply called a network. As you learned in This Post, Getting Started with Google Cloud Platform, GCP can be divided into projects that logically isolate Google Cloud resources. Within a project, you can create multiple VPCs.
By default, up to five networks can be created per project (the quota can be extended by contacting support). Multiple VPCs make it possible to separate GCP resources such as VMs, containers, and so on at a network level. A VPC has a global scope, and it can span all GCP regions. To allow connectivity between VMs residing in different VPCs, you have two options: you can create a shared VPC or peer the VPCs. We will have a look at each option in detail later in this article.
Furthermore, the VPCs are divided into regional subnetworks, also known as subnets, that have associated IP ranges that are used to assign addresses to resources.
When you create a new project, a default network is created for you. Subnets are created for each region and have allocated non-overlapping CIDR blocks.
Important Note
Classless Inter-Domain Routing (CIDR) is an IP addressing schema that replaces the classful A, B, C system. It is based on variable-length subnet masks. In CIDR, the prefixes of the subnet can be defined as an arbitrary number, making the network mask length more flexible. This means that organizations can utilize IP address schemas more efficiently.
Also, default firewall rules are created to allow us to ingress ICMP, RDP, and SSH from anywhere. Any traffic within the default network is also allowed. The following VPC networks screenshot is from the VPC networks section of the GCP portal:
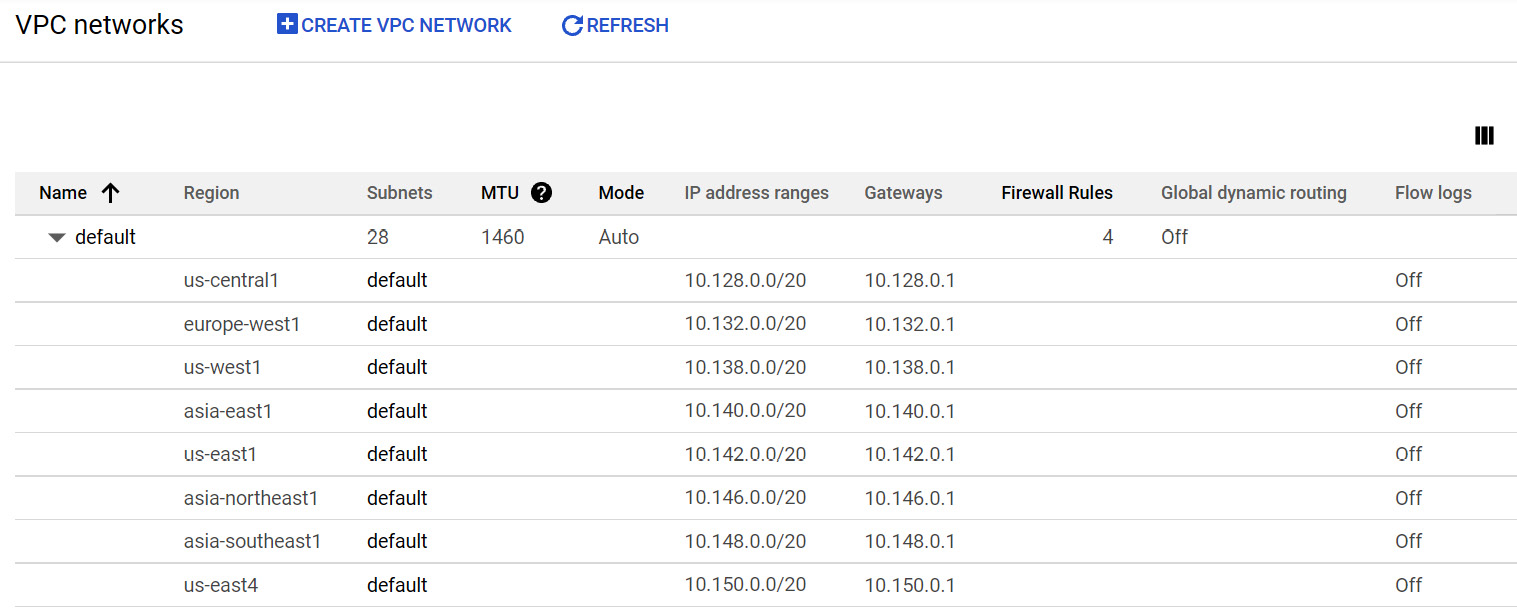
Figure 10.2 – VPC networks
If you create a new VPC, you have two modes to choose from:
- Auto mode: Automatically creates one subnet per region with predefined IP ranges with the /20 mask from the 10.128.0.0/9 CIDR block. Each subnet is expandable to the /16 mask.
- Custom mode: It does not create subnets automatically and delegates complete control to the user. You decide how many subnets should be created and in which regions, dynamic routing mode (either regional or global) and MTU size. You can also specify if you wish for Flow Logs and private Google access to be enabled.
When creating a subnet, you must define one primary range and can also define up to five secondary ranges (though this is optional):
- Primary IP address range: For this range, addresses can be assigned from RFC 1918 CIDR address spaces and should not overlap in the same network. These can be assigned to a VM primary internal IP addresses, VM alias IP addresses, and the IP addresses of internal load balancers. Note that there are always four addresses reserved in this range.
- Secondary IP address range: For this range, addresses can be assigned from the RFC 1918 CIDR address space and can only be used for alias IP addresses. There are no addresses reserved in those ranges.
Important Note
Alias IP addresses can be assigned to a VM if there are multiple services running on it. You can map them to the alias IP that's assigned to that VM. It is also used in the Google Kubernetes Engine Pods. For more information, refer to the Further reading section of this blog.
It is possible to convert an auto mode network in a custom mode network, but not the other way round. Remember to not use IP ranges that overlap between VPCs or on-premises if you will be connecting those networks either through VPC peering or VPNs.
Connectivity
It is time to understand how the connectivity between the VM instances works in VPC. We have already stated that networks are global and that subnets are regional. Now, let's have a look at VM networking. We should note that VMs can have two types of IP addresses:
- Internal IP address: Assigned within the VM operating system
- External IP address (optional): Assigned to a VM but not visible in the operating system
The internal IP will be always assigned to the VMs. The external IP can be either created automatically for you or you can create an IP address yourself. If you don't want to use this type of address, you need to set the address to None when you request the VM. Note that the external IP address is not visible to the VM itself. Which IP address will be used to initiate a connection depends on the following scenarios:
- VMs with the same network can communicate using the internal IP, even if they are in a different region.
- VMs in a different network can communicate using external IPs, even if they are in the same regions.
Let's have a look at the following diagram:
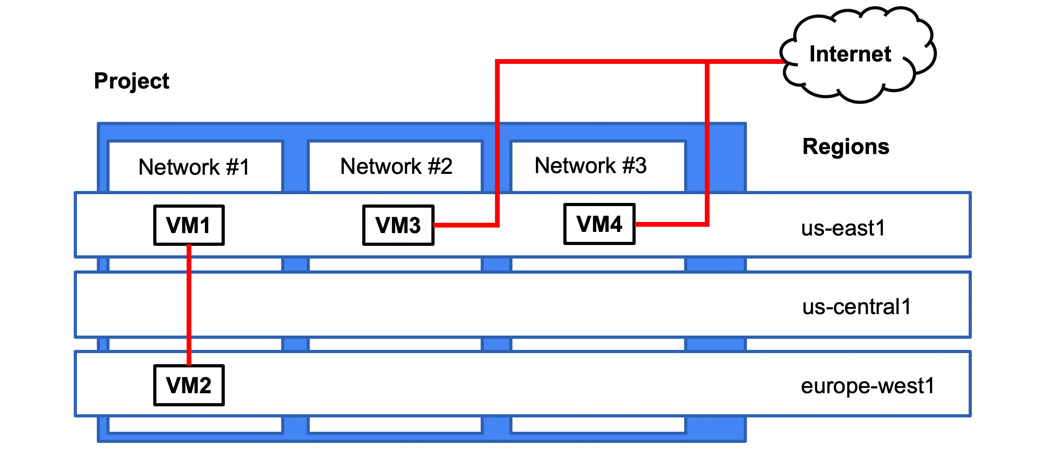
Figure 10.3 – Communication flow
In this scenario, VM1 and VM2 can communicate using internal IPs. VM3 and VM4 need to communicate using external IPs. Note that the traffic between VM3 and VM4 does not need to traverse the internet but is routed through the Google Edge router.
Cost
It is very important to understand how network traffic flows work as it can impact your billing. The general rule of thumb is that the following traffic is free:
- Ingress traffic
- Egress within the same zones using internal IPs
- Egress to a different GCP service within the same region using an external IP address or an internal IP address
Important Note
This free traffic does not include a number of services that haven't been mentioned in this book yet: Cloud Memorystore for Redis, Cloud Filestore, GKE, and Cloud SQL.
You will be charged for the following traffic:
- Egress between zones within the regions
- Egress between regions
- Internet egress (note: VPN traffic is treated as egress)
Important Note
For current pricing, please refer to https://cloud.google.com/vpc/network-pricing.
VPC Flow Logs
VPC Flow Logs allow you to record network flows to and from VM instances. The flows are recorded in 5-second intervals. Note that only the flows are recorded rather than the full network packet capture. The logs contain information regarding the source and destination VPC, and the instance start and end times. VPC Flow Logs are enabled at the subnet level and can be used for real-time security analysis, expense optimization, forensics, or network monitoring.
Cross-VPC connectivity
In some cases, you might need to provide connectivity between two VPCs. As an example, departments in your organization are merging and now they need connectivity to services residing in their respective VPCs.
To do this, there are currently two options:
- Shared VPC
- VPC peering
Let's have a look at both these options.
Shared VPC
In this model, we have a single VPC that is shared between different projects. The project where the shared VPC is created is called the host project. The projects that can use the VPC are called service projects. In the following diagram, we can see we have two service projects (Service Project A and Service Project B):
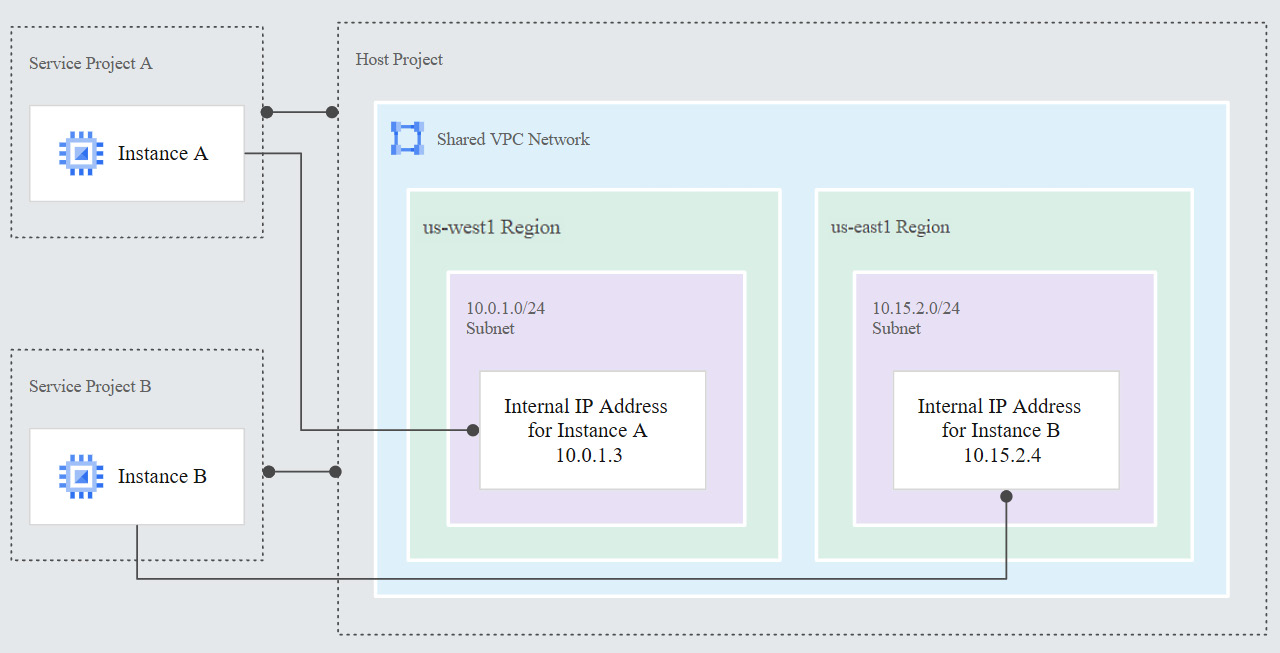
Figure 10.4 – Shared VPC (Source: https://cloud.google.com/vpc/docs/shared-vpc. License: https://creativecommons.org/licenses/by/4.0/legalcode)
To create a shared project, a shared VPC admin role is required (roles/compute.xpnAdmin). The shared VPC admin can further delegate the permissions to the following:
- Network admin: Full control over networks, excluding firewall rules and SSL certificates
- Security admin: Control over firewall and SSL certificates
Users in the service project can provision VMs that are in a shared VPC. To be able to do so, they need to have a network user role assigned. Note that it can be assigned either at a project or subnet level.
VPC network peering
With VPC peering, you can connect two existing VPCs, regardless of whether they belong to the same project or organization. In this scenario, the administration of each VPC stays separated.
Each site of the peering is set up independently and peering is only established once both sides are configured. The project owner/editor and network admin roles are allowed to perform the configuration. It is important to remember that the CIDR prefixes cannot overlap between peering VPCs' subnets. Once peering has been established, every internal IP becomes accessible across peered networks. Multiple peers can be created per VPC, but transitive peering is not supported. This means that only connectivity between directly peered VPCs is allowed. You cannot bridge the traffic between two VPCs via another VPC. To understand this better, take a look at the following diagram:

Figure 10.5 – VPC peering
In this scenario, VPC1 is peered with VPC2 and VPC3. There is no communication between VPC2 and VPC3 until peering between those two is configured. Note that peering can also be established with a shared VPC.
Choosing between shared VPC and VPC peering
There are two main factors that will allow you to choose between a shared VPC and VPC peering, as follows:
- If VPCs exist in different organizations, choose VPC peering.
- If you need a shared governance model, choose a shared VPC.
Important Note
In real-life scenarios, you might have more detailed requirements for your cross-VPC communication, so we encourage you to do further reading on the subject.
Load balancing
Load balancing is one of the most important features of GCP networking. It allows you to distribute a workload between your scaling resources. It works with GCE, GAE, and GKE.
Load balancing in GCP is one of those topics that can be difficult to comprehend at the beginning. There are many types of load balancers, and the Google documentation makes it slightly difficult to map them to what you can see in the console. When we go to the Google Cloud Console (https://console.cloud.google.com) and navigate to NETWORKING | Network Services | Load Balancing, and finally click on Create load balancer, we will be presented with the following configuration options:

Figure 10.6 – Load balancer options
When you look at the documentation, it distinguishes between the following load balancing options. We will look at these in more detail in the Load balancer types section:
- HTTP(S) load balancing (external and internal)
- SSL proxy load balancing
- TCP proxy load balancing
- Network load balancing
- Internal TCP/UDP load balancing
You can clearly see that this does not match the GUI options. Note that to configure an internal TCP/UDP load balancer, you need to choose either TCP Load Balancing or UDP Load Balancing and then choose the Only between my VMs option:

Figure 10.7 – Internal load balancer
Thankfully, the exam does not require you to know how to exactly configure each load balancing method and instead concentrates on the differences between them. However, you will need it when you put your knowledge into practice.
Important Note
Refer to the following how-to guide. All the options are described step by step: https://cloud.google.com/load-balancing/docs/how-to.
You might need to perform a couple of labs (use a service such as Qwiklabs.com) to feel comfortable with load balancer configuration. For our discussion, we will stick to the documentation definitions as they are also in line with the exam guidelines.
Global versus regional load balancing
Load balancing can be delivered on a regional or global level. This means that for regional load balancing, the balanced resources will reside within one region, whereas in global load balancing, the resources can reside in many regions. The feature that distinguishes GCP from other cloud providers is that some of the load balancing options are available globally. You don't really need to worry about placing the load balancer in the right region:
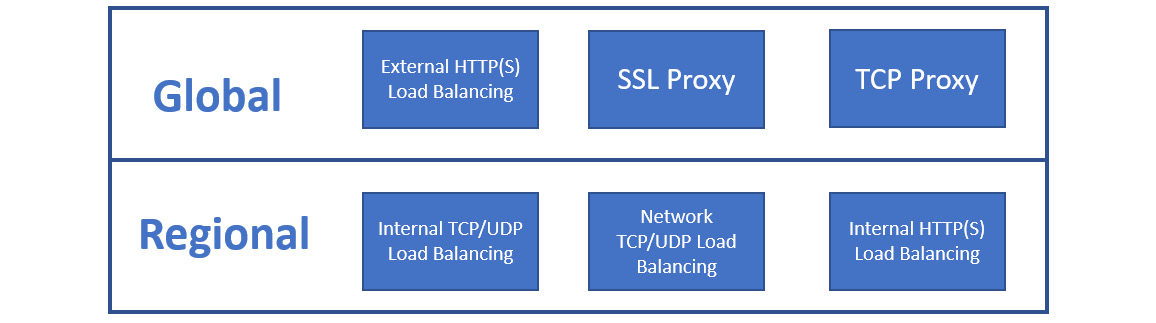
Figure 10.8 – Global versus regional load balancing
As shown in the preceding diagram, the internal and network load balancers are regional only.
External versus internal
We can also distinguish between load balancers in terms of whether they are external or internal. In most scenarios, you would like to expose an application to the internet. This would be the perfect use case for an external load balancer. However, you may also want to load balance traffic in the backend of your application for high availability scenarios. In this case, you would use an internal load balancer, which does not allow connectivity from outside of the VPC.
Proxy versus load balancer
There is an important difference between a proxy and a load balancer in terms of the source IP reaching your backend VM. In the case of a proxy, the source IP is swapped to the proxy's IP as the connection is terminated at the proxy. In the case of a load balancer, the source IP is preserved. Keep this in mind when you configure your firewall rules using the source IP.
Load balancer types
Keeping in mind the key differences we mentioned previously, let's have a look at each load balancing type:
- HTTP(S) load balancing: One of the load balancers that requires special attention is the HTTP(S) load balancer. External HTTP(S) load balancers are global and allow external connectivity. It supports both IPv4 and IPv6. It can be only used for HTTP and HTTPS traffic but offers a couple of additional features, such as the following:
- Internal HTTP(S) load balancers are regional and accessible only in the selected region of the VPC. They do not support the following:
- Cloud CDN
- Cloud Armor
- Storage buckets
- Google-managed SSL certificates
- SSL policies
Important Note
Session affinity sticks the client session to one VM instance as long as the instance is healthy.
- SSL proxy load balancing: The SSL proxy terminates the user's SSL (TLS connections) and is intended for non-HTTP(S) traffic. It is global and allows external connectivity that supports both IPv4 and IPv6. The traffic from the proxy to the machines can use either the TCP or SSL protocols.
- TCP proxy load balancing: The TCP proxy terminates non-HTTP traffic that does not require SSL. It is global and allows external connectivity that supports both IPv4 and IPv6.
- Network TCP/UDP load balancing: Network load balancing uses a non-proxied load balancer that distributes traffic-based inbound IP protocol data such as addresses, ports, and protocol types. It is regional and external with support for IPv4 only. The network load balancer collects VMs to be load balanced into a logical group called a target pool.
- Internal TCP/UDP load balancing: Internal load balancing is a non-proxied form of load balancing. It is regional and internal with support for IPv4 only. As an example, it can be used for three-tier applications where web services need to load balance an internal connection to the application tier.
Next, let's compare these different types of load balancers.
Comparison
Now that we have learned about each load balancer, let's have a look at a table that will help us put the most important features into one area:
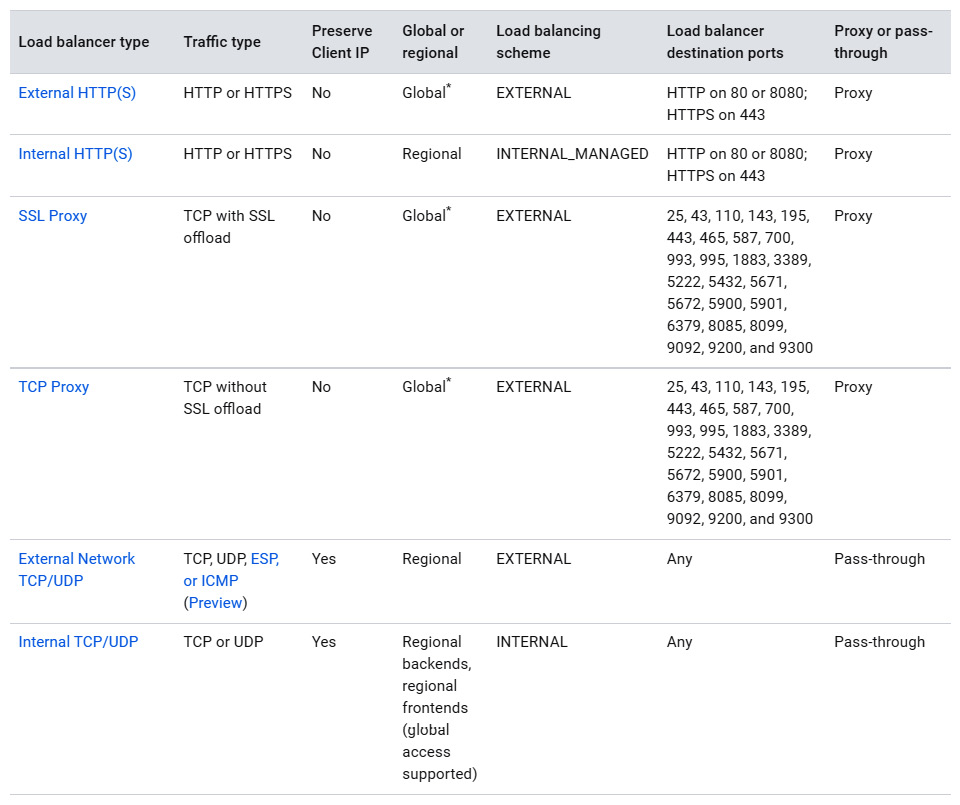
Figure 10.9 – Load balancer comparison (Source: https://cloud.google.com/load-balancing/docs/choosing-load-balancer. License: https://creativecommons.org/licenses/by/4.0/legalcode)
Looking at Figure 8.9, think about the use cases for each of the balancers. A good example could be a three-tier application. Which load balancer would you use to balance each tier?
Choosing the right load balancer
To choose the right load balancer, let's have look at the following diagram provided by Google:
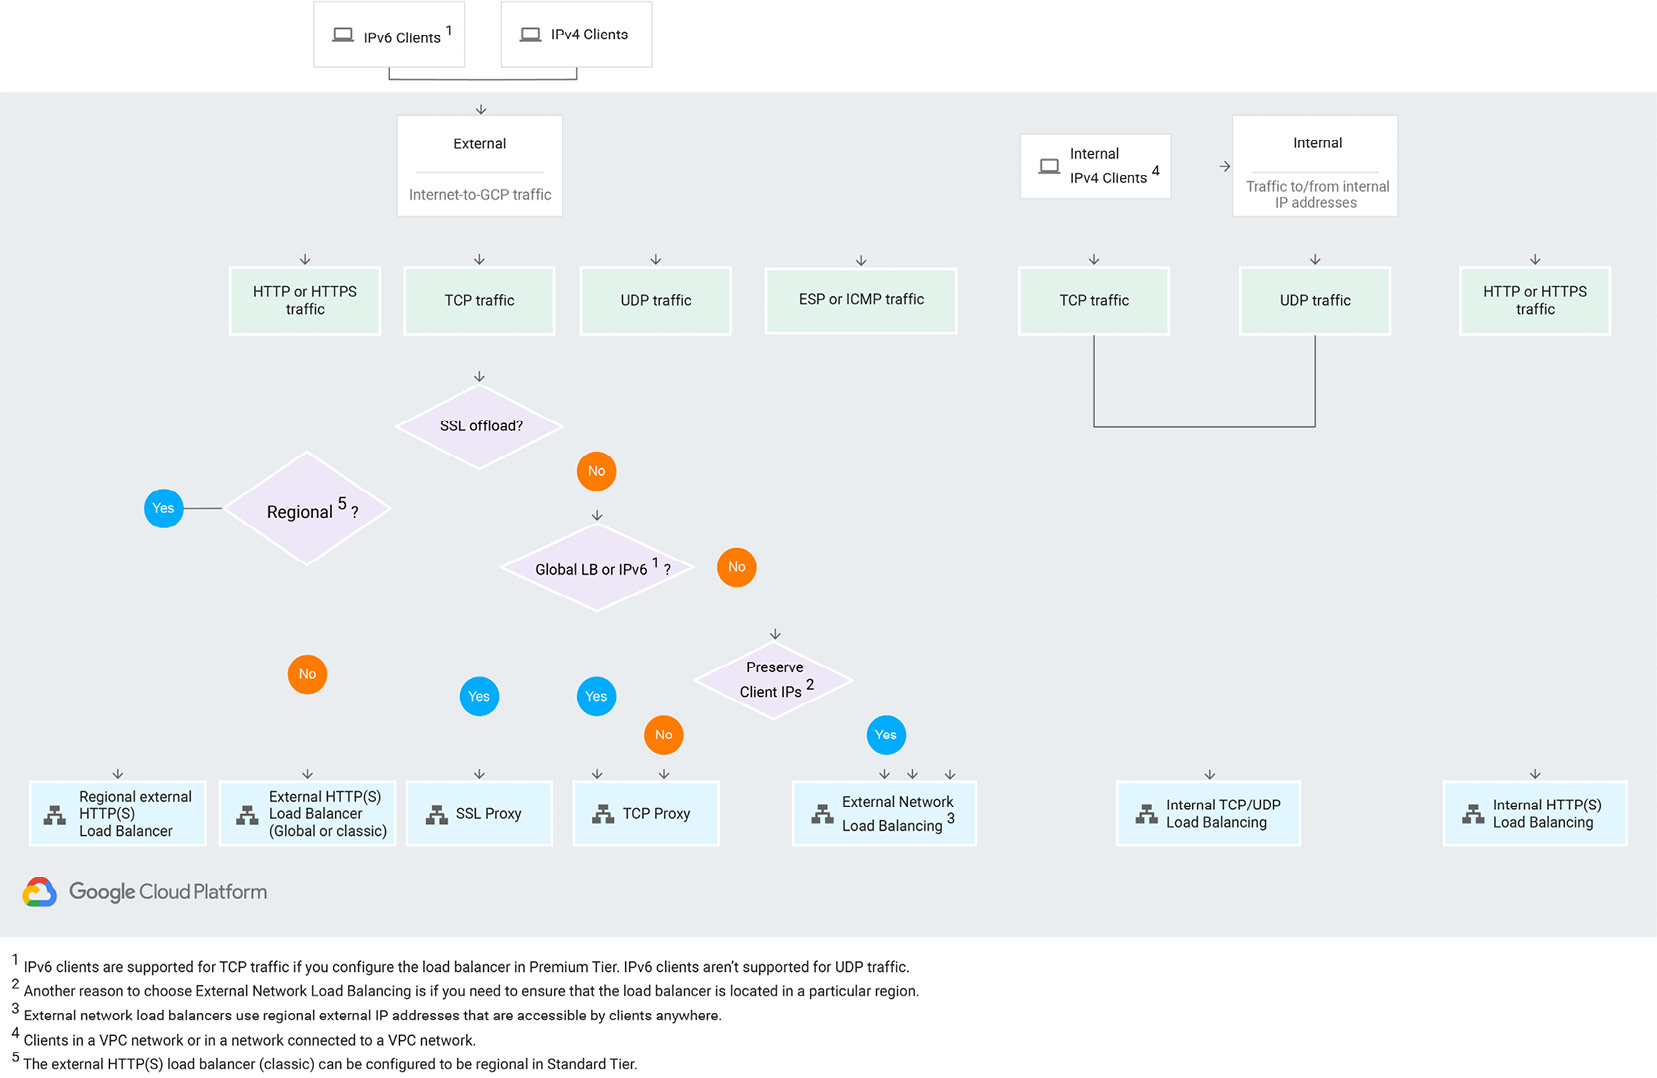
Figure 10.10 – Load Balancer considerations (Source: https://cloud.google.com/load-balancing/docs/choosing-load-balancer. License: https://creativecommons.org/licenses/by/4.0/legalcode)
Let's go through the preceding diagram step by step:
- First, we need to choose whether we want the load balancer to be accessible externally or internally. For external exposure, we choose what traffic we want to balance.
- For HTTP and HTTPS traffic, we use an HTTP(S) load balancer.
- For TCP traffic with an SSL offload, we would go for the SSL proxy. If we don't need the offload SSL but need IPv6 or global scope support, we would choose the TCP proxy.
- Then, we need to check whether we need to preserve client IPs. If yes, we go for the network load balancer; if not, we stay with the TCP proxy. The network load balancer can be also used for UDP traffic that does not need IPv6 or global scope.
- For internal load balancing, use an internal TCP/UDP load balancer.
As you can see, choosing the appropriate load balancer can be quite an intimidating task. However, if you follow the preceding flow chart, you should be able to choose the best option.
Now that we have understood how load balancing works, we will look at NAT.
NAT
NAT is a service that translates source and/or destination addresses when traffic passes through a routing device. In the case of GCP, NAT allows us to hide the original IP address of our VM when communicating with external networks. In the case of GCP, it allows VMs with internal addresses to access the internet.
There are currently two options for NAT, as follows:
- NAT gateway
- Cloud NAT
Google recommends using Cloud NAT over NAT gateway. If you are still using NAT gateway, Google recommends that you migrate it to Cloud NAT as it is a managed and self-scaling service.
NAT gateway
Google allows us to provision a VM that will act as a NAT gateway. This way, you are exposing only one VM to the internet. The gateway machine needs to be configured with the --can-ip-forward parameter, which allows traffic forwarding. You will also need to create default routes for the subnets that should be using the gateway. As you can see, this solution does not look scalable and introduces the concept of single points of failure.
To eliminate this problem, you can create multiple gateways and put them in managed instance groups. Next, you configure the routing rule to the NAT gateways with the same priority. In this case, GCP uses equal-cost multi-path (ECMP) to distribute the traffic between the NAT gateways.
Important Note
To find out how to create highly available NAT gateways, complete the Building High Availability and High Bandwidth NAT Gateways lab at https://www.qwiklabs.com/focuses/612?parent=catalog.
If this sounds complicated, fortunately, there is an easier solution. Yes, you guessed right! Cloud NAT.
Cloud NAT
Cloud NAT is a regional self-scaling service that's fully managed by Google. It allows VMs to access the internet without the need for an external IP address. It does not, however, allow inbound internet traffic to the VMs. This service is provided by Google SDN, so there are no gateway instances to manage. In fact, under the hood, there are no actual proxy VMs.
In terms of bandwidth, each VM gets exactly the same bandwidth it would get if it had an external IP.
Hybrid connectivity
By hybrid connectivity, we mean connectivity between GCP and your on-premises data center. It is important if you want to connect through a secure channel to GCP and not simply traverse the internet. There are a number of ways this connectivity can be achieved. The method you choose will depend on your reliability, bandwidth, and latency requirements.
Now, let's have a look at some possible hybrid connectivity options, that is, VPN Interconnect and peering.
VPN
Cloud VPN is a regional service that will securely connect your on-premises network to GCP VPC using an IPSec tunnel. All traffic traversing the internet through the tunnel is encrypted. Both the IKEv1 and IKEv2 ciphers are supported. The VPN connection requires a Cloud VPN gateway, an on-premises VPN gateway, and two VPN tunnels that are set up from the perspective of each gateway. A connection is established when both tunnels are created. The on-premise gateway can be either a hardware or software device. There is a special requirement that the MTU of your on-premises gateway should not be higher than 1,460 bytes. VPN supports both static and dynamic routes. Dynamic routes are managed by the routers in the VPC network and use Border Gateway Protocol (BGP), while static routes are created manually and support route next hops.
At the time of writing, Google offers two types of VPN gateways: HA VPN and Classic VPN.
HA VPN
An HA VPN, as you may suspect, is a highly available VPN solution that allows us to connect our on-premises network to a GCP VPC in a single region. Due to its highly available nature, an HA VPN offers a 99.99% SLA on service availability. When we create this type of VPN, GCP automatically creates two external IP addresses – one for each of its fixed interfaces and each HA VPN gateway interface supports multiple tunnels. We should note that it is possible to configure an HA VPN with only a single active interface and one external IP, however this will not offer the SLA mentioned. There are some requirements that need to be in place to achieve the 99.99% availability SLA. Let's discuss this in more detail:
- Availability is guaranteed only on the Google Cloud side of the connection, which means end-to-end availability will be dependent on the correct configuration of the peer VPN gateway. If the correct configuration is in place, then both sides are Google Cloud gateways and end-to-end 99.99% availability will be guaranteed. In order to achieve high availability when both VPN gateways are in VPC networks, we are required to use two HA VPN gateways, and both must be in the same region.
- Although both gateways must be in the same region, if our VPC network is configured for global dynamic routing mode, the routes to the subnets that the gateways share can be in any region. If we configure our VPC network for regional dynamic routing mode, then only routes to subnets in the same region will be shared with the peer network. Learned routes are applied only to subnets in the same region as the VPN tunnel.
- HA VPN must also reject Google Cloud IP addresses if they are configured in an external VPN gateway resource; for example, using the external IP address of a VM instance as the external IP address for the external VPN gateway resource. HA VPN must be used on both sides of a Google Cloud network in order to get a fully supported HA VPN topology.
We must also ensure that we configure two VPN tunnels from the perspective of the Cloud VPN gateway. This comes with specific requirements depending on our design:
- Two peer VPN gateway devices: This configuration requires that each of the tunnels from each interface on the Cloud VPN gateway must be connected to its own peer gateway.
- Single peer VPN gateway device with two interfaces: This configuration requires that each of the tunnels from each interface on the Cloud VPN gateway must be connected to its own interface on the peer gateway.
- Single peer VPN gateway device with a single interface: This configuration requires both tunnels from each interface on the Cloud VPN gateway must be connected to the same interface on the peer gateway.
- A peer VPN device must be configured with the appropriate redundancy. The device vendor will specify details of a redundant configuration, and this may differ depending on the vendor.
- If our design requires two peer devices, then each peer device should be connected to a different HA VPN gateway interface. If the peer side is from another provider, for example Azure, then VPN connections should be configured with appropriate redundancy on the Azure side as well.
- Finally, our peer VPN gateway device must support dynamic (BGP) routing.
Classic VPN
Classic VPN gateways have a single interface and a single external IP address. They support tunnels that use BGP or static routing and will provide an SLA of 99.9% service availability. We will not dwell too much on classic VPNs. From Q4 2021, we will no longer be able to use static routing to create classic VPN tunnels that connect to another classic VPN gateway nor connect a classic VPC network to another cloud provider network. You will also be unable to create a new classic VPN tunnel. Google encourages us to migrate our production traffic to an HA VPC.
Interconnects
Interconnect is a layer-2 connectivity method that incurs a monthly cost. You would use it when you need low latency and highly available connectivity between GCP and your on-premise network and you are planning for large data transfers.
It comes in two flavors, as follows:
- Dedicated Interconnect: The connection is established with Google Edge. Google charges us on an hourly basis and the cost is dependent on the size of the circuit (that is, 10 Gbps or 100 Gpbs). There is also a charge for egress traffic from a VPC network through a Dedicated Interconnect connection.
- Partner Interconnect: The connection is established with the Google partner network. Google also charges us on an hourly basis for VLAN attachments, depending on their capacity and egress traffic from a VPC network through a Partner Interconnect connection is also chargeable.
The connections can be scaled by introducing multiple links. For Dedicated Interconnect, each connection delivers 10-Gbps or 100-Gbps circuits. Up to eight 10-Gbps connections can be created, giving us a maximum of 80 Gbps total per interconnect or 2 x 100-Gbps (200 Gbps) circuits. With Partner Interconnect connections, bandwidth ranges from 50 Mbps to 50 Gbps. Interconnect comes with an uptime SLA of either 99.9% or 99.99%. This depends on your configuration and number of connections.
For more information on pricing scenarios, we recommend that you review https://cloud.google.com/network-connectivity/docs/interconnect/pricing.
Peering
Peering is a layer-3 connectivity method. It provides connectivity to services such as Google Workspace, YouTube, and Google APIs with public IP addresses. It allows us to establish connectivity with higher availability and latency. Note that those connections exist outside of GCP. Peering has no maintenance costs and also comes in two flavors, as follows:
- Direct Peering
- Carrier Peering
Direct Peering offers 10-Gbps connections per link established with a GCP PoP, which are points where the Google network connects with the rest of the internet. Carrier Peering bandwidth depends on the provider. Note that peering provides no SLA.
Choosing the right connectivity method
In general, Google's recommendation is to start the connectivity with Cloud VPN and move to Interconnect if needed. Again, Google comes with a nice flow diagram that will help you make the right choice when it comes to the best connectivity method for your situation:
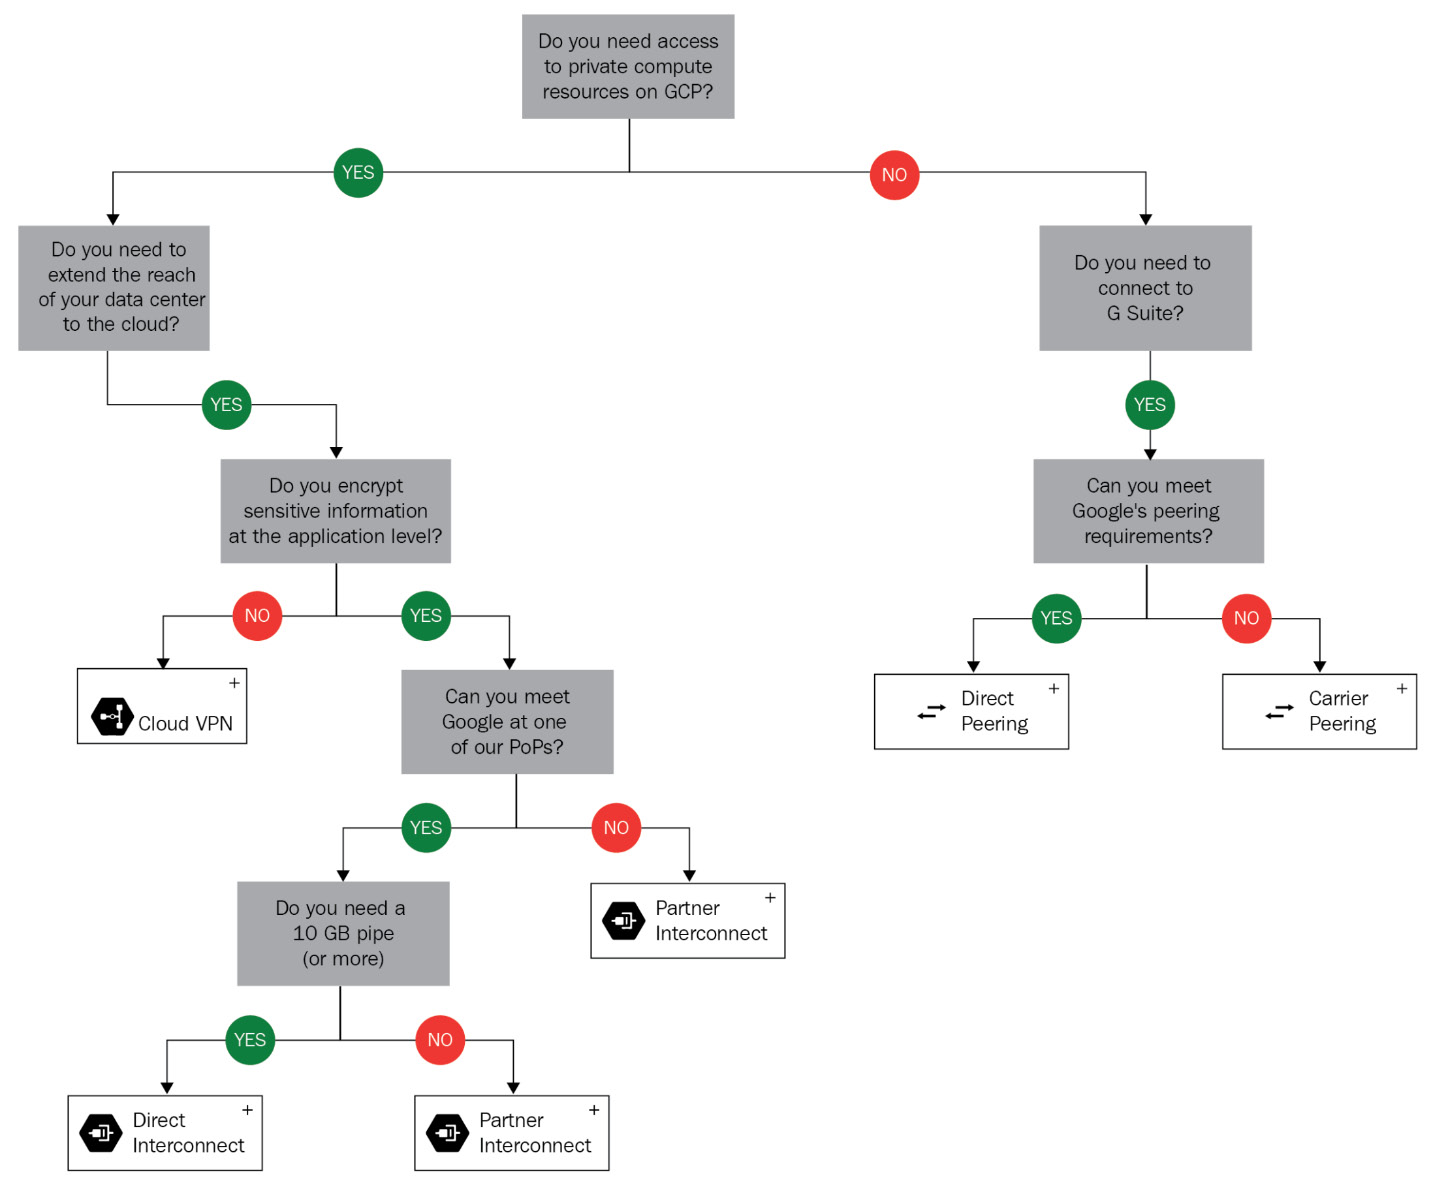
Figure 10.11 – Interconnect considerations (Source: https://cloud.google.com/hybrid-connectivity/)
This concludes the hybrid connectivity section. Again, think twice before you go for Interconnect connectivity. Unless you have high bandwidth and low latency requirements, start with VPN and only move to Interconnect if you aren't getting the desired results. In a later section, we will look at the Domain Name System (DNS), which is critical for proper hostnames and URL resolution.
Network Connectivity Center
Network Connectivity Center is a hub-and-spoke model for managing our network connectivity in Google Cloud. It allows us to connect our on-premises or other public cloud networks together using Google's network as a Wide Area Network (WAN) for data transfer. Using this service enables access to the global range and reliability of Google's network.
Using the hub-and-spoke model, sites are connected using various kinds of on-premises connections to connect to each other. For example, Data Center A could be connected to a VPC via a Cloud VPN, and Data Center B could be connected to the same VPC via Dedicated Interconnect. These sites are then connected via a Network Connectivity Center hub associated with the VPC.
DNS
DNS allows the resolution of domain names into IP addresses. There are a couple of concepts you need to understand when it comes to DNS in GCP, such as the following:
- DNS resolution
- Cloud DNS
- DNS Security (DNSSEC)
DNS resolution
VPCs come with internal DNS services. Machines get their internal names registered automatically within an internal zone. This allows VMs within the same network to access each other using the internal DNS names. The DNS record follows the life cycle of the VM. It's created when the VM is created and is deleted when the VM is deleted. This means that names are created when the instance is deployed and are removed when the instance is deleted. Note that the records are only created for internal IPs (not external and alias IPs). The resolution only works for VMs within the same VPC.
As you probably know, there are many types of DNS records (A, MX, SRV, CNAME, and so on). The actual records that are created in this case are so-called A records. These are records that translate the hostname into an IP address. They are created using the following pattern:
<INSTANCE_NAME>.c.<PROJECT_ID>.internal
Here, INSTANCE_NAME is the hostname that is auto-generated by GCP and PROJECT_ID is the ID of the project in which the VM is deployed.
When a VM is provisioned, the IP settings are configured automatically. The VMs DNS server setting is also configured and is pointing to its metadata server. For public name resolutions, queries are forwarded to Google's public DNS servers. For external IPs, the records are not registered automatically. They can be registered in external DNS servers or in a DNS zone hosted in the Cloud DNS service.
Cloud DNS
Cloud DNS is a managed service that allows you to host millions of DNS records without the need to manage any servers or software. As this is hosted on the same infrastructure on which Google is hosted, it provides an uptime SLA of 100%.
Cloud DNS allows us to create managed zones that will contain multiple records. To migrate from your current provider, you can export the zones and then import them into Cloud DNS. The records can be managed using APIs and the gcloud command.
DNSSEC
DNSSEC is a DNS extension that allows the authentication of domain lookup responses. It protects the requester from the manipulation and poisoning of DNS request responses. In GCP, DNSSEC can be enabled per DNS zone. Note that it also needs to be configured at your domain registrar. On top of that, the requester needs to make sure that the resolver on their workstation validates signatures for DNSSEC-signed domains.
Important Note
For more details, refer to https://cloud.google.com/dns/docs/dnssec.
VPC firewall rules
A firewall is either a hardware or software device that filters network traffic that's passing through it. This filtering can be done based on many conditions, such as the source, target IPs, protocol, or ports. It allows you to secure your network from unwanted access.
The firewall rules allow you to control traffic flow to and from VM-based instances. Firewall rules work independently of the VM operating system and are always enforced if put in an enabled state. VPC acts as a distributed firewall that leverages micro-segmentation. This means that the firewall rules are enforced per VM, even if the machines reside in the same network. It should be noted that it does not have the ability to analyze the contents of data packets. The firewall rules are constructed of the following components:
- Ingress (inbound) firewall rules:
- Priority 0: 65545 with a default value of 1000
- Action: allow or deny
- Enforcement: enabled or disabled
- Target (destination): All instances in the network, tag, and service account
- Source: Address range, subnet, service account, and network tag
- Protocol and ports: Allow all or specify a protocol(s) and port(s) egress (outbound) firewall:
- Priority 0: 65545 with a default value of 1000
- Action: allow or deny
- Enforcement: enabled or disabled
- Target (source): All instances in the network, tag, and service account
- Destination: Address range and subnet
- Protocol and ports: Allow all or specify a protocol(s) and port(s)
We can further divide these firewall rules as follows:
- Default firewall rules
- Implied rules
- Always allowed traffic rules
- Always denied rules
- User-defined rules
- GKE firewall rules
The preceding rules are the actual rules that you would define once you have an understanding of what traffic you need for your infrastructure and application to communicate. The default rules are defined by Google to provide the basic protection and functionality that are needed so that you can manage your environment. Now, let's have a closer look at each of them.
Default rules
There are a number of allow ingress firewall rules with a priority of 65534 that are created for the default network, as follows:
- default-allow-internal: Ingress connections for all protocols and ports between instances in the VPC
- default-allow-ssh: Ingress connections on TCP port 22 from any source to any instance in the VPC
- default-allow-rdp: Ingress connections on TCP port 3389 from any source to any instance in the VPC
- default-allow-icmp: Ingress ICMP traffic from any source to any instance in the VPC:
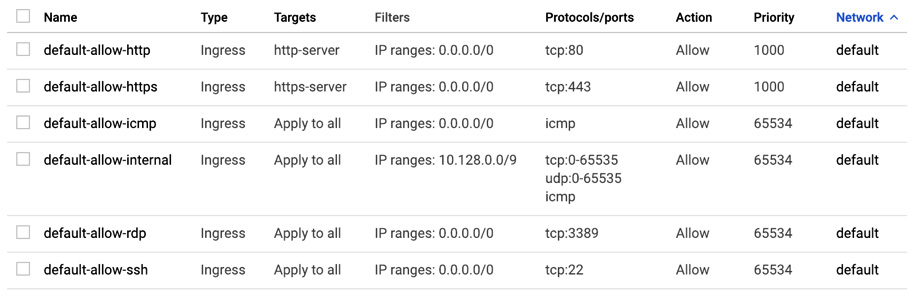
Figure 10.12 – Firewall rules
There are also predefined rules for HTTP and HTTPS traffic. The targets for those rules are tags. You can assign those tags to your VMs to allow this type of traffic from any source.
Implied rules
There are two implied firewall rules with the lowest possible priority (65535), as follows:
- Deny ingress rule with source 0.0.0.0/0
- Allow egress rule with destination 0.0.0.0/0
At this point, it may be beneficial just to clarify that 65535 is the lowest possible priority, and 0 is the highest. Also, the IP range 0.0.0.0/0 is equivalent to all IPv4 addresses. The rules cannot be removed but can be overridden by any rules that have higher priority.
Always allowed traffic rules
There are certain types of traffic that are always allowed from a VM, as follows:
- Traffic to a metadata server
- DHCP traffic
- DNS traffic
- NTP traffic
Always denied rules
There are also types of traffic that are always blocked, as follows:
- GRE traffic
- Protocols other than TCP, UDP, ICMP, AH, ESP, SCTP and IPIP
- Egress SMTP traffic on TCP port 25
User-defined rules
Finally, user-defined rules are the rules that you would define to allow communication that's needed for your application that does not match the default, always allowed, or implied rules:
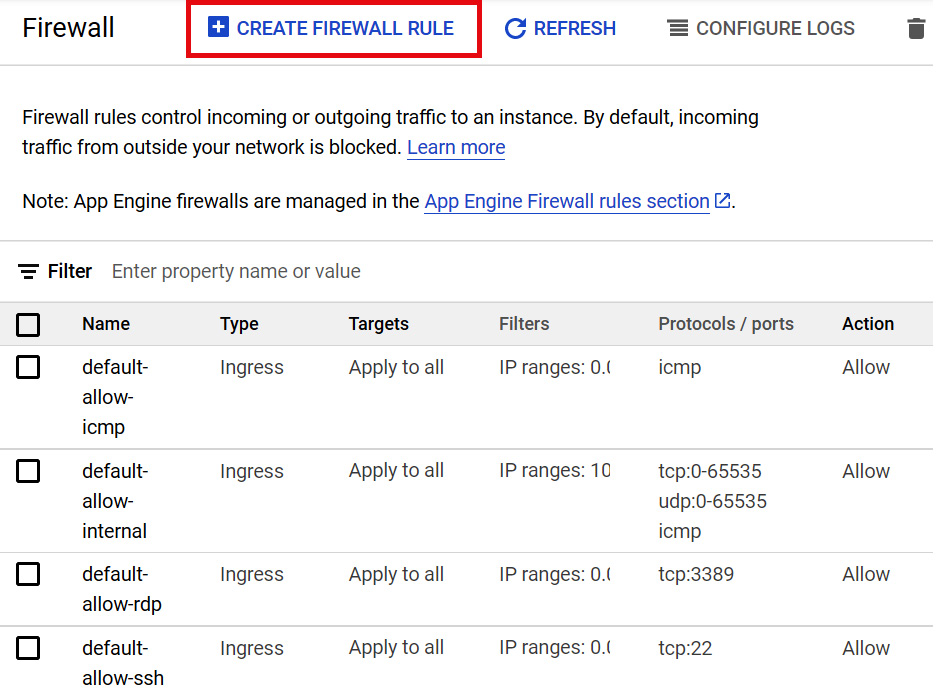
Figure 10.13 – Create firewall rule
These rules can be created by going to the Navigation menu, VPC network | Firewall, and clicking CREATE FIREWALL RULE.
Firewall logging
Firewall logging allows you to verify whether your firewall rules are functioning correctly. It can be enabled for new and existing firewall rules. The logs are injected into the Google Cloud operations suite (formerly Stackdriver).
Hierarchical firewall policies
Hierarchical firewall policies allow us to create and enforce consistent policies across our organization. They can be assigned to our organization as a whole or to individual folders. Like VPC firewall rules, hierarchical firewall policies contain rules that can deny or allow connections but can additionally delegate evaluation to lower-level policies or VPC network firewall rules with the goto_next action. This allows organization-wide admins to manage firewall rules in one place.
We should note that creating a policy at organization or folder node level does not automatically apply a rule to the node – the policy needs to be associated with nodes in the organization and a single policy can be associated with multiple nodes. Policies are containers for firewall rules and when we associate a policy with an organization or folder, the rules are applied immediately. We can swap policies for a node, which atomically swaps all the firewall rules applied to a VM instance under that node. Rules associated with the organization node are evaluated first and any folders and VPC networks in the organization will inherit this policy. If policies are applied to a folder, then all folders and VPC networks in this folder will inherit its associated policy. Hierarchical policies cannot be associated with projects. The levels of hierarchy at which firewall rules can be applied are shown in the following diagram:
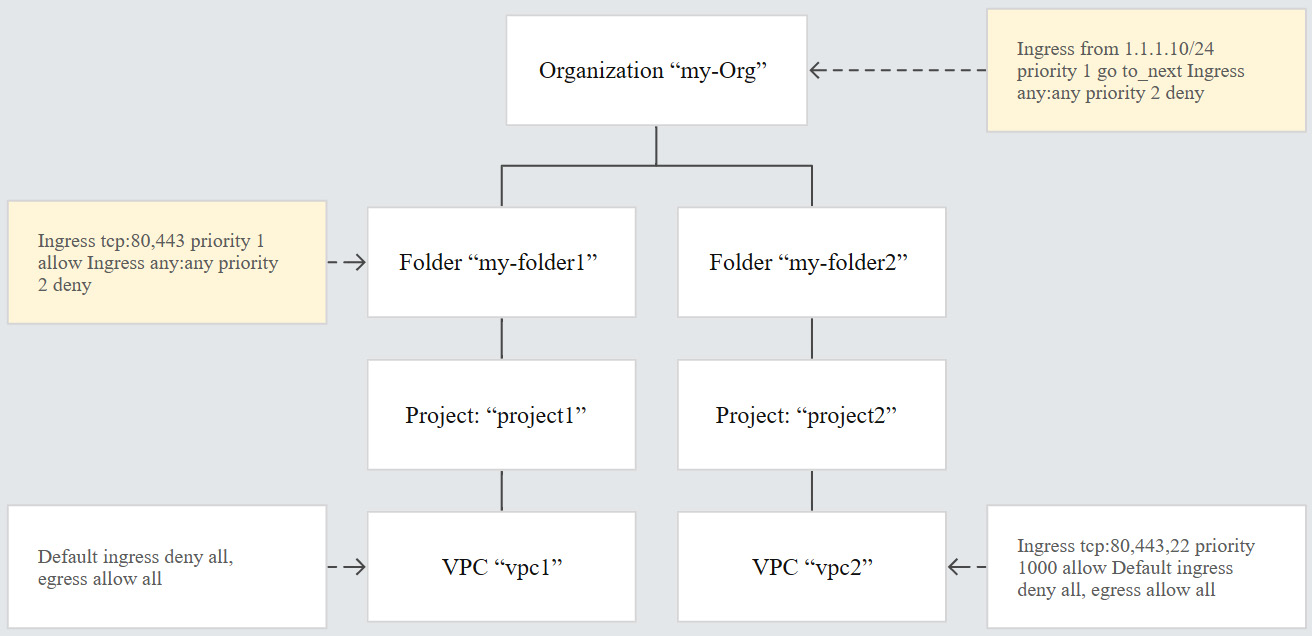
Figure 10.14 – Hierarchical policy inheritance (Source: https://cloud.google.com/vpc/docs/firewall-policies)
Hierarchical firewall policy rules must have a specified priority that will be unique to each policy. This is unlike VPC firewall rules, which can have multiple rules that have the same priority. Additionally, firewall policy rules do not have names, but rather the policy itself has an ID and a name, and each rule has a unique priority number. Rules are then evaluated in priority order starting with the highest priority rule, which is represented by the lowest number. For example, a rule with priority number 100 would override a rule with 200.
To create a firewall policy from Google Cloud Shell, use the following code and replace your organization ID and folder ID:
gcloud compute firewall-policies create \ [--organization ORG_ID] | --folder FOLDER_ID] \ --short-name SHORT_NAME
We would then add the rule the policy by using the following. We have used an example org ID:
gcloud compute firewall-policies rules create 1000 \ --action=allow \ --description="allow-scan-probe" \ --layer4-configs=tcp:123 \ --firewall-policy=example-firewall-policy \ --organization=123456789\ --src-ip-ranges=10.100.0.1/32
Finally, associate the firewall policy with the organization node. We have used an example org ID:
gcloud compute firewall-policies associations create \ --firewall-policy=example-firewall-policy \ --organization=123456789
In the next section, we will look at private access options.
Private access options
Google provides various options to let VM instances reach supported APIs and services without the need for an external IP address. Depending on your use case you can configure one or all of the options available and they operate independently of each other. As a high-level overview, here are the reasons for using each option:
- Private Service Connect for Google APIs: Used to connect to Google APIs and services using an endpoint in our VPC network if on-premises and GCP resources don't require an external IP address.
- Private Google Access: Used to connect to Google APIs and services without giving our GCP resources external IP addresses.
- Private Google Access for on-premises hosts: Used to connect to Google APIs and services through a VPC network if your on-premises host does not require an external IP address.
- Private Service Connect for services: Used to connect to supported services in another VPC network without assigning an external IP address to our GCP resources.
- Private Services Access: Used to connect to specific Google or third-party services without assigning our GPC or third-party resources an external IP address.
- Serverless VPC Access: This is used to connect directly from a serverless Google service to resources in a VPC network using internal IP addresses.
There are also DNS considerations when using private access, so it is important to look further into each option and understand its impact. As an example, if we wanted to use the Private Google Access for on-premises host option, our on-premises network must have DNS zones and records configured so that Google domain names resolve to the set of IP address for either private.googleapis.com or restricted.googleapis.com.
Important Note
For more details, check out the Google documentation at https://cloud.google.com/vpc/docs/private-access-options.
Summary
In this post, we have gone through basic networking concepts in GCP. We have learned about VPC, load balancing, firewall, DNS, and hybrid connectivity. Make sure that you understand how you connect VMs to the GCP network, as well as how to protect and load balance them. Now that you have an understanding of different ways to connect to your on-premises data center, we suggest that you get some hands-on experience. Set up your first VPC, create firewall rules, and deploy and manage a VM instance group with a load balancer of your choice. If you have any problems doing this, return to this book and check this post or This Article, Working with Google Compute Engine.
In This Post, Exploring Storage and Database Options in GCP – Part 1, and The Post, Exploring Storage and Database Options in GCP – Part 2, we will see how we can store data. This is essential for stateful workloads.
Further reading
The overview of networking services that we provided in this post should be good enough for the exam. If you still feel like you need a deeper knowledge of GCP networking, check out the following links:
- VPC: https://cloud.google.com/vpc/docs/
- Firewalls: https://cloud.google.com/vpc/docs/firewalls
- Load balancing: https://cloud.google.com/load-balancing/docs/
- Interconnects: https://cloud.google.com/interconnect/docs/
- VPN: https://cloud.google.com/vpn/docs/
- DNS: https://cloud.google.com/dns/docs/
- NAT: https://cloud.google.com/nat/docs/
- Alias IP addresses: https://cloud.google.com/vpc/docs/alias-ip