Google Compute Engine (GCE) is one of the fundamental services inside Google Cloud Platform (GCP). While the public cloud continues to move on from traditional Virtual Machines (VMs), there are still use cases for these machines and, just like other vendors, GCE allows us to create and run VMs on GCP. Google refers to a VM in GCP as a Compute Engine instance. Compute Engine makes it easy to find the VM to match our requirements, whether it is a small-sized VM or a large data-processing VM.
GCE is a purely Infrastructure-as-a-Service (IaaS) solution; therefore, you will need to manage and scale your VM as necessary, but this makes it an ideal solution for lift and shift migration from on-premises into the public cloud. You can use your own customized OS as you do within your own data center or you can use some predefined Google, Windows, or Linux images. You can also bring your own license for Windows, but this comes with some considerations. Throughout the GCE section of this post, we will look at how we can deploy a simple GCE instance, the options available to us when we deploy, and more complex solutions that enable us to scale out with ease.
In this article, we will take a deeper look into Compute Engine. Specifically, we will cover the following topics:
- Deploying our first GCE instance
- Deployment options
- Instance templates and instance groups
- Autoscaling
- Autohealing
- Quotas and limits
- IAM roles
- Pricing
Deploying our first GCE instance
Let's begin this post with the basics of provisioning a new VM. We can do this from the GCP console. In this section, we will look at the very basics needed to deploy a VM. We will look at the deployment options in more detail in the next section of this article:
- First, we should sign into the GCP console, then browse to the navigation menu, and go to Compute Engine | VM instances, as shown in the following screenshot:
Important Note
You may be prompted to enable the Compute Engine API when using Compute Engine for the first time.

Figure 4.1 – Browsing to VM instances
- Click ENABLE to enable the Compute Engine API (this is a one-time enablement when we are creating our first Compute Engine instance):

Figure 4.2 – Enabling API
- Click CREATE INSTANCE, as shown in the following screenshot:

Figure 4.3 – Creating an instance
- Give your VM a name; in this example, we called it cloudarchitect. We can select a region and a zone along with the size of the machine. Some zones are more expensive than others and you will notice that, depending on the zone and machine type, we can see the estimation of the cost of our instance change:

Figure 4.4 – Selecting a region and zone
- If we look at the options under the Machine configuration menu, we can select the machine family we want. This gives us the option to select machines for common workloads, high-performance workloads, memory-intensive, or optimized for machine learning. The following screenshot shows us selecting the E2 series of machine from the General-purpose machine family:

Figure 4.5 – Selecting a machine configuration
- However, if this does not meet our requirements, we can also select a custom machine type and select the exact resources we need. We should think of 1 vCPU as 1 hyper-threaded core:

Figure 4.6 – Custom type
- The boot disk selection allows us to select the image we require. For now, let's select Windows Server 2019 Datacenter, as shown in the following screenshot (please note that Windows Server instances are no longer eligible as part of the Free Tier trial):

Figure 4.7 – Selecting a boot disk
- Leave everything else as default; we will look at other settings in more detail shortly in this section. Click Create to begin the deployment.
- Now that we have a VM, we need to connect to it. Within the Compute Instance section, we will now see our new VM. Simply click on the arrow beside RDP and select Set Windows password. Once we've set our password, click on the RDP button:

Figure 4.8 – Setting a Windows password
Important Note
Remote Desktop Protocol (RDP) allows us to connect to another Windows server over a network connection.
- Click SET, as shown in the following screenshot:

Figure 4.9 – Setting a password
- We can now copy this password and use this to RDP to our GCE instance:

Figure 4.10 – Copying a password
- If we created a Compute Engine instance with a Linux-based OS, then we simply need to click SSH, as shown in the following screenshot:
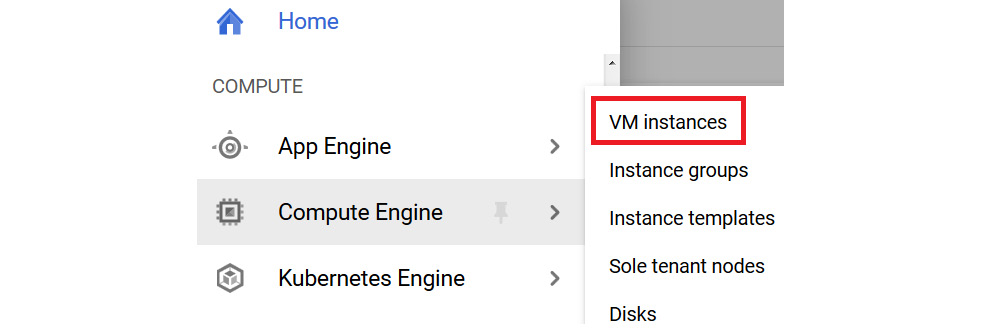

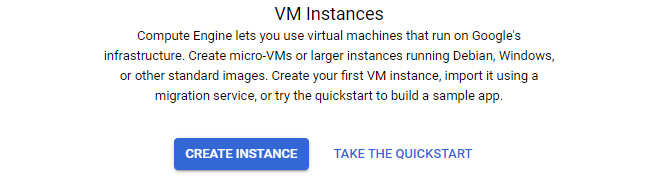
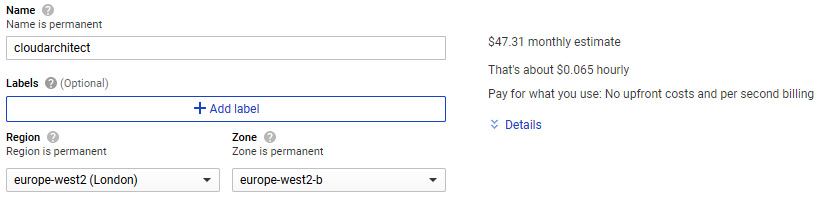

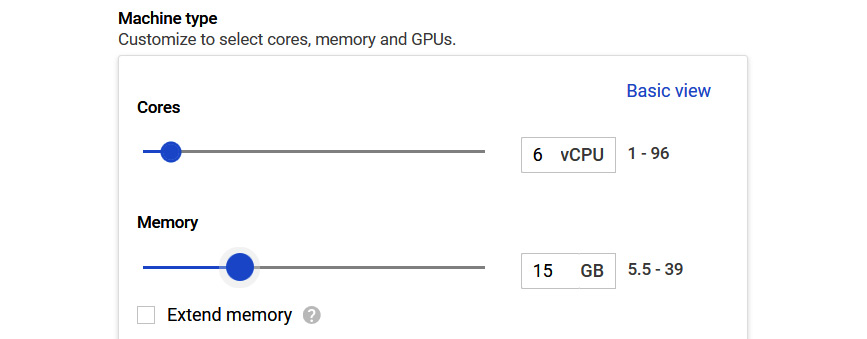
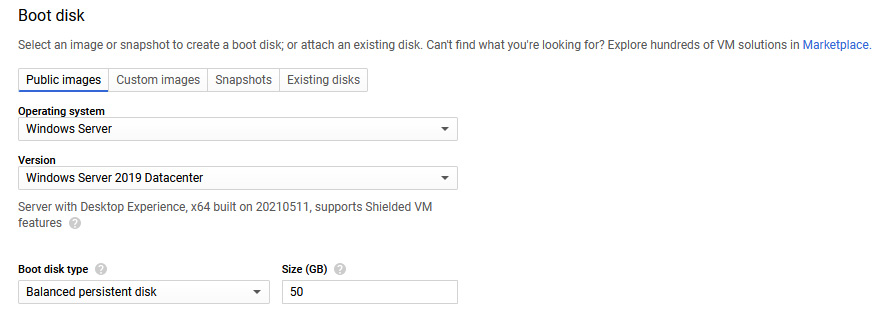
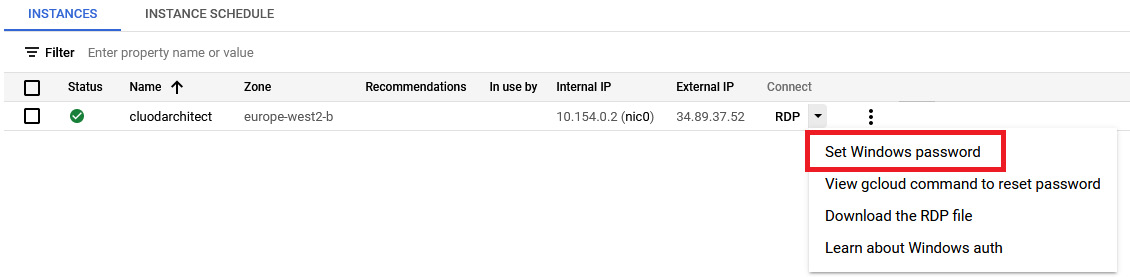
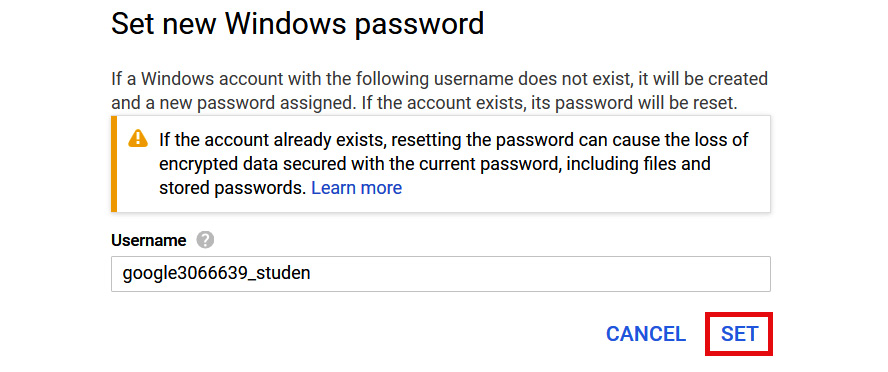
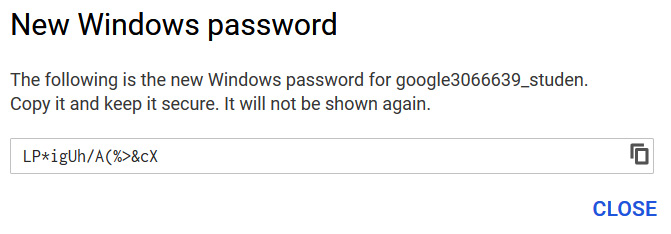
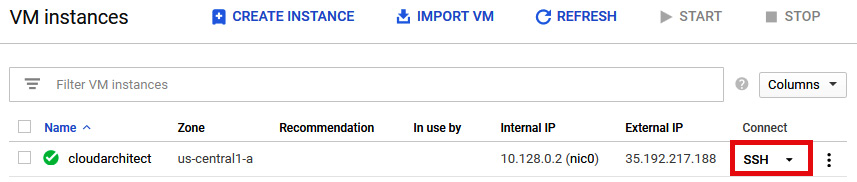
Figure 4.11 – SSH
Exam Tip
If you do not have an external IP, then a bastion host should be used, also referred to as terminal servers. If you need access to resources that have internal IP addresses only, then bastion hosts are configured with external IP addresses and act as a gateway to your internal resources.
As expected, we can also deploy a GCE instance from the command line. The CLI of choice to create a VM is gcloud via Cloud Shell. We will look at Cloud Shell in more detail in This Post, Google Cloud Management Options, but for now, just understand that it is a command line available directly from the GCP console, and it gives us the ability to quickly create our VM instances:
- To activate it, click on the Cloud Shell icon in the top right-hand corner:

Figure 4.12 – Activating Cloud Shell
One feature to note is that following the aforementioned process to create a VM from the GUI, underneath the Create button, you will find the Equivalent REST or command line options, as shown in the following screenshot:

Figure 4.13 – REST or command line
- Click on the command line option to open up the exact CLI you would need to create using gcloud commands:

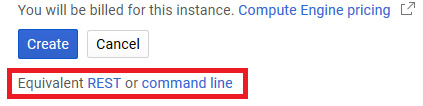
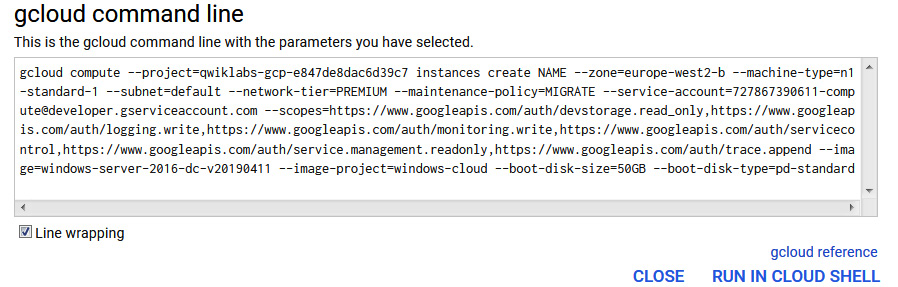
Figure 4.14 – A command line example
You can copy the text or click RUN IN CLOUD SHELL, which will activate your Cloud Shell instance and execute the request.
Deployment options
You will notice that there are some options we left as default. Let's look at these in a bit more detail to make sure we understand all of the settings required to create a Compute Engine instance.
Region
Regions are geographical locations that are made up of three or more zones. We need to select a region where we can run our VM. The requirements may be related to where most traffic is expected. As we have mentioned, some regions are more expensive than others:
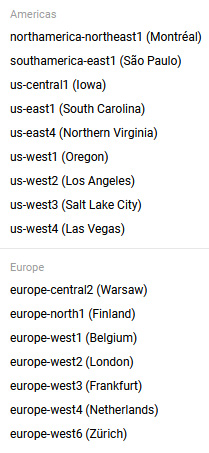
Figure 4.15 – Regions
Make sure the selected region makes sense based on your requirements.
Zone
Make sure you select a zone that suits your requirements. Consider network latency and select a region or zone close to your point of service:

Figure 4.16 – Zones
All zones in a region are connected through a high-bandwidth and low-latency network – usually below 5 minutes for a round trip between each zone.
Boot disk
We have already seen that many predefined images can be selected. The default storage for these images is a balanced persistent disk. This type of disk is backed by Solid State Drives (SSDs) and balances performance and cost. This can be changed to a standard persistent disk, which is backed by standard HDD, or SSD persistent disks, which are backed by SSDs. The default size will change depending on the OS image selected, but this can be adjusted:
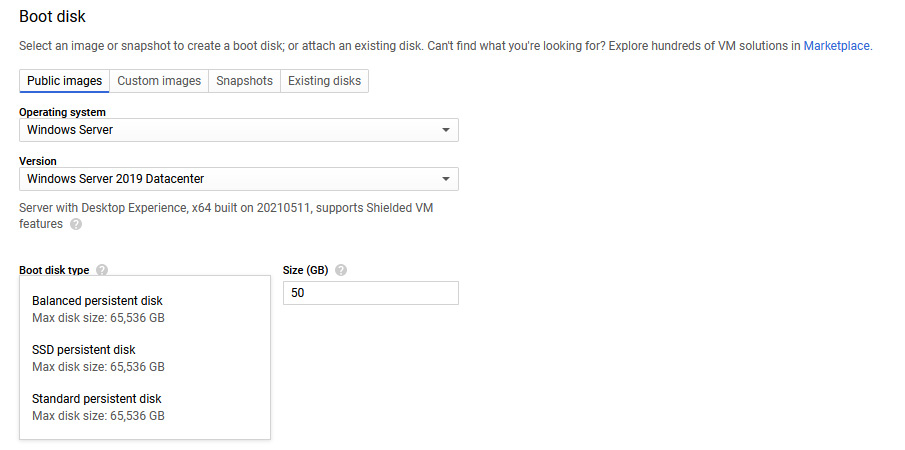
Figure 4.17 – A boot disk type
Changes from the default will again impact the cost of your instance.
Custom images are available per project and can be created from source disks, images, snapshots, or images stored in cloud storage.
Snapshots
It is possible to snapshot a persistent disk and use this as part of a new instance creation, even if is still attached to a running instance. Snapshots can be used to create a new custom image or instance. Snapshots can be created for a number of reasons, one of which is data protection. It is recommended to have a snapshot schedule to reduce data loss. Snapshots are also global resources, which means they are accessible by any resource in the same project.
To create a snapshot from the console, we should browse to the navigation menu and then to Compute Engine | Snapshots. Then, we must give our snapshot a name and select the source disk we wish to work with. Lastly, we can select the location we wish to store the snapshot, as shown in the following screenshot:
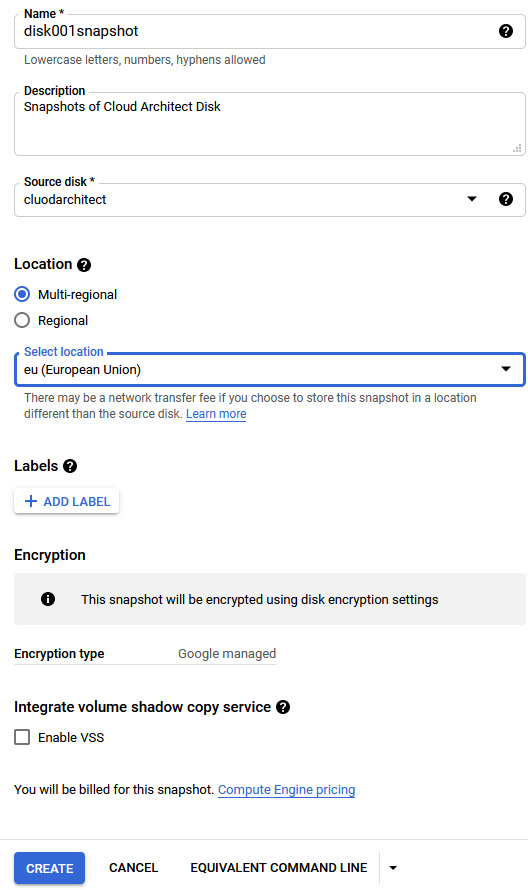
Figure 4.18 – Creating a snapshot
The following diagram shows how the process of multiple snapshots works. The first snapshot will be a full snapshot of all the data on the disk, and subsequent snapshots will be incremental:
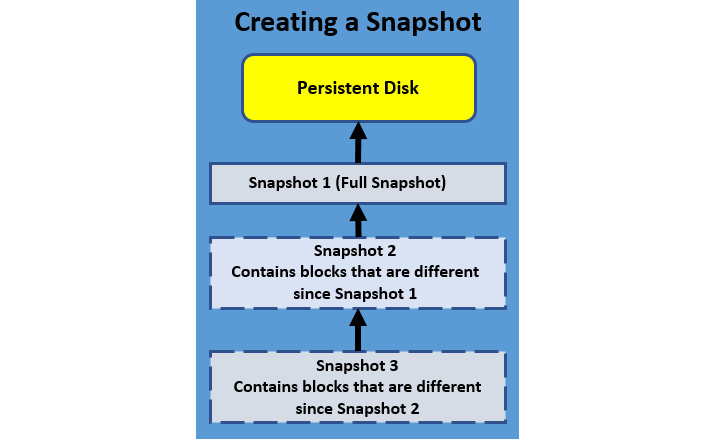
Figure 4.19 – Multiple snapshots
Important Note
Snapshots are incremental and, therefore, will contain blocks that are different from the previous snapshot. Therefore, if you perform regular snapshots, the cost is less than performing a regular full image of the disk. Each snapshot is stored across multiple locations within GCP for redundancy. Snapshots can be stored across projects with the correct permissions.
The exam will not go into great detail on snapshots, but more information can be found here: https://cloud.google.com/compute/docs/disks/create–snapshots.
Existing disks
Existing disks can also be attached to a new instance. To create a new disk, we can browse to the navigation menu and go to Compute Engine | Disk. The following screenshot shows us creating a new blank disk:
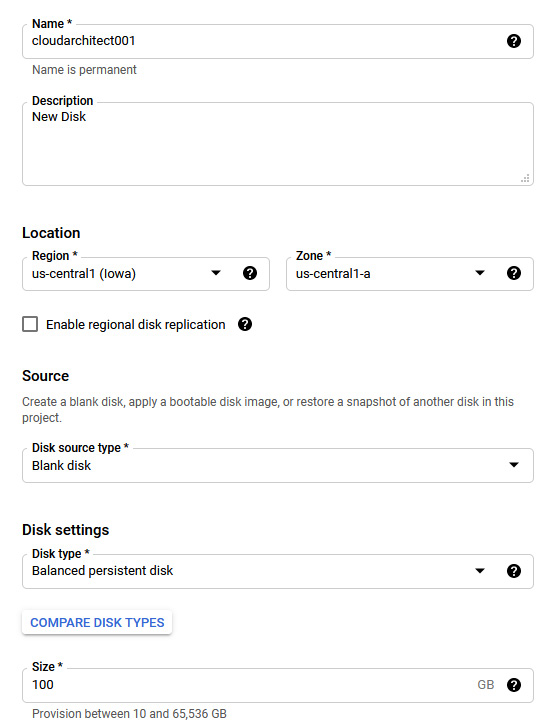
Figure 4.20 – A new disk
Once successfully created, we can use this new disk when we deploy a new Compute Engine instance. The following screenshot shows how this would look when we click on the Existing disks tab. We can see all of the disks available to us:
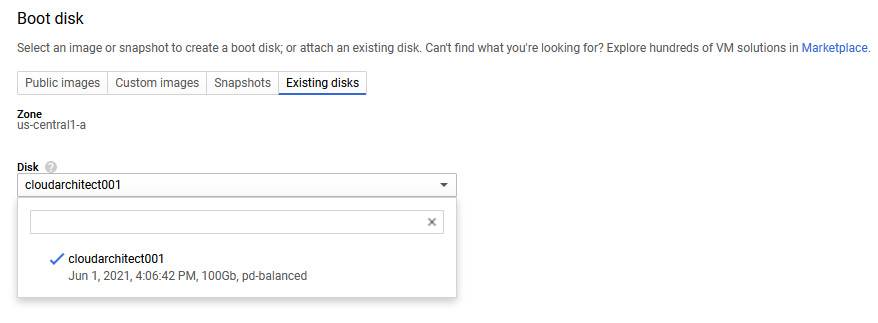
Figure 4.21 – Existing disks
We can also see, from the preceding screenshot, that we can use a snapshot of a disk as our boot disk. We discussed how to take snapshots earlier in this post.
Labels
There are a number of additional options that can be modified. To group-related resources, it can be beneficial to label your VM instances. This can help with organizing and filtering for billing and reporting. Labels work with key-value pairs and can be used, for example, to differentiate between projects, environments, and so on. Simply click Add label and you will be presented with a popup to add your key-value pair, which will be saved and added into the main Create Instance screen, as follows:

Figure 4.22 – Labels
The preceding screenshot is an example of this, where we can label an instance as the production environment.
Confidential VM service
Enable this option to encrypt data while in use. This will keep data encrypted in memory during processing without Google having access to the encryption keys:

Figure 4.23 – Confidential VM service
Container
Enable this option to deploy and launch a Docker container using a Container-Optimized OS (COS). Note you can only deploy one container for each VM instance. This is separate to Google Kubernetes Engine (GKE), which we will discuss in This Post, Managing Kubernetes Clusters with Google Kubernetes Engine:

Figure 4.24 – Container
The preceding figure shows the simple checkbox to deploy a container image.
Enable this to prevent your GCE instance from accidental deletion. Checking this box will set the deletionProtection property on the instance resource. Usually, only critical VM instances that need to stay running indefinitely would have this option checked. Even after this is checked, instances can still be reset, stopped, or even removed after a project is terminated. Only users who have compute.instance.create permissions can modify this flag to allow a protected VM to be deleted.
Reservations
Reservations can be created for VM instances in specific zones using custom or predefined machine types. Use reservations to ensure resources are available for your workloads when you need them; however, as soon as you create a reservation, you will immediately begin paying for it until the reservation is deleted. Increases in demand should be considered before using reservations. This option allows you to select an existing reservation, create a new one, or use none.
Metadata
Adding metadata to your GCE instance allows future queries to pull information about the instance. Metadata is stored on a metadata server and can be queried from the Compute Engine API or from the instance itself. We can pull information such as hostname, instance ID, or any custom metadata we apply. We can also provide configuration information to applications using metadata, which will negate the need to store this data in the application itself.
We also use metadata to reference the startup script to be executed during our instance deployment. Let's assume we host our startup script called startup.sh on a Cloud Storage bucket called deployments. To ensure it is executed, we need to add the path to our bucket and the startup script:
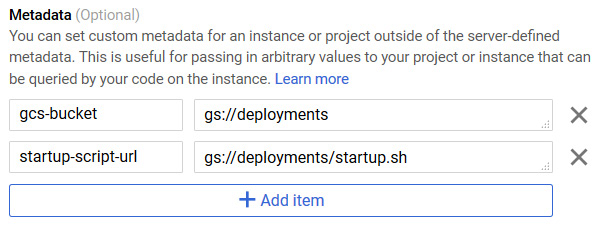
Figure 4.25 – Metadata
The preceding screenshot shows how this would look in the console.
Startup scripts
When populating the variables for a GCE deployment, we can also set a startup script if we wish. This is a script that will run when your instance boots up or restarts. Common examples would be to install specific software or ensure services are started. These scripts are specified through the same metadata server we previously mentioned and use the startup script metadata keys. Again, these scripts can be added via gcloud commands as well as at the console. Let's look at the example commands from the CLI. This is installing apache2 and populating the main page. Please note that after running this code, GCP will ask us to confirm the zone:
gcloud compute instances create cloudarchitect ––tags http–server \
––metadata startup–script='#! /bin/bash
# Installs apache and a custom homepage
sudo su –
apt–get update
apt–get install –y apache2
cat <<EOF > /var/www/html/index.html
<html><body><h1>Hello World</h1>
<p>This page was created from a simple start up script!</p>
</body></html>
EOF'
It is also possible to specify a script that resides on Google Cloud Storage. Again, from the gcloud CLI, we can specify our bucket location. In this example, our bucket is called cloudarchitectbucket:
gcloud compute instances create example–instance ––scopes storage–ro \
––metadata startup–script–url=gs://cloudarchitectbucket/startupscript.sh
Exam Tip
If we want to specify a shutdown script, then we will browse to the metadata section and add shutdown–script as the key and add the contents of the script as the value.
We should note that startup scripts will only be executed when a network is available.
Preemptibility
Preemptibility brings the cost of an instance down but will generally only last a maximum of 24 hours before it is terminated. Certain actions, such as stopping and starting an instance, will reset this counter. It might sound strange to deploy VMs that have such a limited lifecycle, but if we have fault tolerance at an application level, then utilizing preemptible instances can result in significant cost savings. Let's take the example of batch-processing jobs.
These could run on preemptible instances, and if some of the instances are terminated, then the process will slow down but not stop entirely. This allows batch processing to occur without any additional workload on existing instances. We should note, however, that due to the nature of preemptible instances, there is no GCP Service-Level Agreement (SLA) applied, and they can be removed by the provider with only 30 seconds' notification.
To set up a preemptible instance, simply select On under Availability policy while creating a new instance:
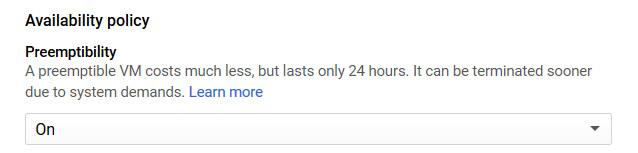
Figure 4.26 – Preemptibility
Availability policy
Compute Engine will perform maintenance on its infrastructure, which may require your VM instances to be moved to another host. GCE will live-migrate your instance if the instance's availability policy was set to use this feature. As a result, your applications will not suffer from any downtime but may witness some performance degradation. Live migration is the default setting for an instance.
Alternatively, if you have built-in high availability at the application level, then you may wish to change this setting to terminate and restart on another host. This setting means that your instance would be shut down cleanly and restarted on a fresh host. Google will report any maintenance issues and how it affects your instance, depending on the setting selected.
Automatic restart
If underlying hardware causes your instance to crash, then GCE offers a setting to automatically restart the instance. This is set to On (recommended) by default. You can set this to Off by selecting from the drop-down menu:

Figure 4.27 – Automatic restart
Google will report any automatic restart under Operations from the Compute Engine menu, as shown in the preceding screenshot. Once we have selected this, we can view any alerts:
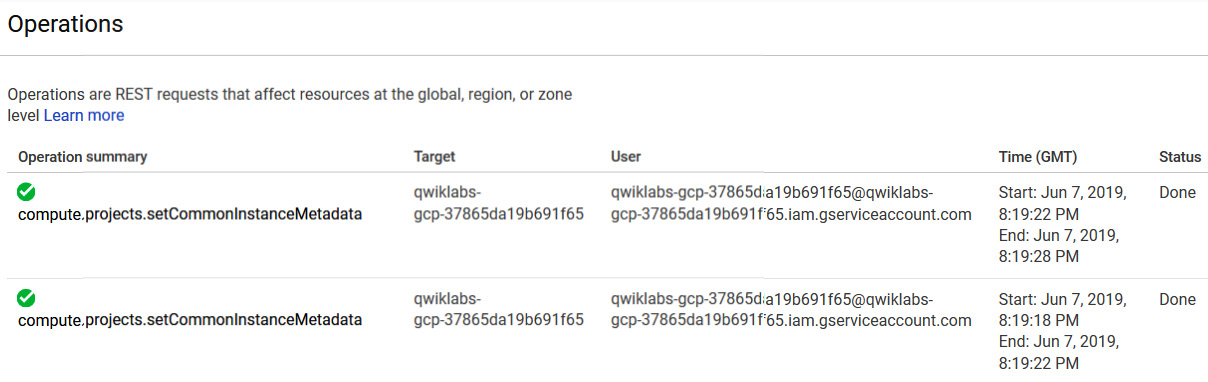
Figure 4.28 – Operations
The preceding screenshot shows what these alerts look like on the Operations screen.
Shielded VM
Let's now look under the security section. The first option is Shielded VM. GCP offers the ability to harden your VM instance with security controls, which will defend against rootkits, bootkits, and kernel-level malware. GCP uses a virtual Trusted Platform Module (vTPM) to provide a virtual root of trust to verify the identity of the VM and ensure they are part of a specified project or region. The vTPM generates and stores encryption keys at the guest OS level. It should be noted that this does not add any extra cost to your VM deployment.
Deletion rule
Under the Disks section, we will find the Deletion rule. This option allows us to either delete or keep the boot disk when the instance is deleted:

Figure 4.29 – Disk options
If there are specific use cases for keeping your boot disk, then make sure the checkbox is removed. You can also select how your data will be encrypted. By default, a Google-managed key will be used, but you can change this to use other options.
Node affinity labels
Sole tenancy was introduced to GCE in 2018 and is a physical Compute Engine server designed for your dedicated use. In other words, the underlying host hardware and hypervisor handles only your GCE instances. A use case for this setup could be security requirements. Many companies have compliance or regulations that require a physical separation of their compute resources.
The following diagram shows this split. We can see that, on the left-hand side, different customers share the same hardware but, on the right-hand side, we have dedicated hardware for this specific customer and only their VMs reside on it:
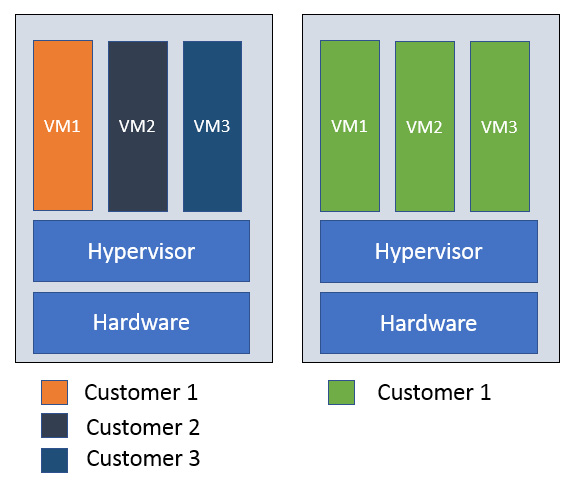
Figure 4.30 – Node affinity
VMs will still have the same live-migration functionality and shared instances, but there are cost implications. Not all regions and zones support sole tenancy.
When we create a VM, we have the option to add a label that would define where the new instance would be deployed. To use sole tenancy, we first have to create a sole-tenant node from the console under Compute Engine | Sole tenant nodes. Note that we could also use gcloud commands for this. Click on Create a node template, and set Region and Node type. The following screenshot shows the different options available. We can also utilize labels to give a key/pair value, such as Environment:HighSecureArea:

Figure 4.31 – Creating a node template
Once the template has been created, on the same menu page, we can now create a sole-tenant node. Again, we can give a name, select a region and a template, and define the number of nodes we need. Note that the region needs to match the region you created the template in:
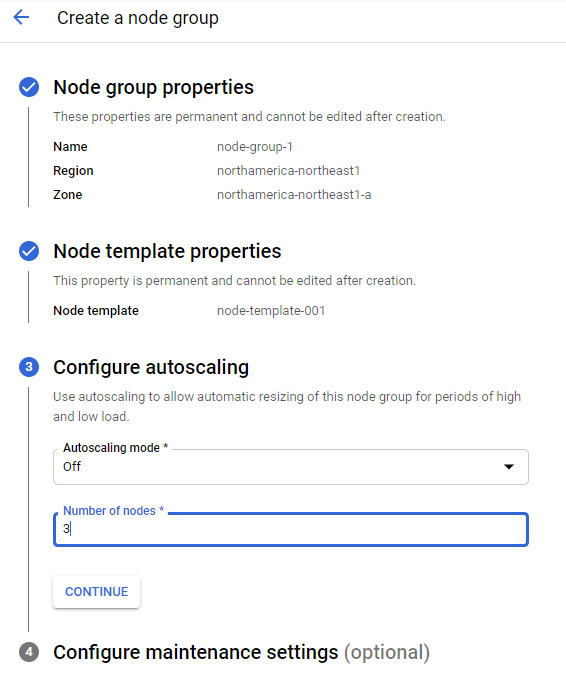
Figure 4.32 – Sole-tenant node
We can now create a VM from within the sole tenancy. Some more advanced settings can be made, but we will look at these in more depth in the coming posts:
- For firewalls, refer to This Post, Networking Options in GCP.
- For security and encryption settings, refer to This Article, Security and Compliance.
GPUs and TPUs
Along with standard vCPUs, Compute Engine also offers Graphics Processing Units (GPUs). These can be used on graphics-intensive workloads such as 3D rendering or virtual applications. We should note here that GPUs can only be attached to predefined or custom-machine types and are only available in certain zones. They are also still eligible for discounts that we receive from standard vCPUs (please note that we will discuss sustained use discounts in more detail later in this blog). When we are creating a new instance, we can add a GPU by expanding the CPU platform and GPU section, as shown in the following screenshot:
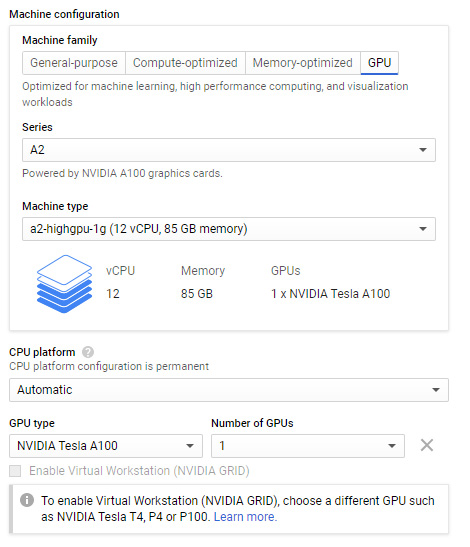
Figure 4.33 – GPU configuration
Tensor Processing Units (TPUs) are custom-developed application-specific integrated circuits designed using Google's experience in Machine Learning (ML) and can be used to maximize performance and flexibility in building TensorFlow compute clusters and other ML workloads. We can access TPUs from the navigation menu and go to Compute Engine | TPUs. Once we enable the API, we can create our first TPU node. From the following screenshot, you can see that we can assign Zone, TPU type, TPU software version, Network, and IP address range. The TPU should be in the same zone as the Compute Engine instance you wish to connect from:
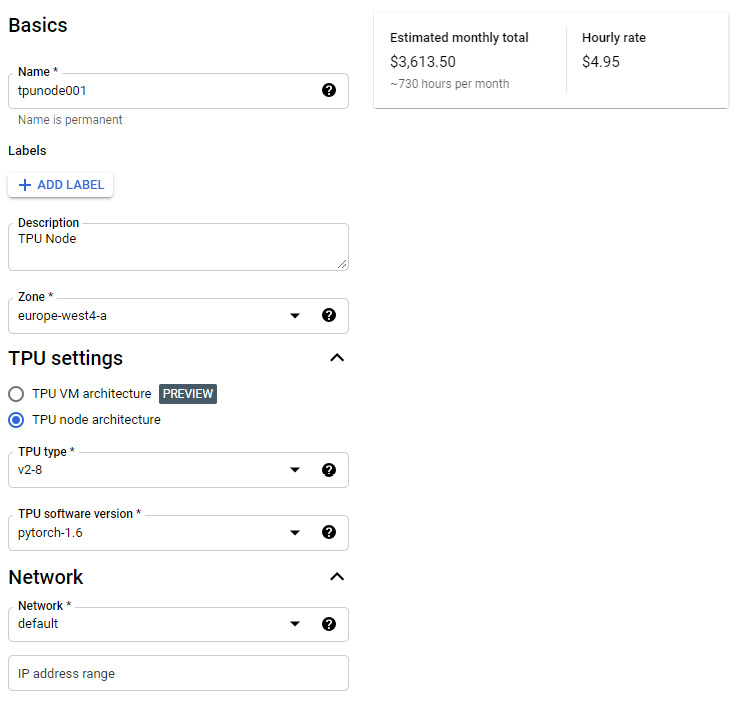
Figure 4.34 – TPU configuration
Under the Management section of TPU configuration, we can also enable preemptibility on TPU nodes.
Instance templates and instance groups
Even when we think of on-premises architecture, many of the key requirements are around high availability and scalability. Of course, this does not change when we architect in the public cloud, but they do become a lot easier and cheaper to do!
We have previously seen how we can deploy individual GCE instances, but not many organizations will move to the public cloud to host a single VM. Business needs depend on the ability to react to demand and react to any instance failures.
Each of the VM instances deployed into the instance group comes from the same instance template, which defines the machine type, boot disk images, labels, and other instance properties that we spoke about previously in this article. Instance templates are global resources, which means they are not tied to a specific zone or region. Zonal resources in the template itself will restrict the template to the zone where that resource resides. For example, the template may include a disk that is tied to a specific zone.
It's important to understand that there are two types of instance groups:
- Managed instance groups: This type of instance group allows your workloads to be scalable and highly available via automated services in the groups, such as autoscaling or autohealing. Google recommends using this type of group unless it is unavoidable due to pre-existing configurations or a requirement to group dissimilar instances.
- Unmanaged instance groups: This type of instance group allows for load balancing across a fleet of VMs that are not identical. They are user-managed, therefore autoscaling and autohealing are not supported.
Let's look at an example of creating a new instance template and group:
- From the navigation menu, we should browse to Compute Engine | Instance templates:

Figure 4.35 – Instance templates
- We can name and update settings as if we were creating a new VM instance. In previous examples, we set a startup script from gcloud commands but, in this example, let's set it up from the console. We add this in the Metadata options and use the startup–script–url key and gs://cloudarchitect/startup.sh as our value:

Figure 4.36 – Metadata
- Click on Instance Groups, and then create a new instance group:
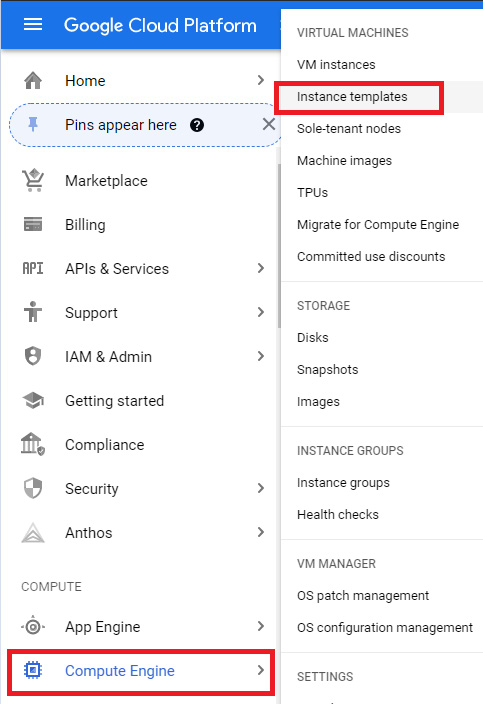
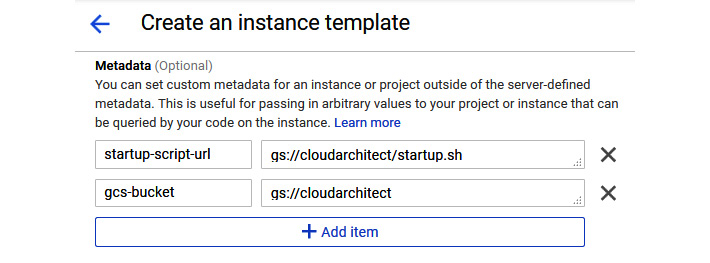
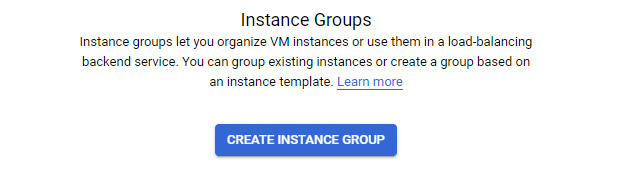
Figure 4.37 – Creating an instance group
Let's look at the different options that we can specify when creating an instance group.
Setting the location
Here, we can set whether we want multiple or single zones. This selection will be based on your availability requirements. If you require high availability, then it's best to go with multiple zones; however, you should note that this restricts your group type to managed only. It also gives an additional field called Target distribution shape, where the default value of Even is set. By default, regional-managed instance groups will distribute managed instances evenly across selected zones. However, there may be a need to change this if, for example, you need some hardware that is not available in selected zones. Other shapes are available, but it should be noted that the Balanced and Any options do not support autoscaling, canary updates, or proactive instance redistribution. You will need to delete the default autoscaling configuration in order to select Balanced or Any:
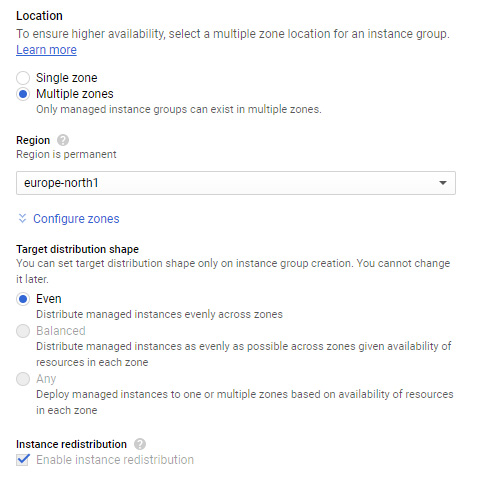
Figure 4.38 – Multiple zones
We can see in the preceding screenshot that, with Multiple zones selected, we are told that Only managed instance groups can exist. Additionally, if we select the Configure zones drop-down menu, we can select zones within the region that we wish to distribute the instances.
Port name mapping
If we select the Single zone option, then we are presented with an optional setting called Port Name Mapping. We can use this in conjunction with a load balancer. We can specify a port name and associated port number and map incoming traffic to this specific number.
Of course, we also need to specify the instance template we want to use for this managed group. This option is only available if we select a managed instance group in the group type options. We also need to select the number of instances to be deployed by the instance group.
We have the ability to turn autoscaling on, off, or up. Autoscaling allows the dynamic growth or, indeed, deletion of your VM instances as demand increases or decreases. We will speak more on autoscaling in this post.
When we have populated everything we need, we can click Create Instance Group. The group will now create the number of VMs we have specified in the instance group. Under Compute Engine | Instance groups, we can see the running instances connected to the instance group.
Autoscaling
We mentioned autoscaling earlier, which deserves a full section to itself. Autoscaling is a fundamental principle of cloud computing. It allows resources to be elastic and can increase and decrease the number of instances based on demand. As a reminder, we can only use autoscaling with managed instance groups. This is because only managed instance groups will use a dedicated template, which, in turn, can be used as a basis for a pool of homogeneous VM instances.
Once autoscaling is enabled in our instance group, it also enables many settings under an autoscaling policy. These policies can be based on CPU usage, HTTP load balancing usage, or Google Cloud operations suite-monitoring metrics. We should also note here that it is possible to autoscale based on custom metrics, so we are not reliant only on out-of-the-box metrics.
The following example is based on CPU usage, which is the simplest form of autoscaling. The autoscaler will collect a CPU utilization of instances in a group and decide whether it is necessary to scale the group or whether it should maintain the current number of VM instances.
Looking at the following screenshot, let's take a look at the settings we should populate:
- Target CPU usage: This is set at 60%. This means the autoscaler should keep an average CPU usage of 60% among all vCPUs in the instance group.
- Minimum number of instances: This is the minimum number of instances that the autoscaler should scale in.
- Maximum number of instances: This is the maximum number of instances that the autoscaler should scale out.
- Predictive autoscaling: Managed instance groups can be configured to automatically add or remove virtual machine instances based on load. This may not suit all applications if, for example, they can take a few minutes to initialize. Predictive autoscaling forecasts scaling metrics based on historical trends and are recomputed every few minutes. It requires at least 3 days of history to gather a service usage pattern, therefore it cannot be enabled when creating a new autoscaling configuration. It can also only be enabled when a CPU utilization metric is applied.
- Cool down period: This number indicates the number of seconds the autoscaler will wait after a VM instance has started before the autoscaler starts collecting information from it. For scale-in decisions, it must consider usage data from all instances, regardless of whether an instance is still within its cool down period. For scale-out decisions, it must ignore data from instances that are still within their cool down period. If predictive mode is enabled, the cool down period informs the predictive autoscaler that it should scale out further to ensure applications are initialized when the load arrives.
Generally, this is the time you expect your application to initialize. The default time is 60 seconds and anything below this could be deemed to give false information to the autoscaler. However, it is recommended that you test how long your application takes to initialize:
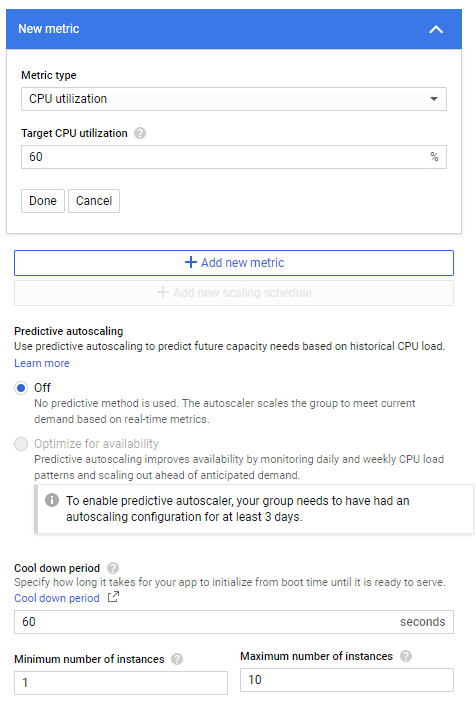
Figure 4.39 – Autoscaling – CPU utilization
We should also understand that, as our managed instance group grows, the impact of adding the same-sized VM decreases. Let's clarify what we mean here. Say we have set a CPU utilization of 75% and a minimum of three instances in our group. The autoscaler is checking to see whether the aggregate of the VM instances averages above 75%. If the autoscaler adds a fourth VM, it adds a 25% increased capacity to the group.
If we have a maximum of 10 VMs in our group, then the tenth VM is only contributing 10% more capacity – so the impact of the tenth node is not the same as the fourth node. We should keep this in mind when setting utilization and maximum capacity. It's also important to note that autoscaling will always act conservatively and round up the statistics. It would start an extra VM instance that isn't really needed, rather than possibly running out of resources.
Scaling based on HTTP load balancing will scale based on the load of your VM instances. A load balancer will spread the load over backend services that are configured when you create an HTTP load balancer. When instance groups are used for the backend, external load balancers offer two balancing modes – utilization, which allows us to specify a maximum target for average backend utilization of all instances in our instance group, and rate, where we must specify a target number of requests per second. This is on a per-instance basis or a per-group basis.
The Target HTTP load balancing utilization value in the autoscaling policy should be a fraction of what is configured in your load balancer setting. For example, if you set the policy to 100 requests per second, then it would be sensible to scale slightly below this and set the usage in the policy to maybe 80 requests per second (80%):
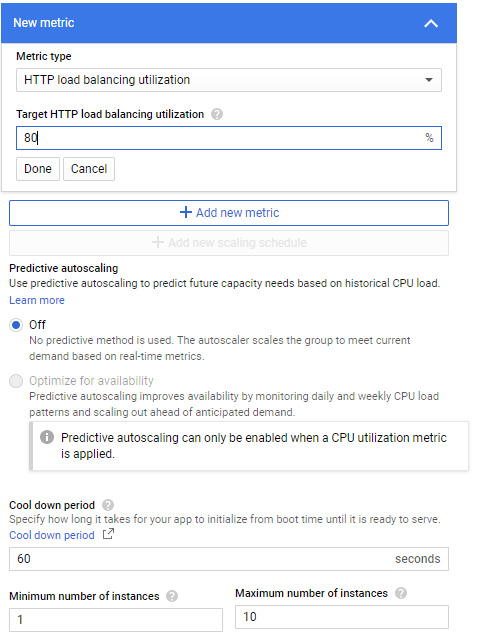
Figure 4.40 – Autoscaling – HTTP utilization
Tip
We will discuss load balancers in more detail in This Post, Networking Options in GCP.
We also can scale on Google Cloud operations suite metrics, where the selected metric will provide data for each instance in the managed instance group or the entire group. These metrics can either be out-of-the-box or custom metrics you have created. Note that at the time of writing, in some documentation, the option is still referred to as Stackdriver in the settings; however, you should be aware that this was rebranded as Google Cloud's operations suite.
Important Note
If you have a requirement to scale down to zero instances from time to time, then you should use per-group metrics.
Let's look at another example, using a custom metric that Google offers as a demonstration metric, custom.googleapis.com/appdemo_queue_depth_01.
Utilization target type is set to Gauge in this example, because this will tell the autoscaler to compute the average value of the data collected over the last few minutes and compare it to the target value:
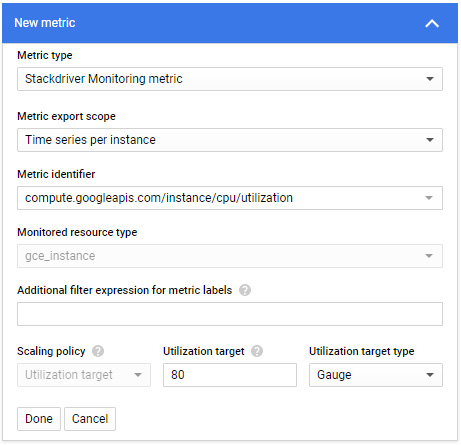
Figure 4.41 – Autoscaling – Stackdriver (Google Cloud's operations suite) metrics
Let's assume we now have a startup script on our instance template, which will invoke another script responsible for generating these custom metrics. We can see, from the charts monitoring tab within our instance group, that the load started to increase on our instance groups around 5:55 P.M. but dropped again around 6 P.M.:
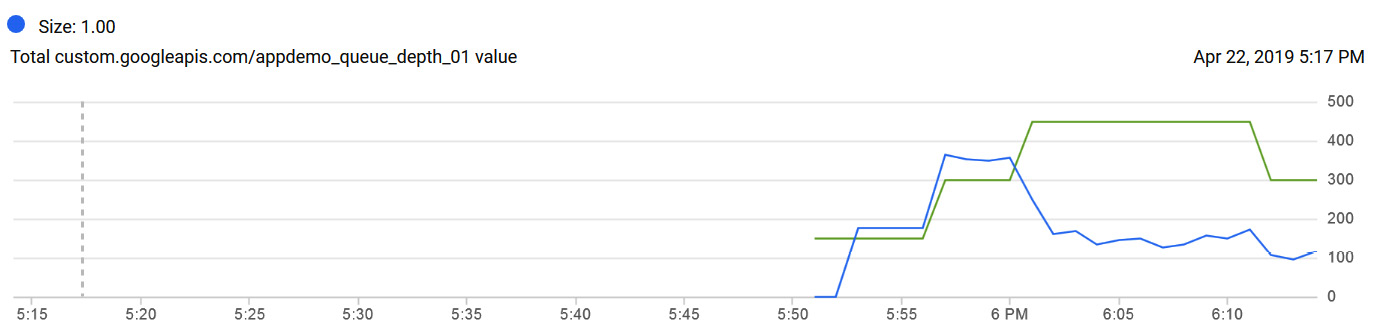
Figure 4.42 – Monitoring load
Given the spike in our queue depth, we can expect that the autoscaling policy would have generated a new instance. If we check the autoscaler logs, we can confirm this. It then added a third instance, before reducing back to two instances when the demand dropped again:
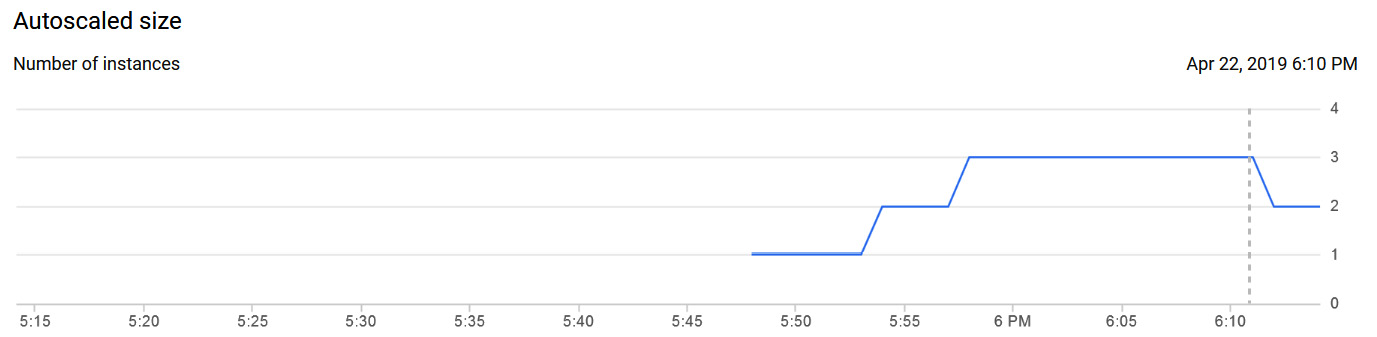
Figure 4.43 – Adding and removing instances
This is true elastic computing! These are small examples of how autoscaling works, and we advise that you ensure you can create your own policies and replicate any load that's responsible for increasing and decreasing your machine instances.
Important Note
You can only create one autoscaler per managed instance group.
Autohealing
Autohealing is also part of the managed instance group settings but merits its own section in order to discuss it further. GCP's managed instance groups are responsible for validating whether each VM instance in our group is running and ready to accept client requests. To perform this validation, it needs a health check, which is basically a probe that contacts each member of the instance group to check their current health. The policy can be based on certain protocols, namely HTTP(S), TCP, or SSL.
We also need to configure the criteria to inform the health check how often to check the instance, the acceptable amount of time that it can get a no response, and the number of consecutive failures to its probe. These settings define when a VM would be classified as unhealthy. If that specific instance is no longer healthy, the autoscaler will add a new instance:
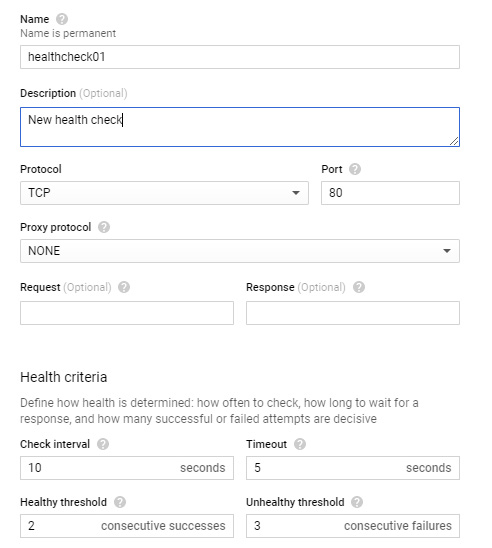
Figure 4.44 – Autohealing configuration
Within the health checks, we also have to specify the healthy threshold. This figure is used to determine how many continuous successful checks must be returned before an unhealthy instance can be marked as healthy and traffic is directed to it.
We can then apply this health check as an autohealing policy in our instance group. The following screenshot shows the health check selected in this example:
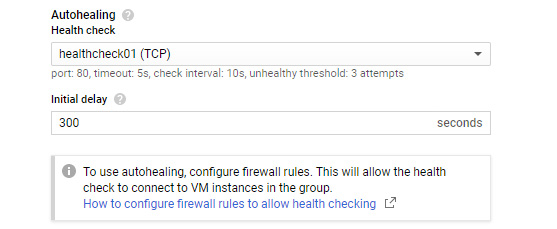
Figure 4.45 – Autohealing information
Autohealing policies can also improve the availability of your application. In the next section, we will look at containers on Compute Engine.
Containers on Compute Engine
As an alternative to running GKE, GCP offers the ability to run containers on Compute Engine. Containers will be covered more in This Post, Managing Kubernetes Clusters with Google Kubernetes Engine; however, it's important to note that containers can be run on both Linux and Windows server VM instances or container-optimized operating systems offered inside of Compute Engine. Docker and Podman are two common container technologies that let us run containerized applications.
We should note that a Container-Optimized OS does have some limitations:
- It does not include a package manager, so we cannot install software packages directly on an instance.
- It does not support execution of non-containerized applications.
- The kernel is locked down.
- It is not supported outside of the GCP environment.
Running a simple Windows container on Compute Engine
Let's assume we have a Windows VM up and running with the Windows Server 2019 DC core for containers image. We can start RDPing to it, as we did in the Deploying our first GCE instance section. As the container is running a core version of Windows, it is running an OS with minimal UI. All we can see is the Command Prompt window.
If we run the docker images command, we can see what images are installed by default:
Figure 4.46 – Docker images
Let's create a new image and run it:
- Run the mkdir my–new–container command.
- Run the cd my–new–container command.
- Run the mkdir content command.
- Run the notepad content\index.html command.
- Enter the following text to create a simple Internet Information Services (IIS) server:
<html>
<head>
<title>Windows containers</title>
</head>
<body>
<p>This is my test windows container!</p>
</body>
</html>
- Use Notepad to create a file called Dockerfile.
- Enter the following text to create the content of Dockerfile:
FROM mcr.microsoft.com/windows/servercore/iis:windowsservercore–ltsc2019
RUN powershell –NoProfile –Command Remove–Item –Recurse C:\inetpub\wwwroot\*
WORKDIR /inetpub/wwwroot
COPY content/ .
- Let's build the Docker image and store it in the Google Container Registry by running the following command (please note the . at the end of the command): docker build –t gcr.io/my–project–id/iis–site–windows ..
- You will see this completed successfully when the output returns something such as Successfully tagged gcr.io/my–project–id/iis–site–windows:latest.
- If you rerun Docker images, you will now see the newly created image available.
- Let's now run a Windows container with the docker run –d –p 80:80 gcr.io/my–project–id/iis–site–windows command.
- Finally, let's browse the external IP of the VM instance.

Figure 4.47 – Web server on Docker
- We can see from the preceding image that we have successfully run a very simple web server running on a Windows container.
Tip
It is important to note that containers built on earlier versions of Windows do not work in Compute Engine instances that have more recent versions of Windows.

A quick look at Google Cloud VMware Engine
Announced in May 2020, Google Cloud VMware Engine is a fully managed service that allows us to run a VMware platform in Google Cloud. Google will manage the infrastructure, networking, and management services so that you can use the VMware platform efficiently and securely. In short, this is VMware-as-a-service that can be deployed in around 30 minutes. It runs using VMware Cloud Foundation on dedicated Google bare-metal servers and can integrate with Google's big data and ML services.
The service is sold based on hyperconverged nodes with VMware services deployed. ESXi, vSAN, and NSX-T sit on top of bare-metal servers, while vCenter, NSX Manager, and HCX are also installed to automate deployment, monitoring, patching, and upgrades. Google is responsible for all of this, while the customer will retain responsibility for any VMs and VMware management tools and services, such as the vRealize suite. Licensing is also fully integrated into the service; therefore, the consumers are not required to worry about any VMware licensing issues relating to cores per socket.
Tip
The Professional Cloud Architect exam does not go deep into the Google Cloud VMware Engine service; however, you should be aware that the service exists, as it can be a milestone for companies who want to migrate quickly into Google Cloud using the lift and shift approach.
Use cases
There are many use cases for Google Cloud VMware Engine, such as data center extensions or migrations to allow companies to scale into the public cloud with guaranteed compatibility of their existing workloads. Disaster recovery is also another huge benefit of this service, as companies can leverage Google's global infrastructure to improve availability. HCX is used in both migrations and disaster recovery. A dedicated interconnect link between the on-premises data center and Google Cloud allows an easy migration of VMs and services between the two endpoints. Google is really trying to sell this as the quickest and easiest way into the cloud. This may be an important thing for some companies, who do not want to feel pressured into retooling their workforce or refactoring their applications to meet objectives to migrate into the cloud while maintaining operational continuity.
One important thing to also note is that role-based access control (RBAC) and billing is all under your Google account. It is all under one banner. This allows the VMware platform to integrate easily into Google's native services.
There are some prerequisites and requirements before we can use the service. At a high level, here are a few considerations. First, we need to enable the VMware Engine API. We can do this directly from the GCP main menu:
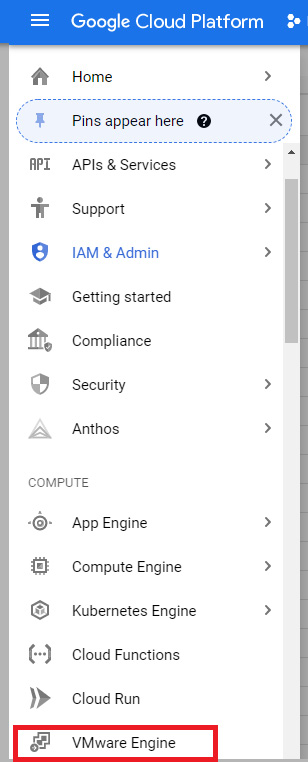
Figure 4.48 – VMware Engine
We then must set up private service access, which is a private connection between your Virtual Private Cloud (VPC) and networks in VMware Engine. You are also required to reserve address ranges that will not overlap with any of your on-premises subnets, VPC subnets, or planned workload subnets. Finally, VMware Engine has a specific set of IAM roles, so consideration should be taken to ensure the principle of least privilege is applied.
Quotas and limits
Compute Engine comes with a predefined quota. VM instances are part of regional quotas and therefore limits are applied to the number of VM instances that can exist in a given region. These default quotas can be changed in the console via the hamburger menu and go to IAM & Admin | Quotas. From this menu, we can review the current quotas and request an increase to these limits. We recommend you are aware of the limits for each service, as this can have an impact on your scalability.
IAM roles
Access to GCE is secured with IAMs. Let's have a look at the list of predefined roles, together with a short description for each:
- Compute admin role: This has the right to access all Compute Engine resources.
- Compute image user role: This has the right to list and read images.
- Compute instance admin (v1) role: This has the right to access full management of Compute Engine instances, instance groups, disks, snapshots, and images. It also has read access to all Compute Engine networking resources.
- Compute instance admin role: This has the right to create, modify, and delete VM instances. Additionally, it has the right to create, modify, and delete disks, and to configure shielded VM settings.
- Compute load balancer admin role: This has the right to create, modify, and delete load balancers and associated resources.
- Compute network admin role: This has the right to create, modify, and delete networking resources, except for firewall rules and SSL certificates. Additionally, this role has read-only rights to firewall rules, SSL certificates, and instances (to view their ephemeral IP addresses). With this role, you cannot create, start, stop, or delete instances.
- Compute network user role: This has the right to access a shared VPC network.
- Compute network viewer role: This has read-only rights over all networking resources.
- Compute OS admin login role: This has the right to log on to a Compute Engine instance as an administrator.
- Compute organization firewall policy admin role: This has full control of Compute Engine organization firewall policies.
- Compute organization firewall policy user role: This can view or use Compute Engine firewall policies to associate with the organization or folders.
- Compute organization security policy admin role: This has full control of Compute Engine organization security policies.
- Compute organization firewall policy user role: This can view or use Compute Engine security policies to associate with the organization or folders.
- Compute organization resource admin role: This has full control of Compute Engine firewall policy associations to the organization or folders.
- Compute OS login role: This has the right to log on to a Compute Engine instance as an administrator.
- Compute OS login external user role: This is available only at the organizational level. It provides access for an external user to set OS login information associated with this organization.
- Compute packet mirroring admin role: This provides access to specify resources that are to be mirrored.
- Compute packet mirroring user Role: This provides access to use resources that are mirrored.
- Compute public IP admin role: This provides full control of public IP address management for Compute Engine.
- Compute security admin role: This has the right to create, modify, and delete firewall rules and SSL certificates. This role also has the right to configure shielded VM settings.
- Compute storage admin role: This has the right to create, modify, and delete disks, images, and snapshots.
- Compute viewer role: This has read-only access to Compute Engine resources. It does not have the right to read the data stored on them.
- Compute shared VPC admin role: This has the right to administer a shared VPC host project. This role is on an organization by an organization admin.
- Patch deployment admin role: This provides full access to patch deployments.
- Patch deployment viewer role: This provides access to view patch deployments.
- Path job executor role: This provides access to execute patch jobs.
- Patch job viewer role: This provides access to get a list of patch jobs.
- DNS administrator role: This has read-write rights to all cloud DNS resources.
- DNS peer role: This has the right to target networks with DNS peering zones. Note that at the time of writing, this is in beta.
- DNS reader role: This has read-only access to all cloud DNS resources.
- Service account admin role: This has the right to create and manage service accounts.
- Create service account role: This has the right to create service accounts.
- Delete service account role: This has the right to delete service accounts.
- Service account key admin role: This has the right to create and manage service account keys. The role has the right to rotate keys.
- Service account token creator role: This has the right to impersonate service accounts.
- Service account user role: This has the right to run operations as the service account.
- Workload identity user role: This has the right to impersonate service accounts from GKE workloads. For less granular access, you can also use primitive roles of owner, editor, and viewer, but we should always use the principle of least privilege.
Exam Tip
If you want to debug an issue in a VM instance, grant the compute instance admin role and not the compute admin role. The latter has full control of all Compute Engine resources, whereas the former has less privilege.
In the next section, we will look at pricing.
Pricing
Google's billing model means that you are charged for vCPUs, GPUs, and GB of memory per 1 second, with a 1-minute minimum. However, Google also offers the opportunity to significantly reduce monthly billing. Sustained use discounts reduce the cost of running specific GCE resources.
Sustained use discounts are applied to specific Compute Engine resources automatically and can result in monthly savings on vCPU and memory for the following resources:
- General-purpose custom and predefined machine types
- Compute-optimized machine types
- Memory-optimized machine types
Sole-tenant nodes will also receive discounts. We discussesd them in more detail in the preceding sections. Additionally, savings are also applied to GPU devices.
If we run one of the preceding resources for more than 25% of a month, then GCE will discount every incremental minute you use for the instance automatically. Discounts will increase with usage, and anything up to a 30% discount per month can be expected. For example, general-purpose N2 and N2D predefined and custom images and compute-optimized machine types can provide us with up to 20% discounts. For general-purpose N1 predefined and custom machine types, sole-tenant nodes and GPUs can provide us with up to 30% discounts. Full discounts can only be taken advantage of if VM instances are created on the first day of the month, as discounts are reset at the beginning of each month. If we deployed instances around the middle of the month, then we would expect a discount of around 10%.
One key thing to note is how the billing is calculated. At a high level, let's look at an example of two different machine types created in the same region but running at different times of the month:
- An n1–standard–4 instance with 4 vCPUs and 15 GB memory from the beginning of the month until halfway through the month
- An n1–standard–16 instance with 16 vCPUs and 60 GB memory halfway through the month until the end of the month
In this example, Compute Engine will organize the machine types into individual vCPU and memory resources and combine their usage. It will break them down to the following:
- 4 vCPUs for the full month
- 12 vCPUs for half the month
- 15 GB of memory for the full month
- 45 GB of memory for half the month
So, we can see that the discount from the 4 vCPUs and 15 GB memory created in the n1–standard–4 instance transfers over to the n1–standard–16 instance, meaning we have a full 30% discount on 4 vCPUs and 15 GB memory. The remaining 12 vCPUs and 45 GB memory attached to the n1–standard–16 instance would only receive a discount from week 2 onwards, meaning a 10% discount.
Another method offered for discounts is committed use discounts, whereby we can purchase a specific amount of vCPU and memory for an agreed term of 1 or 3 years. Discounts can reach 57% for most custom machine types or even 70% for more memory-optimized machine types. There are no upfront costs, but discounts are applied to your monthly billing. You will be billed for the selected vCPU and memory each month for the agreed term.
Discounts are applied via purchase commitments. Let's say, for example, we make a commitment for 8 cores but run 16 cores for 10 hours. We would receive the discount on the 8 cores for the 10 hours, but we would be billed as standard for the remaining 8 cores. The remaining cores would, however, qualify for sustained use discounts. Likewise, if we did not use the 8 committed cores in a monthly cycle, we would still be billed for them, so we should ensure that we only commit to what we will use. There are some other important caveats to committed use discounts.
Discounts are applied to resources in the following order:
- Custom machine types
- Sole-tenant node groups
- Predefined machine types
Let's take another example to make this clearer. Let's say we have a custom machine with 5 vCPUs and 50 GB of memory along with a single predefined machine. If we purchase 10 vCPUs and 15 GB of memory for committed use, the discount would apply first to our 5 vCPUs of the custom machine type and the remaining 5 discounted vCPUs would be applied to the predefined machine type. Likewise, the discount for the full 15 GB of committed use memory would be applied to our custom type memory.
Summary
In this article, we introduced GCP's IaaS offering – Compute Engine. This is a basic offering by Google and aligns with a traditional VM. We discussed how to deploy an instance and how to add to instance groups to scale our services automatically, so we can be confident now of how easy it is to get a VM instance running in GCP. Additionally, we looked at the various optional settings we can select when deploying a Compute Engine instance. We have also introduced containers and how VMware Engine can speed up the move to public cloud adoption. In the next post, we will move away from IaaS and introduce GKE.
Further reading
We recommend that you review the following URLs for further information:
- Compute Engine: https://cloud.google.com/compute/docs/
- Compute Engine IAM roles and permissions: https://cloud.google.com/compute/docs/access/iam