 In this blog I’ll walk you through the process of setting up (or baking, if you will) your Raspberry Pi.
This article will take you through a first-time installation of Raspbian on a Raspberry Pi with the latest Java version. I will also detail some additional configuration that you may want to change to optimize Java and other visual applications. Finally, I will show you how to create a network between your Raspberry Pi and another machine and run a simple Java application.
Powering Your Raspberry Pi
The Raspberry Pi is a great platform for getting started with embedded computing. It has a great community supporting it with lots of options for hardware. If this is your first time setting up a Raspberry Pi, you will need the following hardware to get started:
- Raspberry Pi The same instructions apply to Models B+, A+, B, A, and 2, but in this guide I will be using a B+.
- SD card A good quality 8GB or larger SD card is recommended. If you purchase one with the New Out Of Box Software (NOOBS) preinstalled, you can save some time in setup.
- Power supply The Raspberry Pi is powered by a micro-USB cable, the recommended specifications for which are 2A at 5V. You can often get away with a smaller power supply (as small as 700mA) depending on what USB devices are connected.
- Keyboard and mouse Pretty much any USB keyboard will do. The mouse is optional if you don’t mind navigating the GUI via the keyboard.
- Monitor or TV The Raspberry Pi supports composite or HDMI displays. HDMI is readily convertible to DVI or VGA if that is what your monitor supports.
The first step is to set up your SD card. If you have a Model 2, B+, or A+ Raspberry Pi, then this will be in the form of a microSD card. If you have the older Model B or A, then this will be a full-size SD card. Both types of cards operate the same, and microSD cards usually come with adapters to fit in full-size slots, so that is the obvious choice. The difference in size between a microSD card and a full-size SD card can be seen in Figure 1.
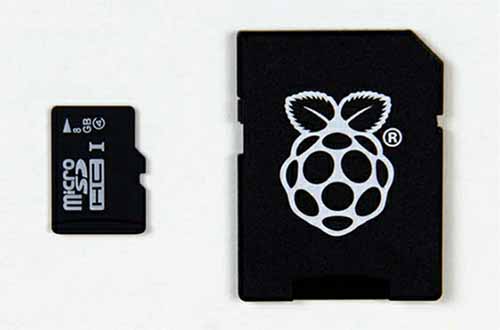
FIGURE 1. NOOBS microSD card with full-size adapter
The Raspberry Pi foundation ships SD cards with NOOBS preinstalled, as photographed in Figure 1. This is a good trade-off between cost, convenience, and performance, and is recommended for anyone who is just getting started. Most online retailers offer a Raspberry Pi bundle that includes the NOOBS SD card for a small incremental cost.
If you have purchased an SD card with NOOBS preinstalled, skip to the section entitled “Installing Raspbian.”
Purchasing Compatible SD Cards
If you need a higher-performance or larger-capacity card, you can buy SD cards and format them yourself. This is also typically less expensive, especially if you are purchasing in bulk. The key criteria to use when selecting an SD card are size, write performance, and quality.
The minimum size card you can use with the Raspbian distribution is 4GB, although this is not large enough to support NOOBS and will leave very little room for your software. At least 8GB is recommended, and for a small incremental cost you can get a 16GB card. The largest-capacity card that is supported in the Raspberry Pi is 64GB, although this will only be helpful if you are doing data-intensive tasks, such as storing sensor data or video over a long period of time.
When shopping for SD cards, you can find a class identifier written on them. A higher number indicates better write performance, with the minimum sustained write speed equal to the number. For example, a class 4 card is tested to support a sustained write speed of 4 megabytes per second (MBps). Similarly, a class 10 card is tested to support a sustained write speed of 10MBps. This matters most if you are developing an application that will write a large amount of sequential data. It also can significantly speed the initial setup time of your card. However, this is an indication of neither read performance nor nonsequential write performance, so the real-world performance of your SD card may vary.
Perhaps the most important factor is the quality of the card. Buying from a well-known manufacturer and reputable vendor greatly increases the chances you will get the size and performance you are paying for. Unknown manufacturers and ill-reputed vendors may sell you low-quality or counterfeit cards that perform well below their advertised specs. A good community resource for researching SD card compatibility and performance is the Raspberry Pi SD cards page on the Embedded Linux (eLinux) wiki: http://elinux.org/RPi_SD_cards.
Formatting SD Cards
The NOOBS installer requires that your SD card be formatted with a File Allocation Table (FAT) filesystem. Both FAT16 (more commonly referred to as FAT) and FAT32 are supported, but not ExFAT. If you have purchased a large SD card, it often comes formatted with ExFAT, so you will need to reformat it with FAT32 in order to proceed with the NOOBS install. The easiest way to make sure your SD card is formatted correctly is to use the SD Association’s SDFormatter utility on OS X or Windows: https://www.sdcard.org/downloads/formatter_4/.
Figure 2 shows a screenshot of what the SDFormatter utility looks like on OS X. Make sure that the correct SD card is selected so that you don’t accidentally delete the wrong drive, and then choose the Overwrite Format option. Specify the name of the card and click the Format button. This process will take a while depending upon the speed and size of your SD card, so this may be a good time to take a coffee break.
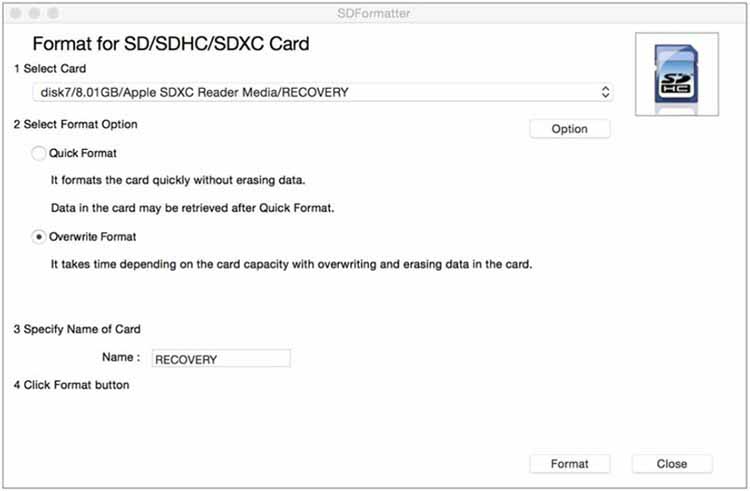
FIGURE 2. SDFormatter utility
If you are on Linux, you can accomplish the same thing with the GParted tool, which is a visual disk manager. Make sure that you select the correct partition and format as FAT or FAT32.
Once you have a properly formatted card, the rest of the installation is as simple as following these steps:
- Download the latest version of NOOBS from the Raspberry Pi website.
- Unzip the downloaded NOOBS archive. Most operating systems come with built-in unzipping functionality.
- Copy the contents of the extracted folder to your SD card. Make sure that you do not have an enclosing folder.
Either NOOBS or NOOBS LITE will work, although I recommend the former so that you don’t have to worry about networking your Raspberry Pi to get it up and running.
Installing Raspbian
Once you have an SD card with NOOBS on it, you are ready to install the Raspbian operating system and set up your Raspberry Pi. This process has been streamlined with the latest installers, so you should have no trouble getting set up quickly. Along the way I will point out common pitfalls that you may encounter, especially with the older Raspberry Pi models.
Connecting Your Raspberry Pi
Here are the connections you will need to make the first time you turn on your Raspberry Pi:
CAUTION
Never insert or remove the SD card while your Raspberry Pi is plugged in. This can result in corruption of the filesystem and lose important data that you have stored on your Raspberry Pi.
- Insert the SD card into the slot on the bottom.
On Models A and B this slot is a full-size friction fit socket, so be careful that you don’t use too much force (it goes in upside down). On Models A+, B+, and 2 this slot is a spring-loaded microSD socket that clicks upon insertion (also upside down). When removing the SD card, you can simply pull out the card on Models A and B, but for Models A+, B+, and 2, press it in and allow the spring to eject it.
TIP
The SD slots on Models A and B are easy to damage if you use too much force (for example, if you force the SD card in incorrectly). Fortunately, this can often be remedied by simply bending the pins back in shape.
- Connect the HDMI or composite cable to your monitor or TV.
HDMI will give you better resolution and is preferred if you have a supported monitor. If you’re using HDMI, plug in your monitor and turn on the power before booting. Using composite on Models A and B is fairly straightforward via the yellow RCA jack. However, on Models A+, B+, and 2 you will need to use an adapter to get the video signal out of the 3.5mm TRRS jack that is shared with audio.
NOTE
The reason why you should always plug in HDMI and turn on your monitor before booting is because the Raspberry Pi defaults to composite input, which will give you a black screen if you later hook up an HDMI device. However, this is not the case when running NOOBS, so you can get by the first boot without doing this in a specific order.
- Plug in your keyboard and mouse.
These devices plug into the full-size USB host ports on the Raspberry Pi. If you are using a Model A or A+, you will be limited to one USB port, so you can either navigate via keyboard shortcuts and skip the mouse altogether, or plug in a powered USB hub to connect more devices.
CAUTION
On Models A and B the USB ports are not hot swappable, so inserting or removing devices can reset the Raspberry Pi, resulting in lost work or filesystem corruption. This was fixed on Models A+, B+, and 2.
- Connect the micro-USB power.
As mentioned earlier, make sure you have a power supply that can provide 5V and ideally 2A of power. Higher current is fine since the Raspberry Pi will only consume the power it needs, but with only a keyboard and mouse hooked up, you can get away with a 700mA power supply. Your typical computer USB slot will only provide 500mA and thus is not safe to use with the Pi. On Models A and B, insufficient voltage from a poor USB cable or insufficient current from a bad power supply can result in crashes and filesystem corruption. Fortunately, the Raspberry Pi B+, A+, and 2 come with power circuitry that ensures the voltage and current are sufficient before turning on. They also draw less power than the older models, saving precious battery life for embedded projects.
How to Tell Your Raspberry Pi Is Working
Once powered on, you will notice that the LED status lights on the Raspberry Pi will light up. The red PWR LED indicates power and will stay solid as long as the Raspberry Pi is plugged in. The green ACT LED indicates activity and will start blinking irregularly shortly after you plug in the Pi. If the PWR LED comes on but the ACT LED does not blink irregularly for a few seconds, this is most likely a sign that the SD card is not working. This could be a bad connection or an improperly formatted or installed card. Here are some troubleshooting steps to try out:
- If the red PWR LED is flickering, you likely have a Model A+, B+, or 2 and have tripped the brownout circuitry. Try a different power supply (higher current) or replace your micro-USB cable (which may be too long, thin, or damaged).
- If the green ACT LED doesn’t flash irregularly for a few seconds:
- Try reseating your SD card. Turn off the power, unplug the SD card, and then plug it in again, making sure it is fully inserted. Remember that the SD card goes in upside down and should not require a lot of force to insert or remove.
- Check your SD card formatting and installation. Your SD card should be formatted as FAT or FAT32 and have the NOOBS files in the root of the filesystem (not in a folder). You can always buy a preinstalled copy of NOOBS if you want to simplify this.
Once you know the Raspberry Pi is working from seeing a few seconds of activity on the ACT LED, the next thing to check is your display. Upon boot the Raspberry Pi shows a rainbow test pattern for a second and then displays a recovery screen for a few more seconds. After this it automatically boots into the NOOBS installer, and you should see the installation screen shown in Figure 3.
If your Raspberry Pi is booting according to the LEDs, but you don’t see the NOOBS installation screen, try these troubleshooting tips:
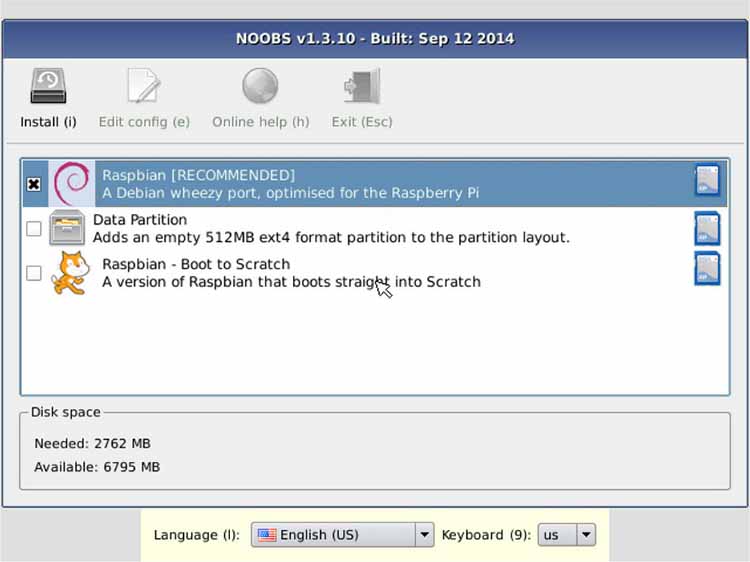
FIGURE 3. NOOBS installer screen
Make sure your monitor power is on and the monitor is set to the correct input (for example, it is easy to forget to switch the input from VGA to HDMI).
- If using HDMI, try safe mode. This is accomplished by pressing the number 2 on your keyboard in NOOBS. Safe mode forces a 640 × 480, 60-Hz resolution that most monitors can support. It also boosts the HDMI signal, which may help with long cables or high interference.
- If using composite, switch to PAL or NTSC. This is accomplished by pressing the number 3 (for PAL) or 4 (for NTSC) to switch to composite input and is only required when booting from NOOBS, which defaults to HDMI.
NOTE
When switching NOOBS video modes with your keyboard, make sure it is fully loaded (ACT LED should have stopped blinking). Also, enable NUMLOCK if you are using the numeric keypad.
Installing Raspbian with NOOBS
Raspbian is a Linux-based operating system that is a port of Debian and optimized for the Raspberry Pi. It was created by Mark Thompson and Peter Green and has been helped along by enthusiastic members of the Raspberry Pi community. It also comes with optimized Java installed right out of the box thanks to support from Oracle.
Picking up from the NOOBS installation screen shown in Figure 3 in the previous section, you will want to select Raspbian as your operating system and also set the correct locale and keyboard for your region. If you don’t have a mouse connected, you can access the Language and Keyboard options via the keyboard by using the letter l and number 9 keys, respectively. By default the Raspberry Pi foundation sets the locale to the United Kingdom, which will leave you hopelessly lost on the command line as you attempt to type the pound symbol (#) or at sign (@) on a U.S. layout keyboard.
Figure 4 shows the number of Raspberry Pis by country as reported by Rastrack. While the United States has the highest Raspberry Pi sales by country, the UK wins with the most Pis per capita, so there is plenty of room for growth in the rest of the world!

FIGURE 4. Distribution of Raspberry Pis across the world
After selecting the options, click the Install button or type the letter i to begin the installation process. Installation takes about 20 minutes, give or take a few minutes depending on the speed of your SD card. The installation screen has a pretty accurate progress bar at the bottom, as shown in Figure 5, and provides some helpful hints on the top for new Raspberry Pi owners. This is a good time to grab a cup of joe as you wait for the success screen to pop up.
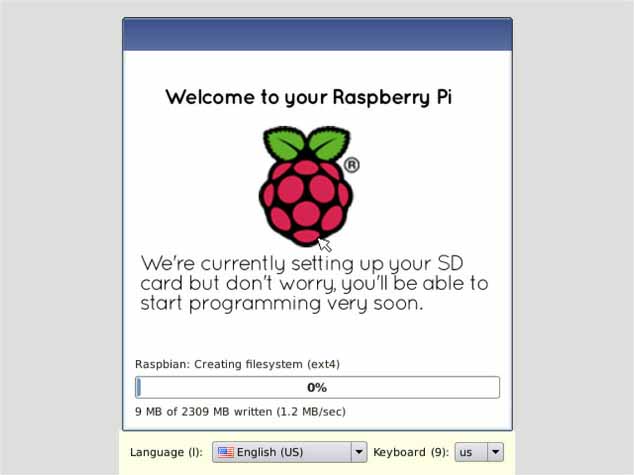
FIGURE 5. Raspberry Pi installation screen
Once you click the OK button or press ENTER, the Raspberry Pi will reboot and start up Raspbian for the first time. Raspbian has a typical Linux boot screen with lots of scrolling text, and a cute Raspberry Pi logo in the top-left corner.
Raspbian is set to automatically log in on your first boot and run the Raspberry Pi Software Configuration Tool (raspi-config), as shown in Figure 6. It is highly recommended to change the default password (as discussed in the following list), but if you need to log in before you get a chance to set it for some reason, the default username is pi and the default password is raspberry.
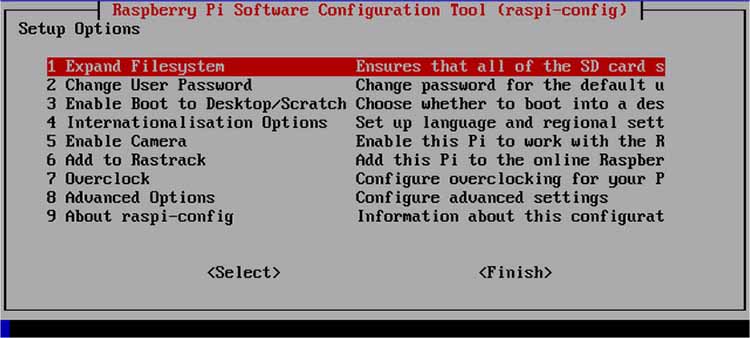
FIGURE 6. Raspberry Pi Software Configuration Tool
Here is a quick rundown of what the different options do (recommended changes are noted):
- Expand Filesystem This lets you expand the root filesystem to fit the size of the SD card. If you used NOOBS to install, this has already been taken care of during the install.
- Change User Password Changing the password is highly recommended for security purposes. Anyone who can access the Raspberry Pi over the network will have root access if you don’t change this.
- Enable Boot to Desktop/Scratch This lets you boot to a graphical user interface (GUI) with X Window System and optionally open Scratch for visual programming. This book steers you to using the command line, but anytime you want to open X Window System, you can type startx.
- Internationalisation Options If you forgot to change this during the NOOBS install, you have another chance to rescue your keyboard layout.
- Enable Camera This enables support for the Pi Camera and is a recommended setting.
- Add to Rastrack This adds your Pi to a worldwide list of Raspberry Pi locations on a map. It is fun to join in and provides valuable statistics on the Raspberry Pi community as you discovered earlier. Since this requires an Internet connection, you may want to revisit this option after completing the upcoming “Networking Your Raspberry Pi” section.
- Overclock The default speed of the Raspberry Pi’s processor is 700 MHz for the A, B, A+, and B+, and 900 MHz for the Raspberry Pi 2. You can optionally raise this; however, it is recommend to start with the default speed. Overclocking the Pi may result in it running hotter and shortening the life of its components.
- Advanced Options Discussed in more detail in the next list.
- About raspi-config This displays an information screen about the Raspberry Pi.
Selecting Advanced Options brings up a submenu with the following additional options:
- Overscan This allows you to enable or disable overscan. If you have a modern LCD, you can safely disable this and get a little more screen real estate at the edges of your monitor.
- Hostname Feel free to change your hostname to be unique.
- Memory Split The memory on the Raspberry Pi is shared between the CPU and the GPU. To improve performance of graphics-intensive applications, I recommend setting GPU memory to at least 128MB.
- SSH This option is for Secure Shell, which is enabled by default, and is required for deployment of Java apps.
- SPI This is general purpose input/output (GPIO) functionality that needs to be enabled for some of the example projects in later my blogs.
- I2C Another GPIO feature for managing a connected bus of devices, this option also needs to be enabled to support projects in later my blogs.
- Serial This enables shell access over serial, although you will need to disable it to free up the serial ports for a later project.
- Audio This lets you force audio to go out over the HDMI or 3.5mm headphone jacks.
- Update This updates the raspi-config tool to the latest version.
On the list of options, the recommended changes are to change your password, enable the Pi Camera, set/confirm the memory split to 128MB, enable SPI, enable I2C, and disable serial. If you forget to do any of these steps, don’t worry; I will remind you in future sections when the required functionality is needed and instruct you to enable it if you haven’t already.
Once you are done making configuration changes, press the TAB key and select Finish. This will reboot your Raspberry Pi and give you your first login prompt as shown in Figure 7. To log in, type the username pi and the new password you chose.
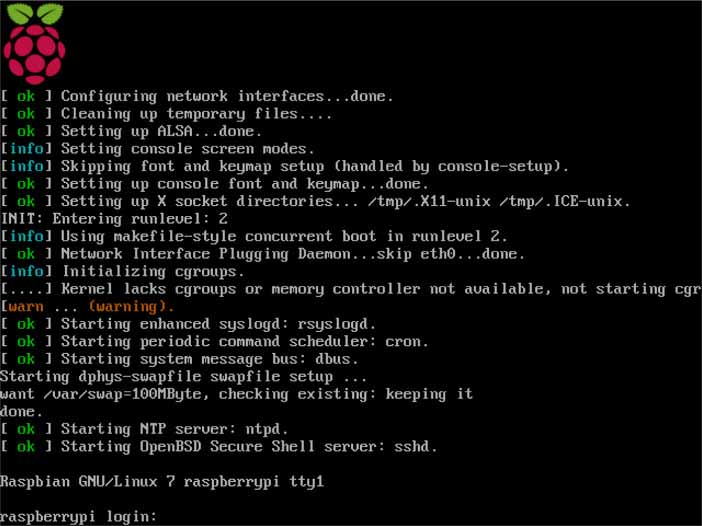
FIGURE 7. Raspberry Pi login prompt
If you need to bring up the raspi-config utility again, you can always do this from the command line by typing
sudo raspi-configThis is probably also a good time to mention the correct way to shut down your Raspberry Pi. If you disconnect power from the Raspberry Pi while it is running, you may damage the filesystem and cause corruption and data loss. To prevent this, make sure that you properly halt the Raspberry Pi before powering it off by using the following command:
sudo shutdown -h nowhis command logs off all users, cleanly closes the filesystem, and terminates before you power off the Pi. You will know your Pi is ready to unplug when you see the green ACT LED flash ten times in sequence.
To reboot you can use a similar command:
sudo shutdown -r nowAs a shortcut you may see some Raspberry Pi users use the halt and reboot commands. These behave as expected and are perfectly safe on the Raspberry Pi, but they are not best practices when you are administering a variety of Unix operating systems, because the behavior varies.
Networking Your Raspberry Pi
To communicate from your computer to the Raspberry Pi, you will have to put your Raspberry Pi and computer on the same network so that your Pi is accessible via TCP/IP. This is also the easiest networking option for Models A and A+ that lack an Ethernet port. There are several different ways to do this depending on the physical location of your computer, the network topology, and your available hardware.
Connecting via Ethernet
If you have a router that acts as a Dynamic Host Configuration Protocol (DHCP) server, you can simply plug the Raspberry Pi into your network using an Ethernet cable. This only works for Raspberry Pi Models B, B+, and 2, because Models A and A+ lack an Ethernet port.
Once connected, the Raspberry Pi will automatically try to get a network address from the DHCP server. You can check for the IP address that the Raspberry Pi acquired by typing the following command:
ip addr show ethO
Connecting via a Local Computer Network
You can also connect your Raspberry Pi directly to your PC using an Ethernet cable. Again, this option is only available for Raspberry Pi Models B, B+, and 2, but can be a great alternative if you are traveling or in a setting where the network topology doesn’t allow your computer and Raspberry Pi to talk.
TIP
The Raspberry Pi Ethernet adapter includes auto-MDIX to detect and fix cable types, so you can use either a crossover cable or a more common straight Ethernet cable to connect devices.
The easiest way to accomplish this is to assign static IP addresses to both your computer and the Raspberry Pi so they are both in the same subnet. A common local subnet to use is 192.168.x.x, which is one of the reserved subnets for local area networks. The configuration on your desktop computer will look something like Figure 1-8 for OS X or Figure 9 for Windows.
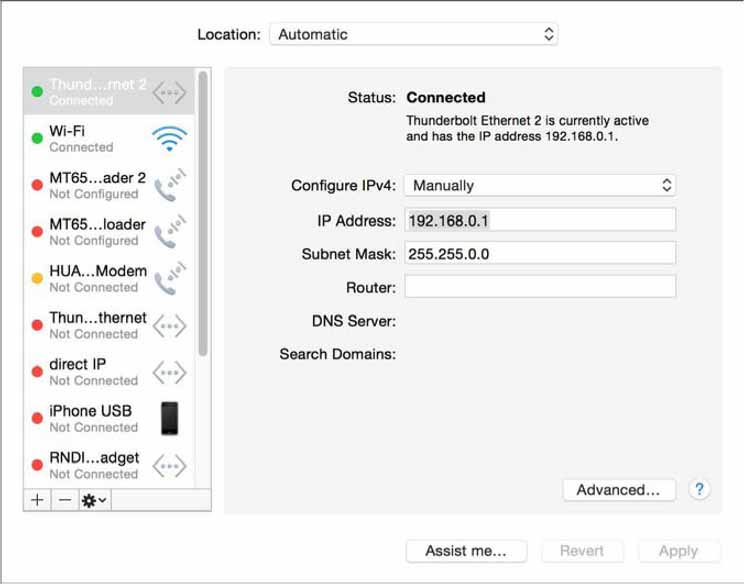
FIGURE 1-8. Static IP configuration in OS X

FIGURE 9. Static IP configuration in Windows
On the Raspberry Pi you will need to modify the cmdline.txt file in the boot folder. To do so, log in to the Raspberry Pi with the following command:
sudo nano /boot/cmdline.txtNano is a simple command-line editor that allows you to edit text files on Unix systems. When you open the cmdline.txt file, you will get an editing screen as shown in Figure 10. Scroll to the end of the line using the arrow keys and type ip=192.168.0.2 (or a similar local IP address). Make sure to leave a space after the last parameter (most likely, rootwait) and do not add any carriage returns.
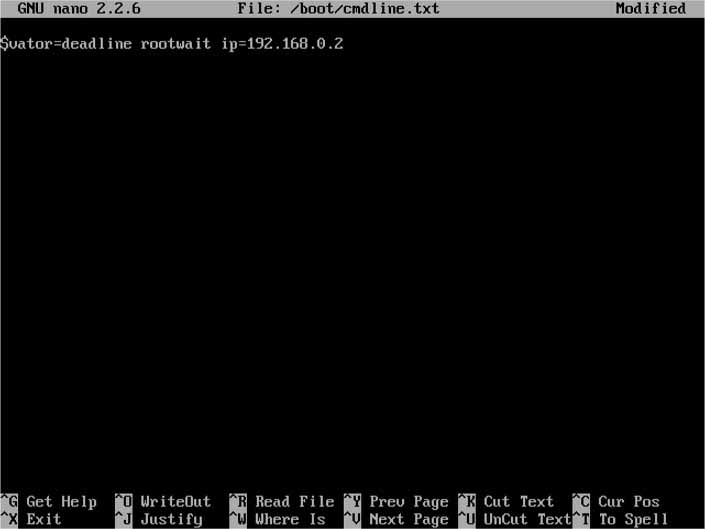
FIGURE 10. Setting a static IP address on the Raspberry Pi
After rebooting your Pi, it will start up with the new IP address fixed, and will be accessible from your computer with that IP address.
Connecting via a Wireless Network
A great option for networking both Raspberry Pi B and A variants is to use a Wi-Fi adapter. This allows you to connect the Raspberry Pi to a wireless network and access it from your computer remotely.
For this you will need a compatible Raspberry Pi Wi-Fi USB adapter. In general, Wi-Fi devices utilizing the RTL8188CUS chipset are well supported on the Raspberry Pi. Often you will find certified Wi-Fi devices sold alongside Raspberry Pis at vendor websites, but you may be able to find a cheaper or faster Wi-Fi adapter with a little bit of research. For a full list of devices that are known to work by the community, check the eLinux Wi-Fi adapter listing here.
Raspbian comes with wpa_supplicant installed and set up for a wireless network, so all you have to do is add your network configuration options from the command line. To do this, I recommend using the WPA command-line tool (wpa_cli), which lets you scan your network and add new wpa_ supplicant configurations. The advantage of using the command-line tool over editing the configuration file directly is that you can’t make an error in your configuration by missing punctuation or formatting.
Listing 1 shows an example of how to use wpa_cli to configure your wireless settings. Obviously, you should replace ssid and psk with the SSID and preshared key of your local network configuration, and this assumes that you are using a network that broadcasts the SSID. Both WPA and WPA2 networks are supported by this configuration.
Listing 1 WPA command-line tool for configuring Wi-Fi
pi@raspberrypi ~ $ wpa_cli Selected interface 'wlanO'

Interactive mode

>	scan OK
<	3 > CTRL-EVENT-SCAN-RESULTS
<	3 >WPS-AP-AVAILABLE
>	scan_results

bssid / frequency / signal level / flags / ssid

12:0d:7f:8b:be:9e 2437 92 [WPA2-PSK-CCMP][ESS] NightHacking-Guest

>	add_network 0
>	set_network 0 ssid "NightHacking-Guest"

OK

>	set_network 0 psk "steveonjava"

OK

>	enable_network 0

OK

>	save_config

OK

>	reconnect

OK
TIP
If you are still using WEP, it is possible to connect your Raspberry Pi, but I don’t recommend it. WEP has been proven insecure and can be cracked in under a minute by low-end hardware and freely available software. There are also some new cryptographic attacks against WPA involving vulnerabilities in TKIP. In short, upgrading your network to WPA2 is an important security practice.
Updating and Upgrading
Now that you are on the network, the very first thing you should do is to update your Raspbian distribution. This will ensure you have the latest package listing and current versions of all of the core files. To do this, first execute the following command to download the latest package listing:
sudo apt-get updateThen you can perform an upgrade of your Raspberry Pi distribution by using this additional command:
sudo apt-get upgradeDepending upon how old the NOOBS distribution you originally used was, and how fast your network connection and SD card are, this could take quite a while. This might be a good opportunity to brew another cup of coffee.
Setting Up a Hostname
If your Raspberry Pi gets its IP address from DHCP, the address can change on every reboot. If you are running the Raspberry Pi headless (without a monitor or display), this can make it a chore to search for the new IP address. A good alternative is to use Bonjour/Zeroconf, which broadcasts your hostname over multicast. This way you can refer to your Raspberry Pi as raspberrypi.local (or, in general, hostname.local) from anywhere on your local network.
The first step is to set a unique hostname. This can be done from the Advanced Options in the Raspberry Pi configuration utility. To bring up the configuration utility from the command line, type the following:
sudo raspi-configAfter setting the hostname, you will be asked to reboot the Pi to update the network configuration. After reboot, you can install Bonjour on the Raspberry Pi by running the following command:
sudo apt-get install libnss-mdnsAfter this command completes, you are ready to access the Pi on the network. From any computer on the same network where multicast packets reach, you can replace the IP address of your Pi with hostname.local. For example, Listing 2 shows the output of pinging my Raspberry Pi with hostname nighthackingpi.
Listing 2 Pinging nighthackingpi via Bonjour
NightHacking-Presenter: ~ sjc$ ping nighthackmgpi. local PING nighthackingpi.local (192.168.1.10): 56 data bytes
64 bytes from 192.168.1.10: icmp_seq=0 ttl=64 time=76.379 ms
64 bytes from 192.168.1.10: icmp seq=l ttl=64 time=93.390 ms
Notice that it automatically translates from the hostname to an IP address of 192.168.1.10. However, if this address changed in the future, I could use the same command to access my Pi.
Bonjour is installed by default on OS X and Ubuntu Linux. If you are running on Windows, you already have Bonjour installed if you have previously installed iTunes. Otherwise, the easiest way to get it is to install Bonjour Print Services for Windows from Apple: http://support.apple.com/kb/DL999.
Connecting to Your Raspberry Pi with SSH
Using an SSH client from your computer is a convenient and secure way of interacting with your Raspberry Pi. Once you have networking configured on both machines, this is as simple as connecting with the hostname or IP address.
For Unix or OS X you can simply use a terminal window and the version of SSH that ships with your operating system. Figure 11 shows an example of an SSH login from an OS X computer.
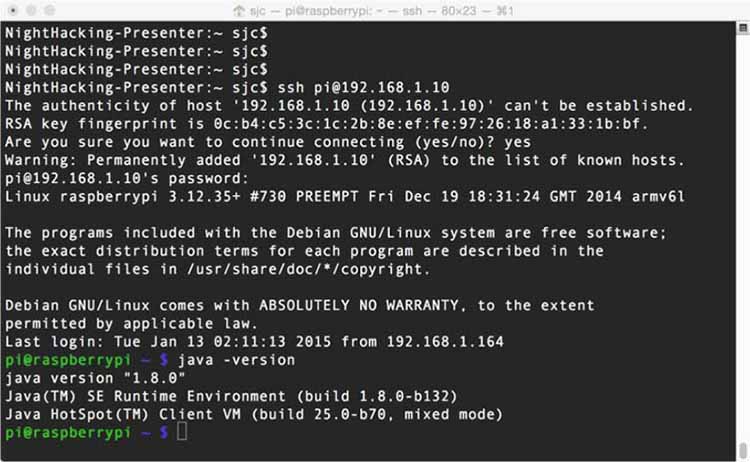
FIGURE 11. SSH from OS X
To connect via SSH on the command line, simply issue the following ssh command:
ssh user@hostnamewhere “user” is your username (most likely, pi) and “hostname” is your Pi’s network name or IP address (for example, 192.168.0.2).
If this is the first time you are connecting, you may be asked to verify the RSA key fingerprint. This is a security measure to ensure that the device to which you are creating an encrypted connection is in fact the device you intended to communicate with. If your network has been compromised (or you are on a public network), then it is possible for someone to launch a man-in-the-middle attack and spoof as your device.
To verify the RSA key fingerprint, physically log on to the Raspberry Pi and type the following command:
ssh-keygen -l -f /etc/ssh/ssh_host_rsa_key.pubThis returns a fingerprint that you can verify against the one returned by the SSH tunnel, which will look something like the following:
2048 0c:b4:c5:3c:lc:2b:8e:ef:fe:97:26:18:al:33:lb:bf root@raspberrypi (RSA)
CAUTION
Checking the RSA key fingerprint after logging on to the Raspberry Pi is as good as not checking at all. Once someone else has established a man-in-the-middle attack, they can simply intercept the command and return a matching fingerprint.
Now that the connection has been established as secure, SSH will ask for your password. Once authenticated, you can issue commands just as if you were physically at the keyboard. This is often more convenient, and it lets you interact with a headless Raspberry Pi to do redeployment, diagnostics, or troubleshooting.
On Windows you will have to install an SSH client yourself. A well-known and free SSH client is PuTTY, which is maintained by a small team based in Cambridge, England. You can find the PuTTY downloads here.
The initial configuration screen of PuTTY is shown in Figure 12. Simply enter the IP address or hostname of your Raspberry Pi, make sure SSH is selected, and click Open. This will start a secure connection that prompts you to verify the RSA key fingerprint (as just discussed) and then lets you connect with your username and password.
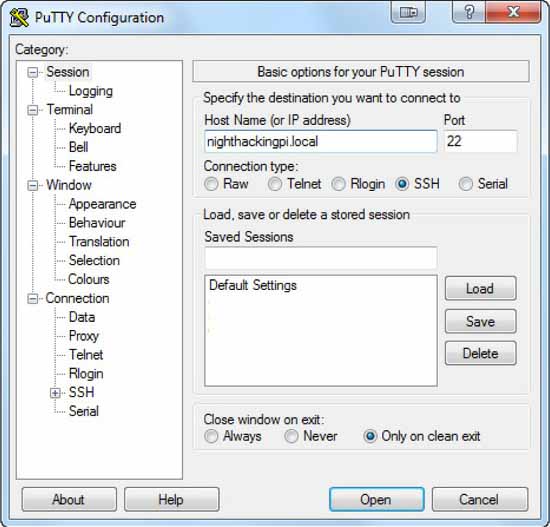
FIGURE 1-12. PuTTY SSH client for Windows
Creating a Simple Raspberry Pi Application
Now that you have a convenient SSH prompt to access your Raspberry Pi, you are ready to try running Java remotely. In the next my article you will install a full-featured integrated development environment (IDE) to speed up development, but for this simple HelloRaspberryPi application, it is easy enough to type it in on the command line.
To create the application, you use the echo and append (>) commands to generate a simple Java class. Listing 3 shows the commands (in bold) you type into the SSH sessions.
Listing 3 Creation of the HelloRaspberryPi class
pi@nighthackingpi ~ $ echo "class HelloRaspberryPi {
>	public static void main(String[] args) {
>	System.out.println(V'Hello Raspberry Pi\");
}
}" > HelloRaspberryPi.java
>
Notice that you can continue a command within quotation marks on the next line simply by pressing ENTER. The command prompt (>) on each line is automatically typed by the system, and in this example I used spaces for indentation. The only other difference from normal Java code is that the double quotes (" ") need to be escaped with a preceding backslash (\).
The last line writes this application to a file called HelloRaspberryPi.java that you can compile by using javac with the following command:
pi@nighthackingpi ~ $ javac HelloRaspberryPi.java
Executing the application is as simple as running java in the same directory with the main class name:
pi@nighthackingpi ~ $ java HelloRaspberryPiMy shell console is shown in Figure 13 along with the output of the program.
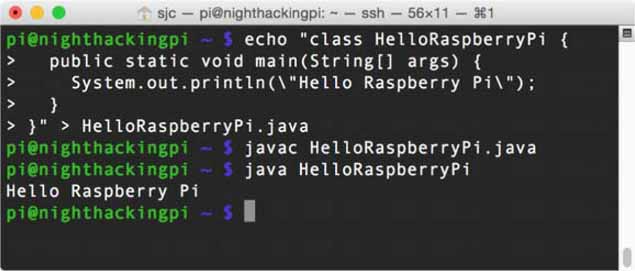
FIGURE 13. Output of the HelloRaspberryPi application
Congratulations on setting up your first Raspberry Pi and running a simple Java application on it! The work you completed in this blog on hardware, configuration, and networking has set the foundation for the rest of your Raspberry Pi projects. In the next blog we will explore the visual capabilities of the Raspberry Pi and set up a full Java IDE to streamline future projects.

