 TinyCalculator is the first and simplest application discussed in this blog. It’s nothing more than a simple calculator for basic arithmetic. But it is useful to show some fundamental concepts of web applications with Java and JSF.
As a kind of appetizer, and unlike how I’ll handle the other applications, I’ll first show you the whole application, with a little explanation afterwards. Then, as a kind of restart, I talk about the foundations of web applications and explain TinyCalculator and different approaches.
You can access the source code for TinyCalculator.
Creating the Application
A web application with Java and JSF uses an application server to run. Don’t be afraid - your IDE usually deals with that. Later on, I’ll discuss that in more detail. We’ll start with the application.
For my blog, I had to decide which IDE to use in the tutorial parts. NetBeans, either the Java EE or All edition, comes with GlassFish. At the time of writing, the direct link to the download page. Because NetBeans has been donated to Apache, this location may change. Just install it, and no further configuration is needed to start with simple applications. It’s quite easy.
Many of this book’s basic examples are based on NetBeans 8 (English), which is bundled with GlassFish 4. GlassFish 4 is the reference implementation of Java EE 7, which is fine for TinyCalculator. To enable the brand new Java EE 8 features, you need GlassFish 5 or any other Java EE 8–compliant server, once available. GlassFish 5 will be bundled with NetBeans 9. Since the first donation (IDE) is still in progress, and Java EE is part of the second Java EE 8 donation, this may be a lengthy process. I’ll describe how to update to Java EE 8 just after TinyCalculator’s explanation.
All applications in my blog are built with Apache Maven, which is bundled with NetBeans. The Maven application structure is almost independent from the IDE. Thus, you may use any IDE of your choice. Depending on your IDE, you may open Maven projects directly (for example, with NetBeans) or you may need to perform a simple import (for example, with Eclipse).
As a novice to JSF or Java EE, you may not have created any Java-based web application before. So, I’ll start this one from scratch in the form of a step-by-step tutorial. Unlike in future blog notes, I’ll cover the whole application here without detailed explanation, and then we’ll catch up after the tutorial:
- Launch NetBeans.
- From the File menu, choose New Project. NetBeans displays the New Project wizard , as shown in Figure 1.
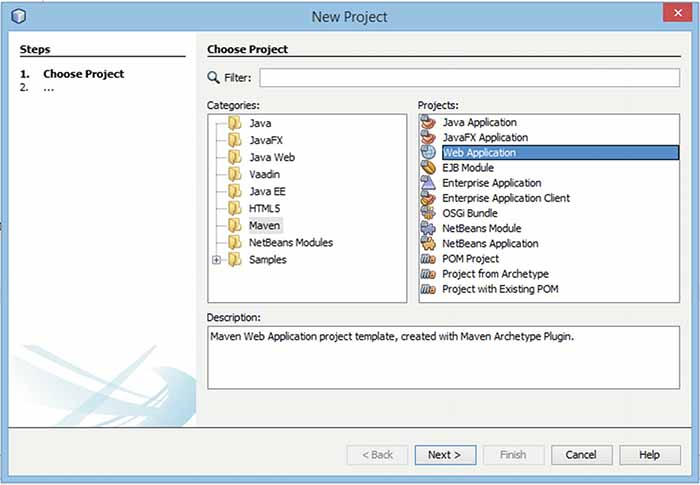
Figure 1 New Project wizard
- Click the category Maven, click Web Application, and then click Next. NetBeans displays the New Web Application wizard , as shown in Figure 2.
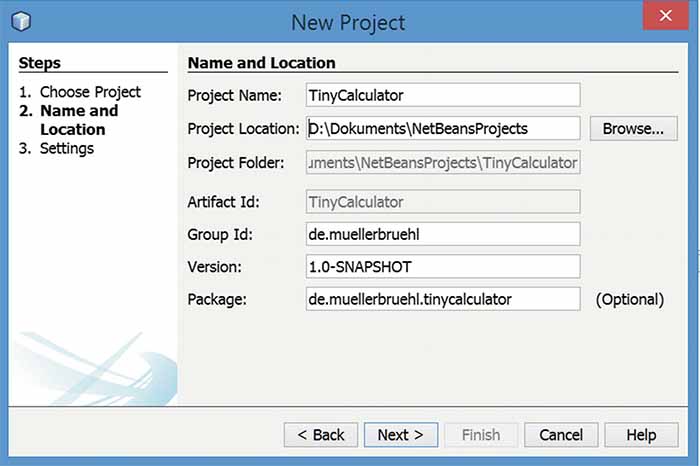
Figure 2 New Web Application wizard
- For the Project Name, enter TinyCalculator . You may adapt the other fields as desired, or just keep them unchanged. It’s good practice to set the Group Id to the reverse notation of your domain. Click Next, keep the settings in the next dialog unchanged, and click Finish.
NetBeans creates a skeleton of a new web application for you and displays it within the projects tree , as shown in Figure 3.
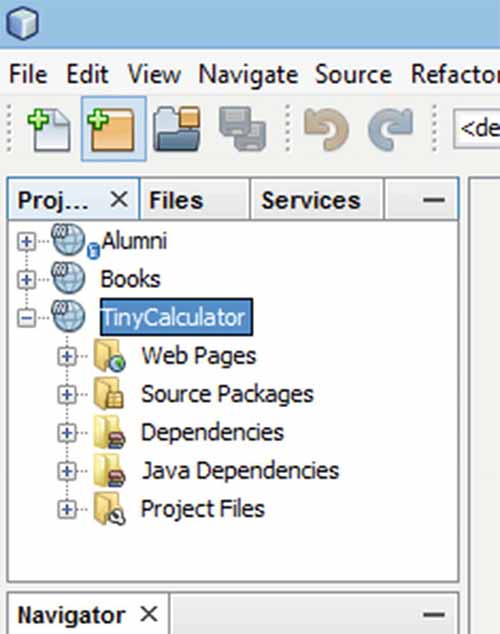
Figure 3 Projects tree
- Right-click (secondary click) TinyCalculator in the projects tree and choose Properties from the context menu. The Project Properties screen appears, as shown in Figure 4.
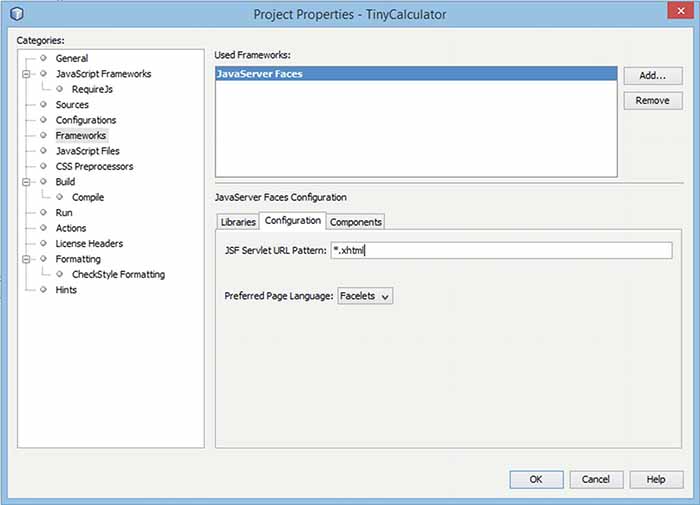
Figure 4 Framework configuration
- Choose the Frameworks category. Choose JavaServer Faces and click the Add button. Click the Configuration tab and change the contents of the JSF Servlet URL Pattern box to *.xhtml. Click OK. While adding JSF to your project, NetBeans creates a web page called
index.xhtmlwithin the web pages, keeping the formerly createdindex.htmlfile. - On the projects tree open the Web Pages node (if it’s not already open), as shown in Figure 5. Select index.html and delete it.
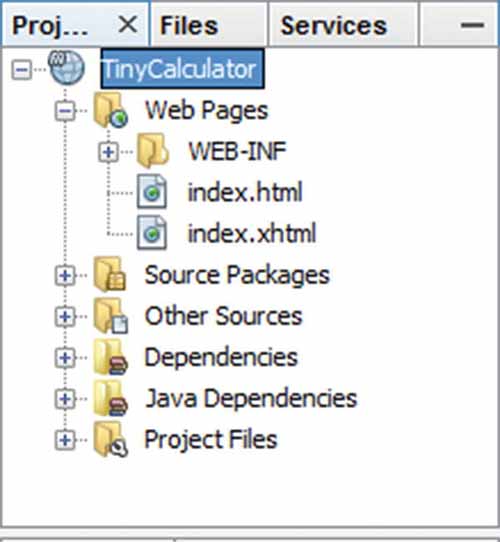
Figure 5 Projects tree
From the File menu , choose New File - or press the shortcut key shown in the menu, which is faster than clicking. The IDE opens the New File wizard, as shown in Figure 6.
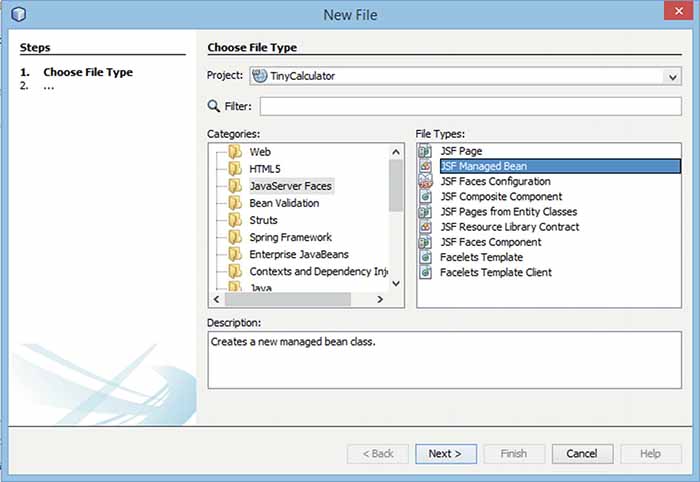
Figure 6 New File wizard
- Choose the category JavaServer Faces and then choose JSF Managed Bean. Click Next. The New JSF Managed Bean window appears, as shown in Figure 7.
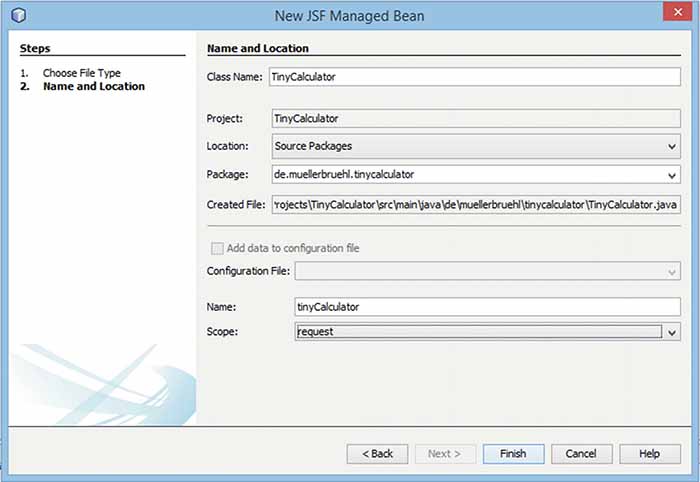
Figure 7 New JSF Managed Bean
- Enter TinyCalculator as the Class Name and from Scope select request. Click Finish. NetBeans creates and opens a Java class file named
TinyCalculator. - Now, edit this class. Key in or paste the code shown in Listing 1.
 1   package de.muellerbruehl.tinycalculator;
 2
 3   import javax.inject.Named;
 4   import javax.enterprise.context.RequestScoped;
 5
 6   /**
 7    *
 8    * @author mmueller
 9    */
10   @Named
11   @RequestScoped
12   public class TinyCalculator {
13
14     public TinyCalculator() {
15     }
16
17     private double _param1;
18     private double _param2;
19     private double _result;
20
21     public double getParam1() {
22       return _param1;
23     }
24
25     public void setParam1(double param1) {
26       _param1 = param1;
27     }
28
29     public double getParam2() {
30       return _param2;
31     }
32
33     public void setParam2(double param2) {
34       _param2 = param2;
35     }
36
37     public double getResult() {
38       return _result;
39     }
40
41     public void setResult(double result) {
42       _result = result;
43     }
44
45     public String add(){
46       _result = _param1 + _param2;
47       return "";
48     }
49
50     public String subtract(){
51       _result = _param1 - _param2;
52       return "";
53     }
54
55     public String multiply(){
56       _result = _param1 * _param2;
57       return "";
58     }
59
60     public String divide(){
61       _result = _param1 / _param2;
62       return "";
63     }
64   }
Listing 1 Editing the TinyCalculator Class File
You may notice the underscores indicating the fields. This usage differs slightly from the Java naming conventions.
- Open the
index.xhtmlpage in the editor and change it to the following:
 1   <?xml version='1.0' encoding='UTF-8' ?>
 2   <!DOCTYPE html>
 3   <html xmlns:="http://www.w3.org/1999/xhtml"
 4       xmlns:h="http://xmlns.jcp.org/jsf/html">
 5     <h:head>
 6       <title>TinyCalculator</title>
 7     </h:head>
 8     <h:body>
 9       <h1>TinyCalculator</h1>
10       <h:form>
11         <div>
12           <h:outputLabel value="Param1: "/>
13           <h:inputText value="#{tinyCalculator.param1}"/>
14         </div>
15         <div>
16           <h:outputLabel value="Param2: "/>
17           <h:inputText value="#{tinyCalculator.param2}"/>
18         </div>
19         <div>
20           <h:commandButton value="Add"
21                            action="#{tinyCalculator.add}"/>
22           <h:commandButton value="Subtract"
23                            action="#{tinyCalculator.subtract}"/>
24           <h:commandButton value="Multiply"
25                            action="#{tinyCalculator.multiply}"/>
26           <h:commandButton value="Divide"
27                            action="#{tinyCalculator.divide}"/>
28         </div>
29         <div>
30           <h:outputLabel value="Result: "/>
31           <h:outputText value="#{tinyCalculator.result}"/>
32         </div>
33       </h:form>
34     </h:body>
35 </html>- Run the project by clicking Run ➤ Run Project (TinyCalculator).
If your application server isn’t running yet, NetBeans will start your GlassFish application server - and your browser, too. It will display the TinyCalculator, as shown in Figure 8.
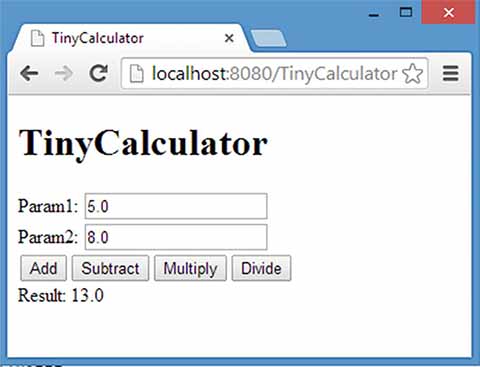
Figure 8 TinyCalculator in action
- Take a big breath - soon you’ll get an explanation of what has happened so far.
Netbeans Code Completion
As you might expect, a good Java IDE will assist you in creating code. There’s no need to type in the whole source code. For example, you can simply type three attributes and let NetBeans create the getters and setters for you. NetBeans will create the code by the aid of the Insert Code menu. Open the context menu (right-click within the source and choose the appropriate menu or press Alt+Insert. Describing all the features of an IDE is far beyond scope of this blog, but you can check NetBeans help, which is available online via the Help menu.
Note
Working with TinyCalculator
This section briefly goes over some aspects of the TinyCalculator application.
Managed Beans
I assume, for you as a Java developer, the code of the managed bean is the most familiar part of the TinyCalculator application. In JSF, developers often talk about managed beans, and that’s how NetBeans called them in its New File dialog. However, this term isn’t really accurate.
A Java bean is a reusable software component. It’s nothing but a pure Java class with a no-argument constructor and properties following a special convention. A property is a private attribute (field) that is accessed via a pair of getter and setter methods. These methods follow the naming convention of setName and getName.
From the abstract perspective of object-oriented programming, the state of an object is held by attributes. An attribute is a variable that can have any modifier, such as private, protected, public, static, and so on. The term attribute is widely used and can imply nearly everything. Although it’s the correct term to describe the state of an object, in Java other terms are often used (which might also be called differently in other languages). In this blog, I mostly use the following:
- A field is a private (or sometimes protected) instance variable.
- A property is a field that is exposed by a pair of getter and setter.
JavaServer Faces is designed to run both in Enterprise Java Beans (EJB) containers as well as in servlet containers. Both are called application servers . Whereas the first one contains a full or partial stack (besides the full platform, only one profile, the web profile, is defined) of Java EE technologies, including servlet, the latter only serves servlets. Thus, other Java EE technologies, like Contexts and Dependency Injection (CDI) , are not available in servlet containers. Some widely known examples of EJB containers are GlassFish and WildFly. Examples of servlet containers include Tomcat and Jetty.
If JSF runs on a pure servlet container, JSF manages so-called backing beans. Such a bean will be annotated as @ManagedBean, and that’s where the term managed bean originates. Starting with Java EE 6/JSF 2.0, developers could use CDI named beans too, which is today’s recommended technology. In TinyCalculator, we use a CDI named bean. Such a bean is annotated by @Named. The current version, JSF 2.3, deprecated the old JSF managed beans. If you want to use CDI managed beans, you either need to use an EJB container like GlassFish or add the CDI framework to the servlet container. A named or managed bean might be accessed by its name.
The second annotation, @RequestScoped, declares the bean’s lifetime - with every request from your browser, an instance of this class is created and destroyed by the termination of the request. A longer lifetime might be declared by @SessionScoped (providing one instance of the bean per user session), @ApplicationScoped (one instance during the application’s lifetime), and more. I’ll talk more about this later in my blog.
In the example, we used a CDI named bean, as in Listing 2.
1   import javax.inject.Named;
2   import javax.enterprise.context.RequestScoped;
3
4   @Named
5   @RequestScoped
6   public class TinyCalculator {...}
Listing 2 CDI Annotation for a Request Scoped Bean
A JSF managed bean, on the other hand, would be declared as in Listing 3.
1   import javax.faces.bean.ManagedBean;
2   import javax.faces.bean.RequestScoped;
3
4   @ManagedBean
5   @RequestScoped
6   public class TinyCalculator {...}
Listing 3 JSF Annotation for a Request Scoped Bean (Do Not Use)
Caution
Always use the annotations for named/managed beans in conjunction with the appropriate scope annotations - for example, both JSF annotations or both CDI annotations. In particular, a named bean with JSF scope would result in a runtime error.
Although you can’t mix these annotations within a single bean, it is possible to use both types (named and managed) beans within one application. That might be useful for migrating older applications that used JSF managed beans. It’s possible to add new features by implementing them as CDI named beans while keeping the existing beans. Then, over time, the existing beans might be changed to named beans too.
But why should you prefer CDI named beans over JSF managed beans? As their name suggests, JSF managed beans are developed especially for and dedicated only to JSF.
CDI (Contexts and Dependency Injection) is relatively new to Java EE and has made it into EE 6. It allows the container to “inject” appropriate objects into your object. These objects may not be known at compile time, and the dependencies will be resolved at runtime. This allows loose coupling of objects. One essential part of this solution is a general naming concept.
Because CDI named beans may be used in different Java EE technologies, JSF itself slowly migrates to CDI, which sometimes replaces the proprietary solution. JSF 2.3 at last simply allows to inject JSF-related objects into places where it had been very tricky before to access these values. The migration to CDI is mostly complete for this version.
Note
But is CDI available in pure servlet containers like Apache Tomcat? No, but JSF isn’t available either until you deploy the JSF library to enable it. Similarly, you may add CDI to a servlet container: just provide a CDI implementation - for example, Weld. In the case of Tomcat, there is a simpler solution: Use TomEE, which is Tomcat bundled with Java EE technologies, implementing the Java EE Web Profile.
Bean Passivation
If the bean’s lifetime is expanded to more than one request, the server still has to manage this object, even though the next request may take a while or will never occur. The latter is mitigated by a session timeout. Until then, the bean is alive. Where there is a lot of traffic, this memory consumption may cause problems.
To avoid memory problems, or for other reasons, depending on the implementation, the container might passivate a bean : the object is persisted somewhere, such as to disk, and during the next request, when needed, is restored into memory (activated).
To enable this feature, the bean must implement the Serializable interface.
Previewing Scopes
I discuss scopes in detail later in my blog. But to give you an initial feeling about scopes, you may perform a little task.
- Add a logger and log the construction of the
TinyCalculator class:
1   private static final Logger LOGGER = Logger.getLogger("TinyCalculator");
2   public TinyCalculator() {
3       LOGGER .log(Level.INFO, "ctor TinyCalculator");
4 }- Launch the application and watch the NetBeans console window.
- Perform some calculations and then close and reopen the browser and application.
- Perform some more calculations.
- Now exchange the
@RequestScopedannotation for @SessionScoped, and then for @ApplicationScoped, and perform the same operations. - Observe the different output.
Did you observe the message "ctor TinyCalculator" printed to the console (ctor is an abbreviation of constructor)? You’ll also find the message in the log. It appeared once for every request when using the @RequestScoped annotation. Using @SessionScoped, this message appears for a new session (such as after closing and relaunching the browser) only. Using @ApplicationScoped, the message appeared only for the first call to the bean after the app had been launched.
The calculation methods may look quite strange. These are not functions returning the calculated value, but methods returning a string and perform the calculation by changing the status of the result variable. The simple reason is that the calculation is called within the action of the appropriate button. Such an action performs a page navigation. Returning an empty string or null keeps the browser “staying” on the current page. In fact, this page will be reloaded (I cover page navigation in detail later in the blog). Using JSF 2.2 or later, such a function might be declared as void, alternatively.
The Page
I don’t want to anticipate the detailed explanation coming up in the next blog notes. I just want to point out that the page will be rendered as HTML and sent to the browser. If you’re familiar with HTML, you would recognize only some HTML elements. JSF’s former intention was to provide the programmer a kind of known interface, hiding away that HTML stuff. Because of that, JSF offers a set of its own tags, which are included in the page and are replaced before sending the page to the browser. These tags are regular XML tags, assigned to appropriate namespaces:
1   <h:outputLabel value="Param1: "/>
2   <h:inputText value="#{tinyCalculator.param1}"/>
This is a label with a value (text) of “Param1:” followed by a text element. The value of the text element is retrieved from and sent back to our bean. #{…} denotes the Expression Language (EL) , which is used to glue parts of the user interface to the managed bean. tinyCalculator refers to our bean - by default, the EL uses the bean name with a lowercase first letter, followed by dot notation and referring methods. In the case of properties, this establishes a two-way communication with the getter/setter pair. Name refers to getName and setName (omitting the get and set prefixes). Thus, the text element reads and writes the property:
1 <h:commandButton value="Add" action="#{tinyCalculator.add}"/>In the case of the buttons, each action defines one of the calculating methods.
Note
Starting with JSF 2.2, an alternative approach was introduced, reducing the JSF-specific tags and using more pure HTML. This is known as HTML-friendly markup or more often HTML5-friendly markup, even though it is not HTML5 specific.
The Relationship Between Code and View
The rough relationship between browser view, page definition, and managed bean should be understandable from the explanation. But a picture, like Figure 9, is worth a thousand words.
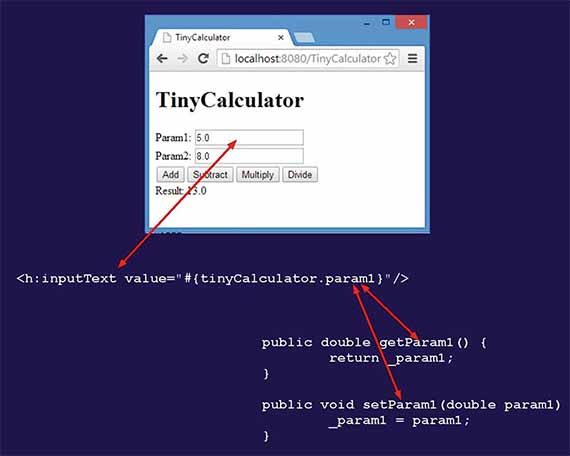
Figure 9 Rough relationship between code and view
The tag <inputText ...> represents a text field in the browser. Its values are bound to a getter/setter pair of the bean. When JSF renders the page, it calls the getter to retrieve the value for the input field. And after clicking an operation button, the content of the page is sent to the server (using an HTTP POST under the hood). JSF transfers the data into the model (our bean) by using the setter.
Note
The simplified presentation shown earlier is useful for an initial understanding of JSF , but it ignores one important fact: the component tree. When processing a request, all JSF components are held within a tree data structure. Depending on enhanced features of your application, it may be useful to access or manipulate this component tree directly. I discuss the component tree in more detail later in my blog.
Summary
In this blog we created our first small JSF application. To provide a quick result, this application was introduced as a step-by-step tutorial, followed by a brief discussion.
There is much more to explain, including the configuration NetBeans built for us under the hood and which we modified by simply changing the project’s properties. This article is just an appetizer - a quick start. Beginning with the next my blog, I’ll discuss the foundations of JSF and its related technologies.
See video tutorial on JSF application creation on example:
See more video about JavaServer Faces (JSF) on my page.

