
 The XAMPP package is free and is preconfigured so that the components will talk to each other. This eliminates the hassle of the usual practice of downloading several individual components and then configuring them to work together.
At the time of writing, the most recent version of XAMPP is version 7.2.4. This version is used throughout the blog note. It has component versions as follows: Apache 2.4.33, MySQL (MariaDB 10.1.31), PHP 5.4.7, and phpMyAdmin 4.8.0.
The package and its components are improved with each release, but the processes described in this book are rarely affected because the updates are usually backward compatible.
Caution Make sure that the package you intend to use contains version 4.8.0 of phpMyAdmin or later. All the instructions that follow do not relate to earlier versions; they had a few minor flaws, such as the interface column headings not lining up properly with the content, and also there was some occasional odd behavior. The new version seems slick and flawless.
Before I give you the instructions for downloading XAMPP, I need to settle a question that bothers every beginner concerning the transferring of a developed database from XAMPP to the remote host. If you use XAMPP on your own computer, a question will arise, as stated in the title of the next section.
Will I Be Able to Transfer the Database from XAMPP to a Remote Host?
The main thought that haunts a beginner is “If I develop a database on a local WAMP, will I be able to move it easily to a remote host?" Beginners have every reason to be worried because most manuals rarely give even a hint on this topic. However, the answer is “Yes, you will be able to move the database".
Now I will provide the information for downloading and installing XAMPP.
Caution Should you wish to explore other free WAMPs, it is possible to install both EASYPHP and XAMPP on the same computer. however, make sure one of them is shut down before opening the other; otherwise, they will fight for the same ports and cause annoying problems.
Download and Install XAMPP
XAMP is free and needs no configuring. To download the package, go to this link.
The home page varies from time to time, so you may have to explore the buttons on the tool bar a little to load the screen shown in Figure 1-2.
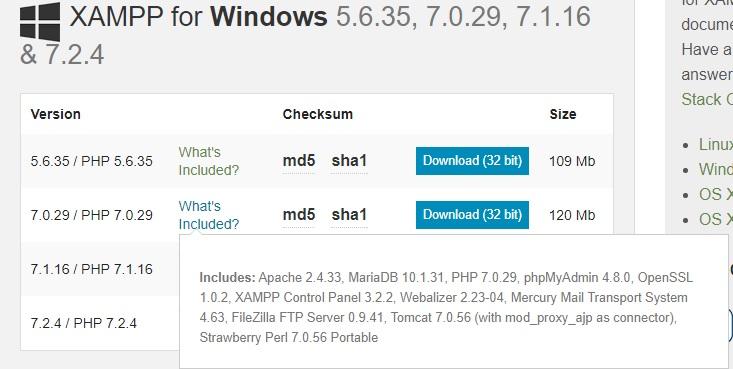
Figure 1-2. Installing XAMPP
The download page will state that you must have C++ MS VC 2008 runtime libraries installed. These are normally already installed in modern versions of Windows; however, the XAMPP installation page provides a URL where you can download the libraries if necessary.
Scroll right down the download page until you see the section illustrated in Figure 1-2. I chose the zip version for Windows, and this installed in 32-bit and 64-bit computers without any problems. I also used the installer version on another computer and found no difference in operation or appearance.

Download the file into your Downloads folder and then double-click it to unzip it into a new folder named xampp on the root of the hard drive; to avoid security issues, don't install it in the Program Files folder. If your main hard drive is C:, the default folder for the installation will then be C:\xampp. During the installation, you may see some black screens with white text—just keep going until the installation is completely finished. You may see a window named XAMPP Options. The installation may demand a restart; my installations did not. You will be asked if you want to load the XAMPP control panel; click Yes. If XAMPP is running, you will see an icon in the Notification area like the one shown in Figure 1-3.
![]()
Figure 1-3. The XAMPP icon
The items on the XAMPP control panel labeled Running usually appear automatically, and you will then be able to stop the various modules. If they do not start automatically, click the start buttons on the XAMPP control panel for Apache and MySQL. If a button says Stop, that module is already running. What next? When the interface appears, change the language to your version of English. If you are asked about running the modules as services, choose to run Apache and MySQL as services, and then those modules will automatically start when you double-click the XAMPP desktop icon.
Caution The XAMPP icon in the Notification area is the same color and shape as the Java update icon.
Create a shortcut on your Desktop for XAMPP's htdocs folder, and place it alongside the XAMPP icon as shown in Figure 1-4. Use this shortcut for loading your PHP files into the C:\xampp\htdocs folder.

Figure 1-4. Time-saving shortcuts
If a desktop icon was not created during the installation, I recommend that you go to the C:\xampp folder, and then create a Desktop shortcut for the xampp-control.exe file.
For maximum convenience, put the two Desktop items side by side as shown in Figure 1-4. One icon starts and stops XAMPP, and the other allows you to create and modify pages directly in the XAMPP htdocs folder.
One common problem is that Skype uses the same port as Apache. So if users have Skype running, Apache won't start. You can change the ports in Skype's advanced options screen. If you have web deployment Agent Services running, you will have to stop that to enable Apache to run.
Starting XAMPP
From here onward, to test your pages in XAMPP, double-click the desktop icon and check that Apache and MySQL have started. If they have not started, click the start buttons for each and then minimize the control panel.
The XAMPP control panel is shown in Figure 1-5.

Figure 1-5. The XAMPP control panel
Note that, under Service, I have shown that the first three modules are running as services, as indicated by the selected boxes. This ensures that those modules will run as soon as you start XAMPP.
Always minimize the control panel so that you have a clear desktop for starting work on your databases.
After starting Apache and MySQL, you can test your installation and examine all of the XAMPP examples and tools; to do this, enter the following address in your browser.
http://localhost/ or http://127.0.0.1/
Closing XAMPP
Close XAMPP when you have finished testing your database and PHP files. This will free up memory for tasks other than database development. To close down, click the minimized XAMPP control panel on the task bar and then click the Quit button on the control panel as shown in Figure 1-6. Alternatively, you can right-click the icon in the Notification area and then click Quit.

Figure 1-6. Closing down the XAMPP program
The security of a database and its data is extremely important. XAMPP provides an interface for making the database and tables on your computer safe from harmful interference, this is described next.
The XAMPP Security Console
The initial installation of XAMPP has the username root, and there is no password. If you use those settings on your own computer, there is a security risk when connected to the Internet. If you work in the same room with other people, the password will protect against interference as long as the password is not divulged to the other people.
As a best practice, you should password-protect your working environment, and XAMPP has a Security Console that simplifies this task.
Start XAMPP by double-clicking the desktop icon. Then enter the following URL in the address field of a browser: http://localhost/security/
A page will appear as shown in Figure 1-7. Select your language in the left panel.

Figure 1-7. The XAMPP Security Console
The unprotected components are indicated by boxes with a red background. Click the URL that is circled in Figure 1-7 and you will be taken to the page shown in Figure 1-8. Only the top half of the page is shown because the password is sufficient protection; the rest of the page can be ignored.

Figure 1-8. The XAMPP form for entering a password
Enter a password and confirm it. Then click the Password changing button.
Your data will now be more secure. If you go back to the security screen, you should see that (some of) those red labels are now green. You may have to restart XAMPP to see the changes.
We are now going to look at phpMyAdmin, which is used to administer your databases. Starting phpMyAdmin is very easy, and you can start it without running XAMPP. Let's first look at how the two tools work together.
Accessing phpMyAdmin Using XAMPP
Using the address field of any browser, enter the following URL: http://localhost/phpmyadmin/ or http://127.0.01/phpmyadmin/
Be sure to include the http://; otherwise, a browser like Chrome will treat it as a search string.
Note The sections describing the use of phpMyAdmin apply to any of the development platforms: XAMPP, WAMpserver, and easy php
You set the password in XAMPP earlier, so whenever you access phpMyAdmin you will need to log in using that password. This prevents Internet robots and human beings from interfering with your database. The latter case is very important if you work in an office with others—you could have a spy or mischievous meddler in the place where you work. When you access phpMyAdmin, a dialog box will appear as shown in Figure 1-9.

Figure 1-9. Enter the password in the dialog box to access phpMyAdmin
Enter your username (usually “root”) and password, and then click the button labeled Go. phpMyAdmin loads rather slowly, but it will eventually appear.
Note that open source programs are continually being improved and upgraded, and you may find that you have a newer version of phpMyAdmin in your XAMPP package than that used in this book. You may also see upgrade messages alerting you to a new version in the phpMyAdmin main window. Where personal data is concerned, security is paramount, so these incremental updates are a good thing for you, though they do mean that some of the screenshots in the book no longer accurately reflect what you see on screen. Don't worry if an interface looks a little different from the ones shown in this book, the usage will normally be similar.
The phpMyAdmin interface may look a little daunting at first, but we'll cover the relevant parts of it when we need to use them. For the moment, you can close the phpMyAdmin window and we'll return to XAMPP.
You now know how to install and secure XAMPP, and you also learned how to start and stop XAMPP. Most of what you have just read will probably be very new, but there are some parts of XAMPP that you will recognize because they follow the normal Windows organization of files and folders.
The Familiar Bits
Within the XAMPP package, the structure of the folders and files will be familiar to Windows users, although their names may not be recognizable.
The XAMPP folders are shown in Figure 1-10.

Figure 1-10. The folders in the XAMPP package; the EASYPHP equivalent of htdocs is www
In Figure 1-10, note the htdocs folder. This is where you will place all your PHP files and the html pages for your website and databases.
Within the XAMPP folder, you will find a folder called MySQL (MariaDB). This folder contains a folder called data where the databases and tables will reside. Regard a database as a folder; a database must have a unique name. A file within the data folder contains all the information about the database, and it has the file type *.opt.
Tables are files; when you have created any tables, these will also live inside the folder named data and they will have the file type *.frm.
Now that you're familiar with the look and feel of the tools you'll be using, you're ready to move ahead. The next my blog will take you nearer to creating your first database and table.