 An APEX application can consist of many components: the application code, the database objects (tables, triggers, sequences, and so on), and even static files such as custom images or CSS files. When moving your applications to another environment, you have to consider whether you need to move these components as well.
When moving your application, you’ll deal with the following three main deployment scenarios, in order of complexity:
- Copying your application in the same workspace
- Moving to a new workspace that uses the same schema
- Moving to a new workspace that uses a different schema
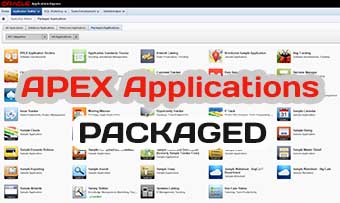
The complexity stems from which objects you need to move with your application. APEX enables you to create a packaged application - a bundle that contains not only the application, but the database objects and related application files needed for the application to run.
In many application development environments, the usual steps involved in moving or installing an application are
- Run multiple SQL scripts to create the database objects.
- Import all the needed libraries and archive files.
- Install the application.
Packaged applications, however, contain the application itself as well as all the database objects needed, all of which can be installed into your APEX environment in one easy step.
Supporting Objects
The Supporting Objects utility combines all the database object scripts you would use into a single step that’s performed during an application installation. To get to the utility, go to your applications details page in the App Builder and click the Supporting Objects icon on the upper icon row (Figure 1).

FIGURE 1. Click the Supporting Objects icon to launch the utility.
On the first page, in the Supporting Objects region (Figure 2) is a summary of all the supporting objects this application contains (if any), how much space is needed for this install, whether license text is used, and a check for system privileges upon install. Supporting Objects are much more than DDL scripts.

FIGURE 2. The Supporting Objects region
The following sections will examine the subtabs within the Supporting Objects pages:
![]()
Messages In the Messages section, you can define custom (or keep the default) messages for each step of the install process, as well as licensing, welcome, upgrade, and deinstallation messages. If you do not have a specific component in your supporting objects, this step will be skipped and the message will not be shown. You can define the following types of messages:
- Welcome This message is shown after the application is installed and just before supporting objects are installed. Use this message to tell the user what is going to happen, what checks are done, or any important information you need to convey before the supporting objects are installed.
- License Use this message to prompt the user to accept or decline a licensing agreement.
- Application Substitutions This message is displayed above the application substitutions.
- Build Options This message is displayed above the build option prompts step of the install.
- Validations This message is displayed above the validations step of the supporting objects install. A good use of this message is to go over all the validations you have set up for your supporting objects just in case the install fails or the installer is missing a critical component.
- Confirmation This message is shown just before the supporting objects are installed.
- Post Installation This is two messages—a success message and a failure message. Use the failure message to help guide the user to a quick resolution. Include things to check in their environment and perhaps contact information.
The Upgrade Message section has four messages to set. Use these message areas to help describe to the installer what is happening on a particular step, what validations will take place and how to deal with them, as well as troubleshooting tips for issues that may arise.
- Upgrade Welcome Message This message tells the user that supporting objects have been discovered that can be upgraded and prepares them for the upgrade process.
- Upgrade Confirmation Message Similar to the install confirmation message, this message is shown just before the install occurs.
- Upgrade Success/Failure Message These messages will be shown after the upgrade takes place. Use the failure message to suggest resolutions or provide contact information.
- Deinstallation Here we have two messages—a Deinstall Message and a Post-Deinstall Message. Use the Deinstall Message to prepare the user for the deinstall and the Post-Deinstall Message when the deinstall is completed. You may want to remind the user that any data in the table that is to be dropped will be lost, so back up the data if necessary.
Prerequisites On the Prerequisites page, you can define how much space you think your application will need. When installing your application, the parsing schema’s default tablespace is checked to see if the space is available or not.
In the Required System Privileges section, you can select which database system privileges are needed to install your application.
In the Objects That Will Be Installed section, select the objects whose existence will be validated before you install your application. If any of these objects exist when the prerequisite check occurs, the installation will stop and present an error to the user, as shown in Figure 3.
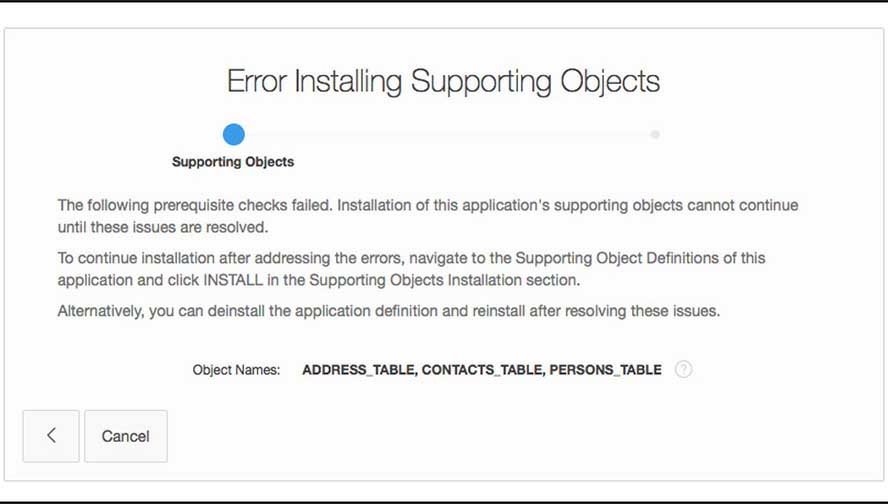
FIGURE 3. Failing a prerequisite check
To add an object, click the pop-up LOV icon to see a list of all the objects in your schema, with the objects type in parentheses. Select an item and you are returned to the main page. Click the Add button to add the item to the lower object area. To remove objects, select one or more objects in the lower area and click Remove.
Creating checks to ensure that all the required objects and tables do not already exist is a good practice to follow. This will prevent tables or other database objects from being overwritten and critical data from being lost. It also prevents the users from facing ugly errors on application installation that may be cryptic or confusing.
Substitutions In the Substitutions page (Figure 4), you can enable the user to change or keep application-level substitution strings. This page will be displayed to the user at install with a prompt text message you define, either to keep the existing value or change it. When installing the application, a step in the install wizard will present the user with this prompt if chosen and with the ability to change the substitution text or leave the default value. To ensure the user is prompted, be sure the Prompt? checkbox is checked.

FIGURE 4. The substitution strings supporting objects page
Here’s an example: Suppose you had a substitution string in your application with a server or environment name or an environment type (Development/User Acceptance Testing/Production). Upon install, you could change that name on this step (Figure 5). As a reminder, substitution strings can be created and maintained on the Edit Application Definition page on the Shared Components page, or by clicking the Edit Application Definition button on the main application details page. Once on the Edit Application Definition page, click the Substitutions subtab or scroll down to that section.

FIGURE 5. The substitution strings change prompt
Build Options The Build Options page displays all the build options you have defined for this application. By selecting the Prompt checkbox, you can have the installing user decide whether she wants to retain the build option’s settings or leave the default setting. Build options are examined later in my blog.
Validations The options in this section work very similar to page, item, and region validations. These validations prevent the application from installing if a particular validation you set fails. To create a validation, click the Create button in the upper right. The validation creation page is similar to the page for creating a validation in our application, with a few changes. In the Validation Type dropdown list, you can see a few new values, validations dealing with CGI_ENV variables. The CGI_ENV variables, or Common Gateway Interface Environment variables, are a series of hidden values that the web server sends to every CGI program you run. The ones available to use in validations are DAD_NAME, HOST_NAME, and SERVER_NAME. A good example of using the CGI_ENV variables is to check the SERVER_NAME upon install to ensure this is being installed into the correct environment, preventing production apps from being overwritten by accident. When you’re done looking around here, click the Cancel button.
Install This is the meat of your supporting objects. Click the Install subtab to open the Installation Scripts page. Here you define what database objects to take when exporting your application.
- Click the Create button in the upper right to launch the Create Script wizard.
- The first step of the wizard asks you to choose your method for the script creation, as shown in Figure 6.

FIGURE 6. The first page of the Create Script wizard
- Create From Scratch Click this option to be prompted to name the file. Then, on the last page of the wizard, you’ll see a code canvas to create your SQL code, where you can copy and paste code from SQL Developer or another tool.
- Create From File Click this option to name the script and then upload the script with your code in it. Again, you can create a script in SQL Developer or in SQL Developer Data Modeler.
- Create From Database Object Click on this option to launch the Script Attributes step of the wizard. Enter a name in the Name field. Then enter a sequence number if you want to have scripts run in a sequence or specified order. Finally, the wizard asks for the database object types you want to use in your install scripts. Highlight the object types you want to move, and then click Next to move onto the third step of the wizard. (Quick note here: This object list is a multi-select list, so you can select one or many database object types in the list (CONTROL/COMMAND-click or SHIFT-click to add several objects). If you want to have one jumbo install script, select all the objects. If you want to separate out your scripts into a table script, a package script, and so on, select one object at a time per script—you can see how sequence numbering works.)
- On the third step of the wizard, you’ll see a shuttle, where you can move any object from the types you selected on the previous page, from the left to the right. All objects on the right of the shuttle will be included in the created install script. Use the Filter text field to find the exact script(s) you are looking for. Type in the text field and press RETURN/ENTER to filter the results. If you selected only table object types in the previous step, you will see a checkbox, Include DDL Related To Tables. Check this checkbox if you want all the DLL associated with this table, such as triggers and indexes, to be present in the created script.
- Once you have selected all the objects you want to use in your install script, click the Next button. The final page is the script itself, with all the code for the objects pregenerated for you. Look over the script and click the Create button to add it to your supporting objects.
Database objects may change over time, requiring you to upload new scripts or change the scripts by hand. If you choose the Create From Database Object option, you can use the Refresh Checked button to re-create the scripts, taking up any database object changes automatically. Click the checkbox on a script’s row, and then click the Refresh Checked button:

On the Installation Scripts page, you can run a few tasks to help check the health and order of your support objects:
- Install Supporting Objects Runs you through actually installing the objects in your database to check for errors.
- Upgrade Supporting Objects Runs you through your upgrade scripts, just as Deinstall Application guides you through your deinstallation scripts.
- Edit Application Brings you back to your applications details page
- View And Download Single Script Concatenates all your scripts into a single file you can edit or download.
- Resequence Scripts Resequences the installation scripts, changing the numbers into multiples of 10, as shown next:

Upgrade The options on the Upgrade page are similar to those for creating install scripts, with a new region on the first page, Query To Detect Existing Supporting Objects. The query should determine whether the supporting objects already exist and need to be upgraded. If the query returns a row, the upgrade scripts will be run. When creating the upgrade script, you have two options: Create From Scratch and Create From File.
Deinstall On the Deinstall page, you can create a deinstall script that will be run when a user selects to remove the application from his workspace. This script will drop all the database objects you defined in its creation. When creating the deinstall script, you can choose from Create From Scratch and Create From File.
Export On the Export page, you can define whether the supporting objects will be exported by default when exporting your application. You have three choices here:
- No Does not include the supporting object definitions in the export.
- Yes Includes supporting object definitions in the application export.
- Yes And Install On Import Automatically Includes the supporting object definitions in the export as well as a call to install them. (Note that this option is valid only for command line installs and will install or upgrade your supporting objects automatically.)
Supporting Objects Tasks
Back on the Supporting Objects main or summary page are a few tasks you can perform directly.
- View Install Summary This task shows a list of all the scripts you have with your application’s supporting objects.
- Export Application This task is a shortcut to the export page. This page can be also found on the application details main page, Export / Import icon.
- Install Supporting Objects, Upgrade Supporting Objects, and Deinstall Supporting Objects These tasks enable you to run your scripts in your environment for testing and error checking. (Note that some of these tasks will be present only when a particular supporting object is present. For example, you will not see the Deinstall Supporting Objects task unless there is a deinstall script.)
- Remove All Supporting Objects This task removes all scripts, messages, and options associated with your application.