
 This big blog focuses on installing the Oracle Grid Infrastructure on Linux, which includes preparing the hardware, storage, and networking layer components for clustering, along with the cluster software install. The Oracle Grid Infrastructure must be installed and running before you install the RDBMS software. Figure 4-1 shows the installation process for the Oracle 11g RAC. The term Grid Infrastructure is new in Oracle 11g Release 2 and meant for Oracle Clusterware and ASM. This was known as Oracle Clusterware in Oracle 11g Release 1 and earlier versions.

FIGURE 4-1 Oracle RAC installation flowchart
The first step involves configuring the operating system and hardware for the Oracle Grid Infrastructure and RDBMS software. Each server in the cluster will have at minimum one public network interface and one private network interface. The public network interface is the standard network connection that connects the server to all of the other computers in your network. The private network interface is normally a nonroutable private network connection shared by only the servers in the cluster. Some servers have additional network interfaces for management framework, and they are not critical for the installation or functioning of the Oracle Grid Infrastructure. The Oracle Grid Infrastructure and Oracle RAC software use the private network interface to communicate with the other servers in the cluster.
Another important step is the decision about shared storage. The shared storage for datafiles is an important step in hardware preparation. As a fundamental requirement for high availability, all the database files in the cluster will be stored on shared storage that is separate from the server nodes in the cluster. The shared storage allows multiple database instances, running on different servers, to access the same database information and ensures that if one or more server nodes fail, all remaining nodes will continue to have access to all database files.
After the shared storage for the datafiles is defined, the next step is installing the Oracle Grid Infrastructure, which logically binds multiple servers into a cluster. During the Oracle Grid Infrastructure install, you specify the location at which to create two Oracle Grid Infrastructure components: a voting disk to record node membership information and the Oracle Cluster Registry (OCR) to record cluster configuration information. Starting with Oracle 11g Release 2, the voting disk and OCR can be stored inside the Oracle ASM. However, a local copy of OCR known as Oracle Local Registry (OLR) is stored along with the Oracle Grid Infrastructure binaries. The Oracle Grid Infrastructure install is performed on one server and will be automatically installed on the other servers in the cluster during the remote operation phases of the Oracle Universal Installer.
At the end of the Oracle Grid Infrastructure install, Oracle configures the virtual IP (VIP) addresses, ASM, the local listener, and the SCAN listeners for the servers in the cluster. Clients use a single client access name to connect to the database service in the cluster. The SCAN is a domain name that resolves to three IP addresses from the same subnet of the public network in round-robin fashion. Because the SCAN is not associated with any particular server in the cluster, there is no need to reconfigure the clients if a server is added or removed from the existing cluster.
Prior to Oracle 11g Release 2, clients connecting to the database using a virtual IP required reconfiguration if the connecting database service was moved onto another server in the cluster. Clients can still connect to the database service using a virtual IP, but this is not a preferred way to connect to a database service in Oracle 11g Release 2 RAC.
After the Oracle Grid Infrastructure is installed, if you use ASM for shared storage, you will create additional disk groups using the ASM Configuration Assistant to store the Oracle datafiles; then you will install the Oracle Database 11g Release 2 RAC database software and create the cluster database. The installer will recognize that the Oracle Grid Infrastructure has already been installed. Like the Oracle Grid Infrastructure install, the Oracle RAC database install is performed on one server, and the software is automatically installed on the other servers in the cluster.
After the database software is installed, you will create a cluster database using the Database Configuration Assistant (DBCA). The last step is to install the Enterprise Manager Agent. The Enterprise Manager Agent connects to the Enterprise Manager Grid Control, where you administer the Oracle RAC environment. Like the previous installs, the agent install is performed on one node in the cluster and automatically installed on the other nodes.
This article uses the 64-bit Linux operating system, and Oracle Database 11g Release 2 (11.2.0.2) is the installation. Also, this article assumes that the cluster servers have the minimum required hardware. Port-specific documentations and installation guides should be consulted during installation. This article is not intended to replace the Oracle installation guide, and it is always recommended that you consult the support notes from Oracle Support. However, this article can be used in parallel with the installation manuals.
Preinstallation Tasks
Installing the Oracle Grid Infrastructure starts with some hardware preparation steps, such as configuring network names and addresses, updating relevant configuration files, and setting up specific operating system users, groups, and privileges. Installation of the Oracle Grid Infrastructure will be smooth sailing when the required prerequisites are configured correctly.
Configuring the Network
The preinstallation tasks start with configuring the network. Multicast communication must be enabled for the private network. This is a new requirement in Oracle Grid Infrastructure 11g Release 2 (11.2.0.2) to provide redundancy for the cluster interconnect (private network interfaces) without using any OS-specific teaming or bonding drivers. Oracle uses multicast communication on the private network to establish initial communication with the peer servers in the cluster and later on switches to unicast communication once the communication is established. Therefore, it is very critical that you enable multicast network communication for the private network for a successful install or upgrade of Oracle Grid Infrastructure 11g Release 2 (11.2.0.2). Oracle has published My Oracle Support Note 1212703.1, which provides scripts to test and verify that the servers in the cluster can communicate with each other using multicasting on the private network.
NOTE
The public and private interfaces on all cluster servers must have the same name. For example, in a two-node Oracle RAC, if the public interface name on node 1 is eth0, then the public interface name on node 2 should also be eth0.
You need to register three IP addresses in the DNS for the single client access name resolving to a domain name in round-robin fashion. Register one virtual IP for each cluster node in the DNS as well. The virtual IP must be unplumbed because the Oracle Grid Infrastructure will configure the virtual IP during the installation process.
You also need to configure the/etc/hosts file, which contains the Internet Protocol (IP) host names and addresses for the local host and other hosts in the Internet network. This file is used to resolve a name to an address (that is, to translate a host name into its Internet address). When your system is using a domain name server (DNS) for address resolution, this file is accessed only if the name server cannot resolve the host name. Oracle Grid Infrastructure 11g Release 2 allows you to assign IP addresses dynamically using the Oracle Grid Naming Service (GNS), which requires a DHCP service running on the public network to provide one IP address for each cluster server’s VIP and three IP addresses for the single client access name addresses. For simplicity and better explanation of the whole installation and configuration process, this blog note uses manual assignment of the IP addresses.
Following is a sample hosts file. The command ping (which stands for Packet Internet Grouping) can be used to verify the configuration. Except for the VIP interface, all other interfaces, including SCAN (Single Client Access Name), should be up and running at this time. Do not register the SCAN name in the /etc/hosts configuration file because doing so will not allow SCAN to resolve with three different IP addresses.

In this entry, the IP address is specified in either dotted decimal or octal format, and the host name is specified in either relative or absolute domain name format. If you specify the absolute domain name, the portion of the name preceding the first period (.) has a maximum length of 63 characters and cannot contain blank spaces. For both formats of the name, the total number of characters cannot exceed 255 characters, and each entry must be contained on one line. Multiple host names (or aliases) can be specified.
After the hosts file is configured properly on one of the nodes, copy it to the other nodes so that they are exactly the same. The hosts file on each node needs to contain the private, public, and virtual IP (VIP) addresses and node names of each node in the cluster.
You need to edit the /etc/sysconfig/ntpd configuration file of the NTP service on each cluster node to use the slewing option to synchronize the time on each cluster node, as shown next. It is very important that the system time on all servers in the cluster is synchronized to avoid false node evictions.
OPTIONS="-x -u ntp:ntp -p /var/run/ntp.pid"
Oracle 11g introduced the Cluster Time Synchronization Service, which will start the CTSSd in exclusive mode if NTP is not started on the cluster nodes. If the NTP service is configured and running on all nodes in the cluster, the CTSSd will run in observer mode.
Setting Up the Groups and Users
In typical Oracle RAC installations, the operating system user oracle will own the RDBMS binaries and all Oracle-related files. Normally this user will be the part of the DBA group. Any user who is part of the DBA group and has sysoper/sysdba privileges can connect to the oracle instance without supplying a password. This is called operating system authentication. This privileged user can also start up and shut down instances.
Oracle RAC allows using different operating system users to own different components of Oracle RAC so that people with different job responsibilities and accountabilities can manage their respective components of the whole Oracle RAC system. For example, the system admin team may use the operating system account grid to manage the Oracle Grid Infrastructure, whereas the database team may use the oracle user to manage the databases. We will use different operating system accounts in the installation process explained in this blog. Oracle products use an operating system group called oinstall that is associated with the central inventory. All operating system accounts used for Oracle product installation will have oinstall as a primary group so that Oracle central inventory is shared by all Oracle product owners. You will create the following operating system users and groups on each cluster node before installing the Oracle Grid Infrastructure and RDBMS software:

Verify that the attributes (uid and gid) of the users and groups created here are identical on all cluster nodes. Internal to the operating system and cluster layer, the UIDs are compared to the UIDs of the member nodes while authorizations and permissions occur. Therefore, it is important to keep the user IDs and group IDs consistent across the nodes.

Configuring Shared Storage
If you decide to use Automatic Storage Management (ASM) as shared storage for the datafiles, you should configure partitions on the external shared disks. ASM requires raw disks for storage because file systems cannot be used as ASM devices. The disk partitions are without any file systems and initially owned by the root user. You should only create one partition per disk presented to the ASM, and each ASM disk should be of the same size for better I/O performance.
System vendors use the logical volume manager to present the external shared storage to the servers in the form of logical volumes to properly utilize the available storage space; however, using logical volumes for Oracle ASM to be used with Oracle RAC is not supported because logical volumes encapsulate the physical disk architecture and do not allow Oracle ASM to optimize the I/O on the available physical devices.
NOTE
Oracle provides ASM libraries to ease the management of the storage devices. The ASMLib library provides persistent paths and permissions for storage devices used with ASM. Once the ASMLib library is installed and configured on all cluster nodes, there is no need to update udev or any other device label files that typically store device paths and permissions. Oracle supplies ASMLib for each Linux distribution, which can be downloaded from the Oracle Technology Network website.
ASMLib
ASMLib is a support library for Automatic Storage Management. This library provides a layer of abstraction for the devices used by ASM. The ASMLib library also allows an Oracle database using ASM more efficient access to the disk groups it is using.
Download the ASM library oracleasmlib-2.0, the Oracle ASM utility oracleasm-support-2.0, and the ASM kernel module oracleasm from the aforementioned web location and install them on each cluster node as the root user. Here is an example of installing ASM libraries on a Linux machine:

You will have to configure the Oracle ASM library driver on all nodes in the cluster. While configuring this, choose the grid user and the asmdba group as the owner of the ASM driver because the grid user will own the Oracle Clusterware and ASM components of the Oracle RAC. Oracle loads and runs the ASM driver on system startup according to this configuration. Here is an example of configuring ASM on a Linux machine:

Repeat this step on each cluster node. If this step is not performed, the oracleasm service will not start on the cluster node and you will not be able to use Oracle ASM as shared storage for the Oracle RAC database.
The next step after configuring the Oracle ASM driver on each cluster node is marking the shared disk partitions on the first cluster node and scanning the marked disk partitions on the other nodes in the cluster. Marking a shared disk partition is also called “creating the Oracle ASM device.”
You will perform the following step on the first cluster node only to mark all candidate disk partitions to be used with Oracle ASM. This ensures the disk headers are wiped clean because ASM will not select the devices as candidates if it finds the Volume Table of Contents (VTOC) information of any volume manager or file system.
")
Once the disk headers are wiped clean, the next step is to stamp the ASM header information on the devices. The following sequence of operations mark the devices as ASM disks:

Once all the candidate disk partitions are marked as candidate disks for Oracle ASM, scan the newly marked disks on the other nodes in the cluster because there is no need to mark the candidate disk partitions on each cluster node. Here is an example to scan the marked disks on other nodes in the cluster:

NOTE
Secure Shell and User Limits Configuration
Oracle Universal Installer (OUI) installs the binaries in one node and then propagates the files to the other nodes in the cluster. The installer primarily uses the ssh and scp commands in the background during installation to run remote commands and copy files to the other nodes in the cluster.
This requires non-interactive file copying across the nodes. You must configure ssh so that these commands do not prompt for a password. Setting up scp can enable this across the nodes. You also need to turn off the banner for ssh. Unlike in previous releases of Oracle RAC, there is no need to manually configure the user equivalence for the Oracle software owners because Oracle allows you to set this up during installation of the Oracle Grid Infrastructure.
The default hard limits for Oracle software owners are not sufficient to install and configure the Oracle Grid Infrastructure. You should edit the /etc/security/limits.conf file as shown here:

You will also need to add the following line to the /etc/pam.d/login configuration file if it has not already been added:
session reguired pam_limit.soThis configuration causes the user login process to load the pam_limits.so module of PAM to further enforce/set the hard limits for the login user as defined in the /etc/security/limits.conf configuration file, because /etc/security/limits.conf is the configuration file of the pam_limits.so module of PAM.
Pluggable Authentication Module (PAM)
PAM was invented by Sun, and in the Linux operating system it provides library modules to supply a flexible authentication mechanism. Programs such as login and su can use these modules for authentication. The updated authentication schemes can be added into the PAM modules rather than changing the programs that depend on the authentication. Each PAM module has its own text configuration file, and PAM consults with these text configuration files before taking any security-related action for the application. In a nutshell, PAM provides account, authentication, and session management.

Configuring the Kernel Parameters
As the root user, update the kernel parameters in the /etc/sysctl.conf file on both nodes. If these settings are already configured, make sure they are at least set to the following values (it is OK if the values are set higher):

NOTE
Oracle Validated Configuration RPM
Oracle provides a RedHat Package Manager (RPM) file for Oracle Enterprise Linux and Red Hat Linux users, which can automatically complete most of the preinstallation tasks. In a nutshell, Oracle Validated Configuration RPM can perform the following tasks:
- Install missing operating system packages required for Oracle Grid Infrastructure
- Configure kernel parameters and user parameters in the /etc/sysctl.conf file
- Create Oracle software owner, inventory, and dba group. This RPM only creates oracle user; if you are installing the Oracle Grid Infrastructure then you may need to create additional users manually.
You will need to register your cluster servers with Oracle Unbreakable Linux Network to use the latest enterprise channel for your operating system and hardware. Oracle uses these channels to download updates and additional software. You should navigate to http://linux.oracle.com for complete details of Oracle Unbreakable Linux Network.
Running the Cluster Verification Utility
Deploying Oracle RAC is a multistage operation, and components can malfunction at any stage due to the various dependencies at each layer.
Testing and verification are required at each stage before proceeding to the next stage. Oracle provides a tool you can use to verify the cluster setup at every stage: the cluster verification utility, or cluvfy.
The cluvfy is a standalone utility used to verify a well-formed Oracle RAC cluster. It can be used at any stage—preinstallation, configuration, or operation—because it verifies the entire cluster stack and does not perform any configuration changes on cluster or Oracle RAC operations. It can be used to verify the stage-by-stage progress during Oracle RAC installation as each stage comprises a set of operations during Oracle RAC deployment. Each stage has its own set of entry (prechecks) and/or exit (postchecks) criteria. Oracle internally runs this utility during the installation process to verify the prerequisites and provide the fix-up scripts for the fixable issue. It is good to run this utility to verify the prerequisites prior to the installation of the Oracle Grid Infrastructure, but this is not compulsory.
Cluster Verification Utility Stages
Following are the 14 stages in the Oracle RAC deployment where the cluster verification utility can be run. Note that the utility automatically checks all nodes that are specified, so it is necessary to run the utility from only one node. This utility is available in the Oracle Grid Infrastructure software media and is named runcluvfy.sh.

At the first stage in preparing the hardware for Oracle RAC installation, you can use clusterverify to check the hardware for basic network connectivity and most common operating system requirements. It also checks the software owner privileges and access to shared storage from both the nodes. It can be invoked by using the following command-line option. The output text (edited for clarity and simplicity) will be similar to the following:

Note
The following components are listed in the cluster verification utility:

Once the hardware, operating system, and network are verified, the cluster is ready for the Oracle Grid Infrastructure installation. Oracle Cluster Ready Services is the foundation for the Oracle Grid Infrastructure and using the following option in the cluster verification utility can check the readiness for the CRS installation. It should be invoked as the OS user grid and the nodes should be listed as command-line parameter arguments. The resulting output is edited for clarity.


When the cluster verification utility does not report any errors, you have successfully set up the cluster for the Oracle Grid Infrastructure installation. If errors are reported, you must fix them before starting the Oracle Grid Infrastructure installation. If the cluster verification utility is successful, the next step will be installing the Oracle Grid Infrastructure on the cluster nodes. The Oracle Grid Infrastructure installation uses OUI, and the steps are common across all of the operating systems.
Oracle Grid Infrastructure Installation
The Oracle Grid Infrastructure installation is the foundation for the Oracle RAC database installation. The Oracle Grid Infrastructure is the backbone of the remainder of the installation, because more than one database can share the same Oracle Grid Infrastructure foundation. OUI is run from one node, preferably as the grid operating system user, in the cluster under an X environment, and the files will be propagated to the other nodes using the scp commands.
The installer works in the background and appears to be hanging in the foreground. For those who are interested in knowing the undercover operations of the installer, we will trace the installer using the options discussed next.
Tracing the Universal Installer
OUI is a simple Java program that copies the files from the staging area and relinks with the operating system libraries to create and update the Oracle inventory. The staging area can be the CD-ROM/DVD or a local mount point in the file system.
OUI puts minimum details about the installation’s options and progress in the installations_ <timestamp>.log. This log file will be typically stored in the $ORACLE_HOME/orainventory directory. However, this log does not contain a detailed level of operations to debug the installation issues.
Starting from Oracle 10g, OUI can be invoked using the DTRACING (or Java tracing) option in the command line. The following invokes the installer with tracing in Oracle 11g Release 2:
$ runInstaller -debug -J-DTRACING.ENABLED=true -J-DTRACING.LEVEL=2 -DSRVM_TRACE_LEVEL=2
Optionally, you can redirect the tracing output to a file. (I always start the installer with tracing on so that I don’t need to restart the installer if any failures occur.). Here is an example of redirecting the output of the tracing to an output file:
$ script /tmp/install_screen.'date +%Y%m%d%H%M%S'.out
$ runInstaller -debug -J-DTRACING.ENABLED=true -J-DTRACING.LEVEL=2 -DSRVM_TRACE_LEVEL=2
Once the installation is complete, simply type exit to close the output file. This tracing option is useful during installation of Oracle RAC, where the files are copied to the remote nodes using the scp command. Tracing tells you what the installer is doing at any point in time by providing detailed traces to the install actions. However, the limited information is also written to the trace file <installations_timestamp>log.
This information is very “high level” and does not get into the actual problems faced by the installer.
Tracing DBCA/NetCA
Because OUI is invoked from the command line, you can easily set the tracing to that program. But in Windows, the platform installer is called by another program, setup.exe, and this program calls most of the other programs, such as dbca and NetCA. To trace these programs, you need to add the tracing codes inside the respective batch files. For example, the dbca utility invokes the dbca.jar file, and you should add the tracing information in the JAR file to get the tracing of the other packaged programs.
The following procedure illustrates dbca tracing in a Windows environment. Here you need to customize the file dbca.bat (under the $ORACLE_HOME/bin directory). You need to add the tracing option inside the batch file and save the batch file with a different name; in this case, we’ll change dbca to cdbca (customized dbca). To do so, simply add the following line before the -classpath argument:
-DTRACING.ENABLED=true -DTRACING.LEVEL=2 -DSRVM_TRACE_LEVEL=2(I always customize the required batch files before any installation and use the customized startup files for the installation.)

From this trace file, you can see that tracing is enabled for the customized dbca and that it outputs detailed information about the activities at every millisecond. This detailed tracing is quite enough to find and diagnose the most common problems expected during the runtime of the database configuration utility.
Cloning Process and OUI
OUI uses the parameter file oraparam.ini, which is included in the directory where setup.exe or runinstaller.sh is located. For example, in Solaris systems, the file is under /Disk1/install/solaris/ OraParam.ini, and in Windows, it’s under \Disk1\install\ win32\OraParam.ini.
OUI verifies that all the conditions are set in the oraparam.ini file and begins the installation. Most of the prerequisite checks are specified in the installer parameter file, and you normally don’t need to modify the contents. Under certain conditions, you can modify the parameter file to install the components or to skip certain conditions for testing purposes.
OUI also supports a few command-line parameters during the installation. The runInstaller -help command will show the full list of command-line options and their descriptions, as well as command-line variables usage.
OUI also sends the exit codes after the installation. This can be used in an unattended installation. The following table summarizes the OUI exit codes and relevant descriptions.

Installing the Oracle Grid Infrastructure
The Oracle Grid Infrastructure installation is simple and straightforward once the prerequisites are met. It can be installed from the installation media (CD-ROM or DVD) or from the staging area if the software is dumped to the disk. Oracle has introduced lots of new features in Oracle RAC 11g Release 2 that are also reflected in the way you install and configure the Oracle RAC database using the Oracle Universal Installer. If you are familiar with Oracle RAC database installation in prior releases of Oracle RAC, you will find lots of changes installing the Oracle RAC database in Oracle RAC 11g Release 2 and onward. One of the major changes is that you can install the latest version of the Oracle Grid Infrastructure without applying any incremental patchset because, starting with Oracle Grid Infrastructure 11g Release 2, each patchset includes a complete set of binaries. Oracle has introduced the Out-Of-Place upgrade option in Oracle Grid Infrastructure 11g Release 2, which allows you to install Oracle Grid Infrastructure 11g Release 2 in a separate home on the same cluster node to minimize the overall downtime required to upgrade the Oracle RAC database.
Run the following in an X client on only the first node in the cluster:
$ cd /u01/stage/11gR2/grid
$ ./runInstaller
The OUI will display the Download Software Updates screen, shown in Figure 4-2.

FIGURE 4-2 The Oracle Universal Installer Download Software Updates screen
This screen allows you to specify Oracle My Support login details so that OUI can download the required software updates, such as any new installation requirement, known patchset update (PSU), and so on, from Oracle My Support automatically before starting the Oracle Grid Infrastructure software installation. This is a new feature from the Oracle Grid Infrastructure 11g Release 2 (11.2.0.2) patchset. Most large organizations’ database servers are behind firewalls, and it is a common practice to restrict Internet access on these servers. Therefore, you will rarely use this option. This screen also allows you to specify a storage location where these software updates are pre-downloaded. We will select Skip Software Updates on this screen because we don’t want to download software updates during this installation.
Click Next in the Download Software Updates screen to open the Select Installation Option screen (see Figure 4-3), where you specify the required installation and configuration option for the current install. This screen provides the following four installation options:
- Install and Configure Oracle Grid Infrastructure for a Cluster This option (the default) installs and configures the Oracle Grid Infrastructure for the current installation.
- Configure Oracle Grid Infrastructure for a Standalone Server This option installs and configures the Oracle Grid Infrastructure on a standalone server. This option is useful if you want to create an Oracle RAC One Node database because it requires Oracle Grid Infrastructure up and running on the server before it can be installed and configured.
- Upgrade Oracle Grid Infrastructure or Oracle Automatic Storage Management This option upgrades the existing Oracle Grid Infrastructure installed on the cluster nodes.
- Install Oracle Grid Infrastructure Software Only This option installs the Oracle Grid Infrastructure binaries on the current node only. This option is rarely used because it will not perform remote operations or any other cluster configurations, such as configuring virtual IPs, the local listener, and SCAN listeners.

FIGURE 4-3 The Select Installation Option screen
Select the Install and Configure Grid Infrastructure for a Cluster option on this screen.
After specifying the installation option, click Next. In the Select Installation Type screen (see Figure 4-4), you can choose between Typical Installation and Advanced Installation. This is a new feature in Oracle Grid Infrastructure 11g Release 2. With the Typical Installation, Oracle will install and configure Oracle Grid Infrastructure with the recommended defaults, providing fewer options to customize the Oracle RAC system. The Advanced Installation, on the other hand, is more flexible and provides more options for configuring/using Grid Plug and Play, shared storage, Grid Naming Services, and the Intelligent Platform Management Interface (IPMI). Select the Advanced Installation option on this screen.

FIGURE 4-4 The Select Installation Type screen
After specifying the type of installation in the Select Installation Type screen, click Next. In the Select Product Languages screen (see Figure 4-5), select the required product language. By default, Oracle uses English for all Oracle products.

FIGURE 4-5 The Select Product Languages screen
After selecting the product language in the Select Product Languages screen, click Next. In the Grid Plug and Play Information screen (see Figure 4-6), you can specify configuration details for Grid Plug and Play functionality, which is introduced in Oracle 11g Release 2 Grid Infrastructure. On this screen, you specify the name of your cluster, SCAN, the port number to be used by the SCAN listeners, and the Grid Naming Services (GNS) information. You should uncheck the Configure GNS check box on this screen because we will not configure GNS in this installation.

FIGURE 4-6 The Grid Plug and Play Information screen
Grid Plug and Play
Grid Plug and Play is a new feature of Oracle Grid Infrastructure 11g Release 2 that eases the management of large grid systems by providing the ability to add and remove cluster nodes dynamically. Oracle requires a dynamic naming scheme to implement this feature; hence, it uses GNS (Grid Naming Services). GNS provides such a naming scheme by using a DHCP server to assign virtual IPs dynamically. Because GNS provides virtual IP assignments dynamically and also resolves the server names, this eliminates any manual configuration of IPs and server names before a node is added or removed from the existing cluster.
NOTE
Now you will see the Cluster Node Information screen (shown in Figure 4-7), where you can specify the names of the cluster and the participating nodes. For each node, you must specify the name of the public and the virtual node name. You can click the Add, Edit, or Remove button to add, modify, or remove node names. Optionally, you can use the cluster configuration file with the same information. The cluster configuration file is useful when you have to specify many nodes. It is not required to specify a private node name in Oracle Grid Infrastructure 11g Release 2 and onward. On this screen, you can configure the passwordless connectivity for the Oracle Grid software owner by clicking the SSH Connectivity button. After specifying the cluster node names, click Next.

FIGURE 4-7 The Cluster Node Information screen
NOTE
In the Specify Network Interface Usage screen (see Figure 4-8), you can specify the planned usage of each network interface. If many network cards are in the nodes, you can instruct the Oracle Grid Infrastructure about which one to use for public traffic and which one to reserve for private network traffic. Here, you can specify the interface name and the subnet. You will also specify the public and private networks, and the VIP interface must be set to Do Not Use. If you don’t want Oracle to use a specific network interface, you can select Do Not Use. If the network IP address starts with 10.x or 192.x, it is assumed to be a private network by default. Starting with Oracle 11g Release 2 (11.2.0.2), you can select multiple private interfaces and Oracle will automatically configure private interconnect for redundancy by using Highly Available IP (HAIP) cluster resources. Once the correct network is selected, click Next.
Highly Available IP (HAIP)
Highly Available IP is a private virtual IP that Oracle Grid Infrastructure configures to provide redundancy for private interconnect in Oracle Grid Infrastructure 11g Release 2 (11.2.0.2) and onward. Oracle can configure up to four HAIPs per cluster server for private network redundancy. Oracle utilizes IP range 169.254.0.0 and multicasting on the private network to implement this redundancy; hence, it is very important that multicasting is enabled on private interfaces and you are not using the 169.254.0.0 range on your network. Otherwise, the Oracle Grid Infrastructure install or upgrade to 11g Release 2 (11.2.0.2) and onward will fail. Please refer to My Oracle Support Bulletin 1212703.1 (Grid Infrastructure Install or Upgrade May Fail Due to Multicasting Requirement) for additional details and a test program to validate the requirement.

FIGURE 4-8 The Specify Network Interface Usage screen
You’ll now see the Storage Option Information screen (shown in Figure 4-9). This screen shows that Oracle Universal Installer does not allow you to specify raw devices for shared storage because in Oracle 11g Release 2 and onward, raw devices are not supported with Oracle RAC database. Oracle only supports ASM and cluster file system for shared storage to be used with Oracle RAC. The use of raw devices is only supported if you are upgrading to Oracle Grid Infrastructure 11g Release 2 from previous releases. If you choose ASM on this screen, Oracle will start ASMCA (Automatic Storage Management Configuration Assistant) in the Create ASM Disk Group screen to configure the ASM before it can store the OCR and voting disk inside the ASM.

FIGURE 4-9 The Storage Option Information screen
The OCR contains critical information about the cluster configuration, including the public and private network configuration details. The minimum advised size of the OCR and voting disk is 280MB, because the reconfiguration of the OCR and voting disk may affect the entire cluster, although the actual information in these files is relatively small. The voting disk is used by the Cluster Synchronization Service (CSS) to resolve network splits, commonly referred to as split brains. It is used as the final arbiter on the status of configured nodes, either up or down, and to deliver eviction notices. It contains the kill block, which is formatted by the other node during the node eviction.
Oracle allows mirroring of the OCR and voting disk. If you decide to choose mirroring, select Normal Redundancy and provide the location of the mirror device. Otherwise, choose External Redundancy. The OCR location can be either a clustered file system or ASM. If you use ASM to store the OCR and voting disk, Oracle decides the number of the OCR and voting disks based on the configuration of the ASM disk group being used to store the OCR and voting disk. The number of voting disks in an ASM disk group is based on the redundancy level of the ASM disk group. Oracle allocates three voting disks in normal redundancy and five voting disks for a high-redundancy ASM disk group. The OCR file is treated like any other database file in the ASM; hence, no special care is required. Specify the location(s) of the voting disk and the OCR as Automatic Storage Management on this screen and click Next.
NOTE
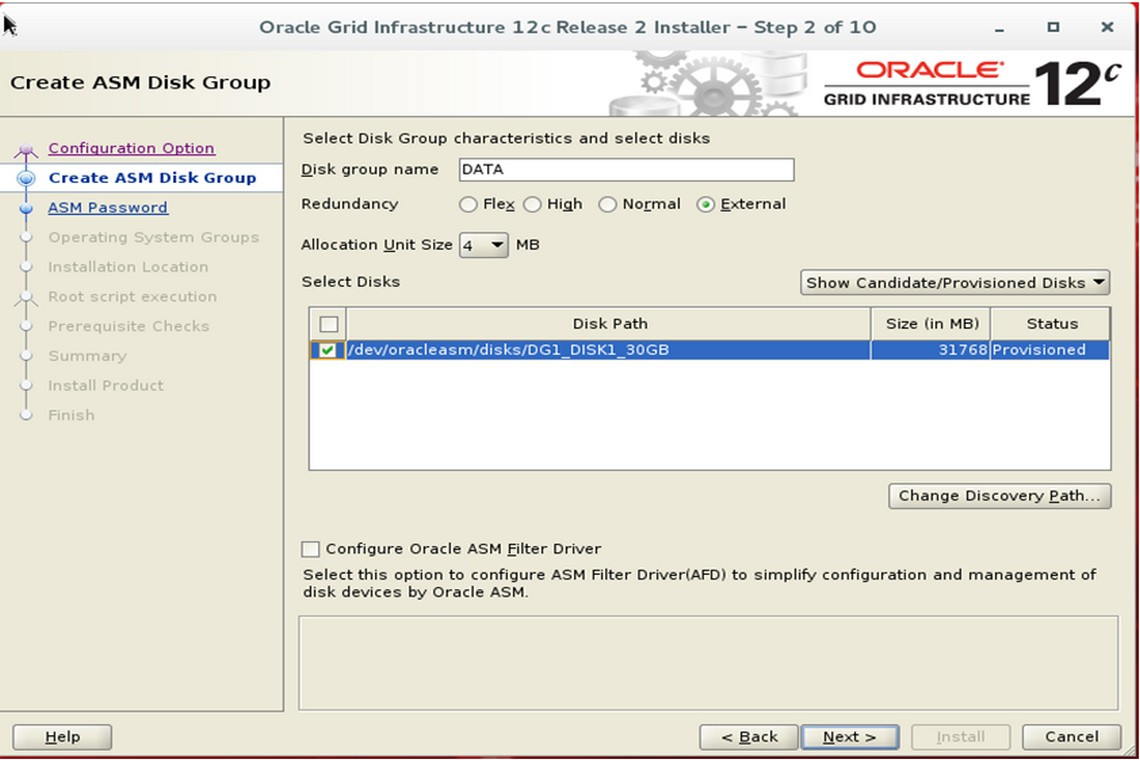
In the Create ASM Disk Group screen (see Figure 4-10), Oracle creates the ASM disk group to be used to store the OCR and voting disks. Oracle Universal Installer internally executes the ASMCA to create and configure the ASM disk group. The Add Disks section on this screen lists all candidate disks that can be used to create an ASM disk group. You can type the name of the ASM disk group; choose the required redundancy for this ASM disk group and select the candidate disks for this ASM disk group on this screen. Specify DATA as the disk group name, choose normal redundancy, select three candidate disks to create the DATA disk group, and then click Next.

FIGURE 4-10 The Create ASM Disk Group screen
NOTE
In the Specify ASM Password screen (see Figure 4-11), you can specify the password for SYS and ASMSNMP users. Select Use Same Passwords for These Accounts because we will use the same password for these users. The ASMSNMP user is required to monitor the ASM targets in the Oracle Grid Control, also known as OEM. Enter the password and click Next.

In the Failure Isolation Support screen (see Figure 4-12), you can specify the IPMI credentials if you want Oracle to utilize IPMI on the cluster servers to shut down the cluster servers in the event of a failure. Oracle requires IPMI drivers and a Baseband Management Controller on each cluster server to integrate Oracle Grid Infrastructure with IPMI. We will not use IPMI in this installation, so select Do Not Use Intelligent Platform Management Interface on this screen and then click Next.

FIGURE 4-12 The Failure Isolation Support screen
In the Privileged Operating System Groups screen (see Figure 4-13), you can select the operating systems groups to be used for operating system authentication for ASM. Select asmdba for the OSBDA group, asmoper for the OSOPER group, and asmadmin for the OSASM group on this screen and then click Next.

In the Specify Installation Location screen (see Figure 4-14), you will specify the storage location for Oracle base and software installation. You should use a separate location for Oracle base for each software owner. For example, you can use /u01/app/grid as the Oracle base for the grid software owner and /u02/app/oracle for the database software owner. You must ensure that the software location is not inside the path specified for the Oracle base; the software location should be in a path that can be owned by the root user. Specify the Oracle base and software location for the Oracle Grid Infrastructure software owner on this screen and then click Next.

FIGURE 4-14 The Specify Installation Location screen
You will now see the Perform Prerequisite Checks screen (shown in Figure 4-15), where the Oracle Universal Installer verifies the minimum requirements for installing the Oracle Grid Infrastructure. Oracle Universal Installer internally executes the cluster verification utility to verify the operating system and hardware prerequisites. Based on the results of the verification tests performed by the cluster verification utility, Oracle displays the failed prerequisites on this screen. Staring with Oracle Clusterware 11g, Oracle also provides the fix-up scripts to fix the failed but fixable prerequisite requirements. Oracle marks each failed prerequisite with a fixable status of Yes, which is also displayed on the screen. You can select the failed prerequisites with a fixable status of Yes and then click the Fix & Check Again button on this screen to fix and verify the prerequisites again. Once the installer verifies the required prerequisites successfully, click Next to continue.

IGURE 4-15 The Perform Prerequisite Checks screen
In the Summary screen (see Figure 4-16), Oracle will display the installation information. You should verify this information. If the information displayed is correct, click Finish to start the software installation.

FIGURE 4-16 The Summary screen
Installation of the Oracle Grid Infrastructure may take up to 30 minutes, depending on the hardware configuration. The installer will copy all the required files to the Oracle Gird Infrastructure home directory and link the files with the operating system libraries. Once the installation and linking is done at the local node, the installer will copy the files to the remote node. During the entire process, you can view the status in the progress bar of the Install Product screen (see Figure 4-17), which shows the percentage completion.

FIGURE 4-17 Oracle Grid Infrastructure installation progress
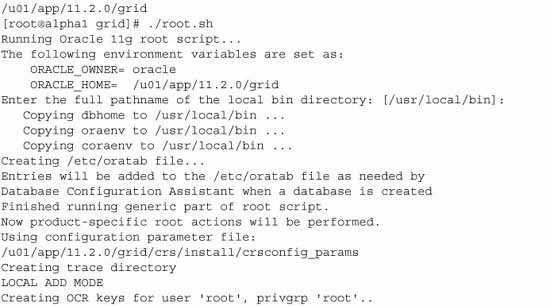
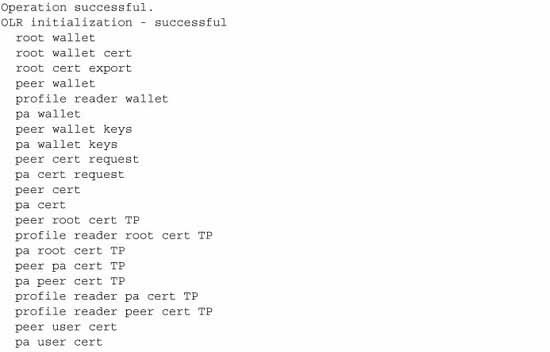
You will be instructed to run the installation scripts as the superuser root. You need to open a new terminal window and run orainstRoot.sh and root.sh as the superuser on the first node first and then you can run these scripts in parallel on the other cluster nodes, except the last cluster node. Once these scripts are executed successfully on other cluster nodes, run them on the last cluster node. The first script, orainstRoot.sh, sets the inventory settings. The second script, root.sh, sets the permission for the files inside the Oracle Grid Infrastructure home, configures the cluster, and starts Oracle Clusterware on the cluster node. The root.sh script internally calls other configuration scripts such as rootmacro.sh, rootinstall.sh, and rootcrs.pl. The rootcrs.pl script does the majority of the post-installation configuration. The root.sh script will also set the write permission on the parent directory of the $GRID_HOME to the root user only. This is the reason it was advised in previous sections to use a separate storage location for the Oracle Grid Infrastructure home. The orainstRoot.sh script creates the /etc/oracle directory and the oratab file entries. These entries are used by the Oracle Grid Infrastructure agents, which are executed during startup and shutdown of the operating system. Once the scripts are run, click Next to see the Finish screen (shown in Figure 4-18).

FIGURE 4-18 End of installation
Changes in root.sh script in Oracle Grid Infrastructure 11.2.0.2
Starting with Oracle Grid Infrastructure 11.2.0.2, there is no need to deconfigure the cluster nodes prior to restarting the root.sh script on a failed cluster node because it can be restarted after the issue on the failed cluster node is fixed. Oracle internally records the checkpoint of the root.sh execution and uses these checkpoints to know the starting point of the root.sh script execution when it is restarted. Oracle has also enabled the ability to execute the root.sh script in parallel on the cluster nodes, except for the first and the last cluster node in the cluster.

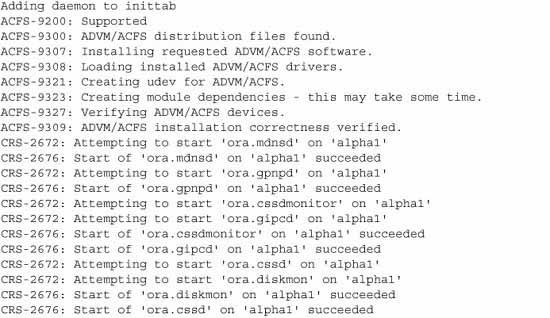
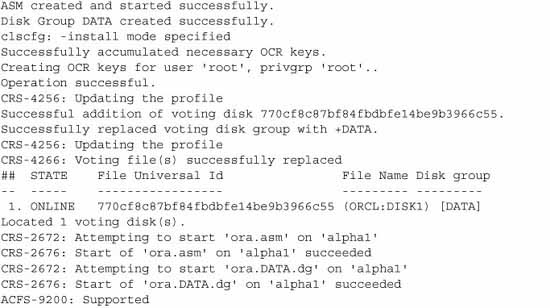
Running root.sh on the first cluster node will start the Oracle Grid Infrastructure daemons and ASM as well as mount the DATA disk group. Successful execution of the root.sh script is very important to complete the installation of the Oracle Grid Infrastructure.


You can exit the installer and look for the installActions.log file in the oraInventory home. If you enabled installer tracing, you also get more information on the installer actions with finer details.
Verifying the Oracle Grid Infrastructure Installation
After the installation, exit the installer. Optionally, you can use the clusterverify utility, as shown next, to verify the Oracle Grid Infrastructure installation. This stage is automated, starting in version 10.2, because the installer runs the cluster verification utility at both the start and the end of the install.

he other way to verify whether the Oracle Grid Infrastructure is installed successfully is to display the cluster resources status. You should see that the cluster resources are started and that their status is ONLINE. Here is a sample display of cluster resources using the CRSCTL utility:


Conclusion
Oracle Grid Infrastructure is the foundation of the Oracle Real Application Clusters deployment, and the installation process is quite simple and straightforward when the underlying storage and network components are configured appropriately. High availability of the infrastructure is obtained by configuring redundant components at the network and storage layers.
The Oracle-provided clusterverify utility helps a lot in preparing and validating the Oracle Grid Infrastructure and provides a lot of options to validate the installation process at various stages. The installer also provides fix-up scripts to help in reconfiguring the kernel parameters and the required settings, thus eliminating mundane tasks and human errors in the preparation of the cluster nodes during the installation.
Oracle Grid Infrastructure 11g Release 2, especially 11.2.0.2, has made significant improvements in the installation and configurations with the new Grid Plug and Play, the Typical Installation type, and restartable root scripts. Oracle Universal Installer performs the prerequisite checks and provides a fix-up script for fixable issues, which makes Oracle Grid Infrastructure installation even easier for the end user.
Oracle Grid Infrastructure Installation on Linux video tutorial
Now let's look at the Oracle RAC 12C Release 2 installation process.