Security-Enhanced Linux (SELinux) is a security framework in the Linux kernel for managing the access control policies of system resources. It supports a combination of the MAC, RBAC, and MLS models that were described in the previous section. SELinux is a set of kernel-space security modules and user-space command-line utilities, and it provides a mechanism for system administrators to have control over who can access what on the system. SELinux is designed to also protect a system against possible misconfigurations and potentially compromised processes.
SELinux was introduced by the National Security Agency (NSA) as a collection of Linux Security Modules (LSMs) with kernel updates. SELinux was eventually released to the open source community in 2000 and into Linux starting with the 2.6 kernel series in 2003.
So, how does SELinux work? We'll look at this next.
Working with SELinux
SELinux uses security policies to define various access control levels for applications, processes, and files on a system. A security policy is a set of rules describing what can or cannot be accessed.
SELinux operates with subjects and objects. When a specific application or process (the subject) requests access to a file (the object), SELinux checks the required permissions involved in the request and enforces the related access control. The permissions for subjects and objects are stored in a lookup table known as the Access Vector Cache (AVC). The AVC is generated based on the SELinux policy database.
A typical SELinux policy consists of the following resources (files), each reflecting a specific aspect of the security policy:
- Type enforcement: The actions that have been granted or denied for the policy (such as, read or write to a file).
- Interface: The application interface the policy interacts with (such as logging).
- File contexts: The system resources associated with the policy (such as log files).
These policy files are compiled together using SELinux build tools to produce a specific security policy. The policy is loaded into the kernel, added to the SELinux policy database, and made active without a system reboot.
When creating SELinux policies, we usually test them in permissive mode first, where violations are logged but still allowed. When violations occur, the audit2allow utility in the SELinux toolset comes to the rescue. We use the log traces produced by audit2allow to create the additional rules required by the policy to account for legitimate access permissions. SELinux violations are logged in /var/log/messages and are prefixed with avc: denied.
The next section will describe the necessary steps for creating an SELinux security policy.
Creating an SELinux security policy
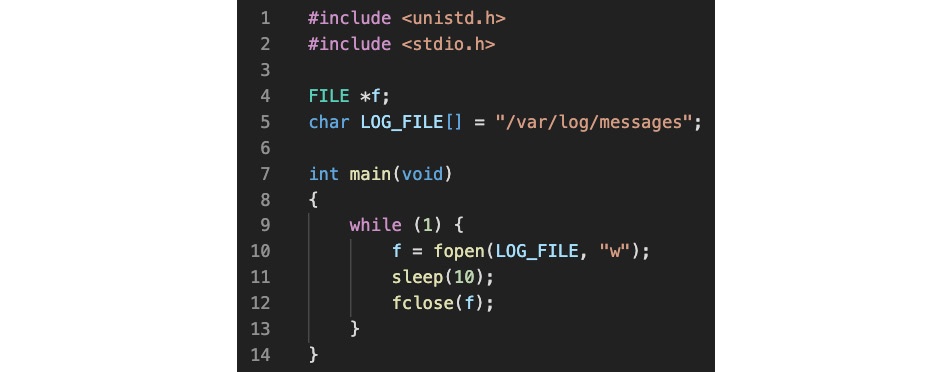
Let's assume that we have a daemon called packtd and that we need to secure it to access /var/log/messages. For illustration purposes, the daemon has a straightforward implementation: periodically open the /var/log/messages file for writing. Use your favorite text editor (such as nano) to add the following content (C code) to a file. Let's name the file packtd.c:

Figure 1 – A simple daemon periodically checking logs
Let's compile and build packtd.c to generate the related binary executable (packtd):
gcc -o packtd packtd.cBy default, RHEL/CentOS 8 comes with the gcc GNU compiler installed. Otherwise, you may install it with the following command:
sudo yum install gccWe are ready to proceed with the steps for creating the packtd daemon and the required SELinux security policy:
- Install the daemon.
- Generate the policy files.
- Build the security policy.
- Verify and adjust the security policy.
Let's start with installing our packtd daemon.
Installing the daemon
First, we must create the systemd unit file for the packtd daemon. You may use your favorite text editor (such as nano) to create the related file. We will call this file packtd.service:

Figure 2 – The packtd daemon file
Copy the files we created to their respective locations:
sudo cp packtd /usr/local/bin/

sudo cp packtd.service /usr/lib/systemd/system/
At this point, we are ready to start our packtd daemon:
sudo systemctl start packtd

sudo systemctl status packtd
The status shows the following output:

Figure 3 – The status of the packtd daemon
Let's make sure the packtd daemon is not confined or restricted yet by SELinux:
ps -efZ | grep packtd | grep -v grepThe -Z option parameter of ps retrieves the SELinux context for processes. The output of the command is as follows:

Figure 4 – SELinux does not restrict the packtd daemon
The unconfined_service_t security attribute suggests that packtd is not restricted by SELinux. Indeed, if we tailed /var/log/messages, we could see the messages logged by packtd:
sudo tail -F /var/log/messagesHere's an excerpt from the output:

Figure 5 – The packtd daemon's logging unrestricted
Next, we will generate the security policy files for the packtd daemon.
Generating policy files
To build a security policy for packtd, we need to generate the related policy files. The SELinux tool for building security policies is sepolicy. Also, packaging the final security policy binary requires the rpm-build utility. These command-line utilities may not be available by default on your system, so you may have to install the related packages:
sudo yum install -y policycoreutils-devel rpm-buildThe following command generates the policy files for packtd (no superuser privileges required):
sepolicy generate --init /usr/local/bin/packtdThe related output is as follows:

Figure 6 – Generating policy files with sepolicy
Next, we need to rebuild the system policy so that it includes the custom packtd policy module.
Building the security policy
We will use the packtd.sh build script we created in the previous step here. This command requires superuser privileges since it installs the newly created policy on the system:
sudo ./packtd.shThe build takes a relatively short time to complete and yields the following output (excerpt):

Figure 7 – Building the security policy for packtd
Please note that the build script reinstates the default SELinux security context for packtd using the restorecon command (highlighted in the previous output). Now that we've built the security policy, we're ready to verify the related permissions.
Verifying the security policy
First, we need to restart the packtd daemon to account for the policy change:
sudo systemctl restart packtdThe packtd process should now reflect the new SELinux security context:
ps -efZ | grep packtd | grep -v grepThe output shows a new label (packtd_t) for our security context:

Figure 8 – The new security policy for packtd
Since SELinux now controls our packtd daemon, we should see the related audit traces in /var/log/messages, where SELinux logs the system's activity. Let's look at the audit logs for any permission issues. The following command fetches the most recent events for AVC message types using the ausearch utility:
sudo ausearch -m AVC -ts recentWe will immediately notice that packtd has no read/write access to /var/log/messages:

Figure 9 – No read/write access for packtd
To further inquire about the permissions needed by packtd, we will feed the output of ausearch into audit2allow, a tool for generating the required security policy stubs:
sudo ausearch -m AVC -ts recent | audit2allow -RThe output provides the code macro we're looking for:

Figure 10 – Querying the missing permissions for packtd
The -R (--reference) option of audit2allow invokes the stub generation task, which could sometimes yield inaccurate or incomplete results. In such cases, it may take a few iterations to update, rebuild, and verify the related security policies. Let's proceed with the required changes, as suggested previously. We'll edit the type enforcement file (packt.te) we generated previously and add the lines (copy/paste) exactly, as indicated by the output of audit2allow. After saving the file, we need to rebuild the security policy, restart the packtd daemon, and verify the audit logs. We're reiterating the last three steps in our overall procedure:
sudo ./packtd.sh
sudo systemctl restart packtd

sudo ausearch -m AVC -ts recent | audit2allow -R
This time, the SELinux audit should come out clean:

Figure 11 – No more permission issues for packtd
Sometimes, it may take a little while for ausearch to refresh its recent buffer. Alternatively, we can specify a starting timestamp to analyze from, such as after we've updated the security policy, using a relatively recent timestamp:
sudo ausearch --start 12/14/2020 '22:30:00' | audit2allow -RAt this point, we have a basic understanding of SELinux security policy internals. Next, we'll turn to some higher-level operations for managing and controlling SELinux in everyday administration tasks. Now let's look at the SELinux launch modes


