Mobile App Use Cases
You can have your app users log in to your app via Facebook, Twitter, or other social networks that allow single sign-on (SSO).
Maybe your web app is an online store powered by WooCommerce: your mobile app allows your customers to browse and purchase products right from the app. Maybe your app enables multiple merchants to have stores on your network: with your app they can manage their inventory and upload photos of products in real time directly from their device.
Maybe you built a dating website with BuddyPress: making a branded mobile app for your dating service could help boost your member base if you gain popularity. With native device features like the camera, your social network members could take and upload selfies directly to their profile.
Maybe you built a real estate site, and you want agents to be able to create new posts in a CPT called “Homes” for a property they’re trying to sell. With the web app users could be snapping photos and posting them with the longitude and latitude, so the listing appears in Google Maps.
You could make a mobile app for construction contractors, plumbers, landscapers, electricians, doctors, dentists, lawyers, accountants, or any other type of physical service–based business that could easily assist them in tracking jobs, accessing client details, uploading before-and-after photos or videos, tracking job locations via GPS, collaborating with coworkers, and more.
Maybe you already have time and money invested in some existing WordPress-powered system that you want to make available via an app in the app stores.
Native and Hybrid Mobile Apps
Caution
What Is a Native Mobile App?
Objective C = iOS
Java = Android
- Performance
Native apps are created and optimized for specific platforms utilizing core languages, libraries, and APIs, making them very fast and responsive.
- Native libraries
Utilizing and having access to all of the native libraries directly has a huge advantage over having access to native library features only via wrapper plugins.
- Security
Native apps can be more secure than hybrid apps because they depend only on their platform, as opposed to hybrid apps, which depend on multiple technologies such as JavaScript, HTML, and CSS.
- More time
To place your app on more than one app store, you’ll need to build the same thing more than once.
- More money
Besides time spent building the same thing for multiple platforms, native iOS and Android developers generally cost more to hire.
- Less talent
There are far more web developers than there are native mobile app developers.
What Is a Hybrid Mobile App?
Why Hybrid over Native?
- Do what you know
You and/or your development team are already jamming with WordPress. Spend time building cool features for your app instead of learning how to build an app.
- Shared codebase
Why reinvent the wheel? To add custom functionality to your mobile app, head to the WordPress plugin repository or build a custom plugin to do what you want. Power your website, iOS app, and Android app with the same codebase.
- Consistent UX
Because you are using web-based technologies like JavaScript, HTML, and CSS, you can easily update and manage your UX to be consistent across all platforms running your app.
- Future proofing
Take advantage of advancing web technologies and development stacks used to make developing mobile apps and deploying mobile app updates easier and easier. A web-based platform is where you want to be able to easily extend your app’s reach across multiple platforms today and tomorrow.
Cordova
PhoneGap
Installing Cordova
App Project Directory:
TestAppApp Package Name:
com.apppresser.apps.testapp(usually a reverse domain name is a good standard to use)App Name:
TestApp
- config.xml
Default settings file pre-Cordova version 7.
- package.json
Default settings file starting in Cordova version 7.
- hooks
Cordova hooks are custom scripts for customizing Cordova commands.
- platforms
By default the platform’s directory is empty, but this directory will contain the files and code used to integrate Cordova with each platform software development kit (SDK) like Android and iOS.
- plugins
Cordova plugins that your app uses. Any plugins that interact with native features will go here.
- www
All your web resources that will be wrapped in your app’s web view.
Note
Cordova and Android
Note
cordova platform add android
Brians-MBP:TestAppbmess$cordovaplatformaddandroidUsingcordova-fetchforcordova-android@^8.0.0Addingandroidproject...CreatingCordovaprojectfortheAndroidplatform:Path:platforms/androidPackage:com.apppresser.apps.testappName:TestAppActivity:MainActivityAndroidtarget:android-28SubprojectPath:CordovaLibSubprojectPath:appAndroidprojectcreatedwithcordova-android@8.1.0Plugin'cordova-plugin-whitelist'foundinconfig.xml...Migratingittopackage.jsonDiscoveredsavedplugin"cordova-plugin-whitelist".AddingittotheprojectInstalling"cordova-plugin-whitelist"forandroidAddingcordova-plugin-whitelisttopackage.json
Cordova and iOS
Brians-MBP:TestAppbmess$cordovaplatformaddiosUsingcordova-fetchforcordova-ios@^5.0.0Addingiosproject...CreatingCordovaprojectfortheiOSplatform:Path:platforms/iosPackage:com.apppresser.apps.testappName:TestAppiOSprojectcreatedwithcordova-ios@5.0.1Installing"cordova-plugin-whitelist"foriosBrians-MBP:TestAppbmess$
cordova build iosCompiles the app into an app build.
cordova run iosRuns the app directly on an iOS device that is configured for testing and plugged into your computer.
cordova emulate iosRuns the iOS app on an IOS emulator.
Cordova plugins
BatteryStatusProvides an API accessing
batterystatus,batterycritical, andbatterylowevents.CameraProvides an API for taking pictures and for choosing images from the device image library.
CaptureProvides access to the device’s audio, image, and video capture capabilities.
ConnectionProvides information about the device’s cellular and WiFi connection, and whether the device has an internet connection.
DeviceProvides information about the device’s hardware and software.
EventsProvides various event listeners to be used within your app including
deviceready,pause,resume,backbutton,menubutton,searchbutton,startcallbutton,endcallbutton,volumedownbutton,volumeupbutton, andactivated.FileImplements a File API allowing read/write access to files residing on the device.
GeolocationProvides information about the device’s location, such as latitude and longitude.
GlobalizationProvides information and performs operations specific to the device locale, language, and time zone.
InAppBrowserEnables the ability to view web pages from within your app without leaving it.
MediaProvides the ability to record and play back audio files on a device.
NotificationProvides access to some native dialog UI elements like
alert,confirm,prompt, andbeep.SplashscreenDisplays and hides a splash screen during application launch.
Status BarProvides functions to customize the iOS and Android
StatusBar.StorageProvides functions for local storage on the device.
VibrationProvides a way to vibrate the device.
cordova plugin add cordova-plugin-camera
cordova plugin add https://github.com/apache/cordova-plugin-camera.git
Ionic Framework
Install Install Ionic CLI from http://bwawwp.com/ionic-cli. Once you’ve installed Node.JS and npm, go ahead and run:
sudo npm install -g ionic
Test Ionic version once installed with
ionic -v.Test Node.js version with
node -v.To install Cordova and Ionic use
sudo npm install -g cordova ionic.
After Ionic is installed, start a new app by using the Ionic
startcommand and passing in an app name, template type, and framework (we’ll usetabshere, but note that there are other layout types):ionic start SchoolApp tabs angular
Navigate to your new Ionic project directory and list the files:
cd SchoolApp
ls
From within your new app project directory, run
ionic serveto build and serve your app in a web browser, and boom! Instant progressive web app.To use Ionic with Cordova in your app project to add native capabilities, run:
ionic cordova platform add android
ionic cordova platform add ios
This adds the respective Cordova platform files to your new Ionic project.
Run
ionic cordova build androidto build your app and generate an .apk file.Run
ionic cordova emulate androidto open up your new Android app in an emulator.You can also launch it in an emulator:
ionic cordova emulate ios --no-native-run
App Wrapper
AppPresser
Installing and configuring on WordPress
Note
AppBuddy
AppCamera
AppCommerce
AppCommunity
AppGeolocation
AppPush
AppShare
AppWoo
App Facebook Connect
LearnDash
In App Purchases
The App Builder

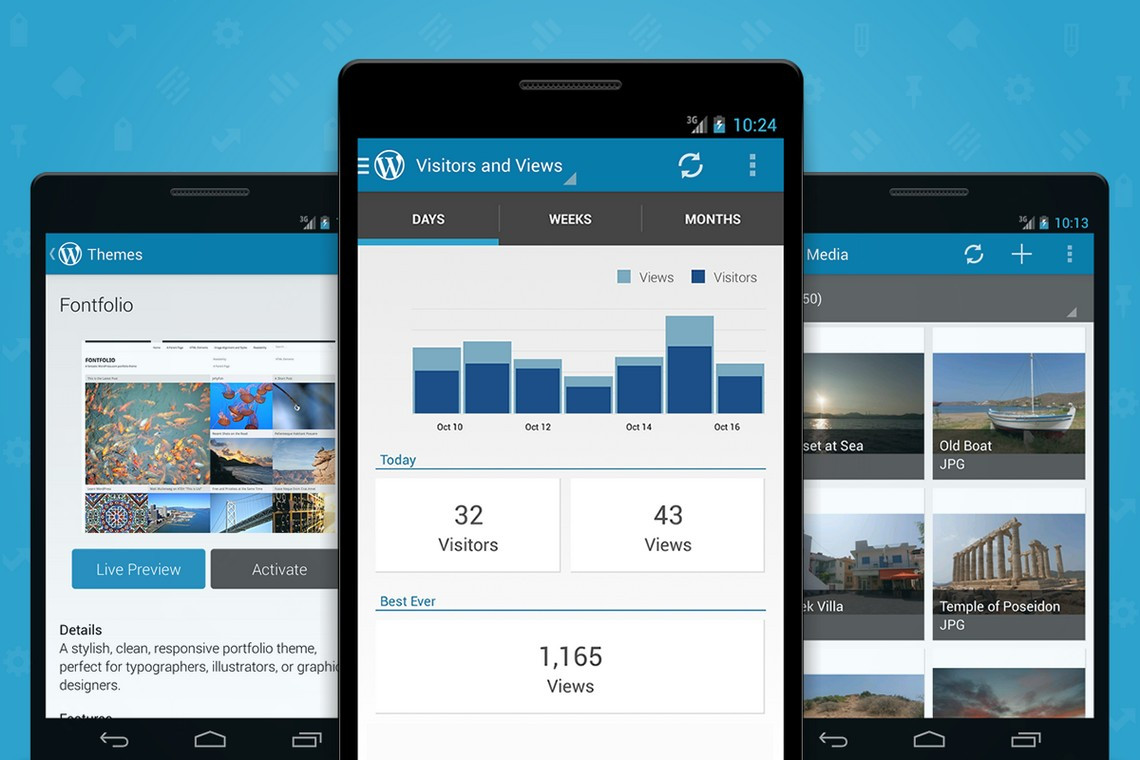
Figure 16-1. MyAppPresser Customizer
Note
- Colors
Visually change the default colors of any of the elements available in your app. The default elements include: Body Background, Text Color, Button Background, Button Text, Left Menu Background, Left Menu Text, Left Menu Icon Color, Link Color, Headings Color, and Android Status Bar Background.
- Design
Customize some of your app design elements like your heading fonts, body font, and any custom fonts you would like to use. You can also apply any custom CSS here to completely customize your app design.
- Settings
Enter general information about your app that will be required in an app build, and further customize your app with additional settings. You can choose from using a side menu or a tab menu or both. You can enable the camera, push notifications, and geolocation. You can upload your app icon, splash screen, header logo, and any additional offline assets such as local images to be displayed or videos to be played. You can upload a JavaScript file to use custom JavaScript within your app. You can choose the default language to be used within your app and even choose right to left (RTL) text if need be.
- Build and Preview
Here you’ll build your app once you finish customizing it. Click Build App to compile your app for testing and/or app stores. Enter your PhoneGap Build auth token to compile for a device. This will allow you to use a QR code to scan and get the app onto your device. Note that iOS won’t work without a signing certificate. You can also download the build files as a ZIP file here if you’d like to extend or customize your app further than what you can do with the App Builder.
- Menus
Control what pages will be available in your apps. You can add either custom links or custom pages. Add a page title and custom link with the full URL to the WordPress website page you would like to add to your app; this is how you can display any WordPress pages in your app using the AppPresser theme. If you have any custom app pages built you can also add them to the app here.
- Custom Pages
Build custom pages for your app. These are not regular WordPress pages loading from within your app; these will be local app pages that are highly customizable.
Note
Compiling and testing an app
Note
Linking between app pages
Link to a page in your side menu:
<a href="#" data-applink="2">Menu 2</a>
Link to a tab page:
<button data-apptablink="1">Tab Menu 1</button>
The number in the link refers to the menu item position, starting with 0. For example, the first page in your menu would be 0, the second page 1, and so on. Link from a custom HTML page to another page (must be in the menu). In this case you are creating a custom HTML page and you want to link to another app page.
Add a button to the page:
<button ion-button>Visit Page</button>
Add a click function in that button:
<button ion-button (click)="pushPage( pages.menus.items[0] )">
 Visit Page
</button>
Based on your menu, the page you are linking to will change.
For side menus, use
pages.menus.items[]. For a tab menu, usepages.tab_menu.items[], as follows:<button ion-button (click)="pushPage( pages.tab_menu.items[1] )"> Visit Page </button>
The number refers to menu items, starting with 0. The first item is 0, the second is 1, and so on.
If you do not want a back button, use
openPageinstead ofpushPage:<button ion-button (click)="openPage( pages.menus.items[3] )"> Visit Page </button>
AppCamera plugin
- Camera license key
Add the license key you received, with your purchase. This will enable you to receive updates for the plugin as they’re released.
- Uploaded photos must be moderated
Use this setting if you want to be able to review/approve/deny all uploaded photos before they are published live.
- Email new photos to admin email
Use this setting if you want to be notified by email, using the WordPress set admin email address, whenever a user uploads a new photo, regardless of moderation being required.
- Save photos to featured image
When you enable this and have uploads set to create new posts, the uploaded image will also be set as the post’s featured image.
- Photo upload description
Text that will be displayed as a description on the rendered upload form.
- Text to display if logged out
Text that will be displayed to logged-out users.
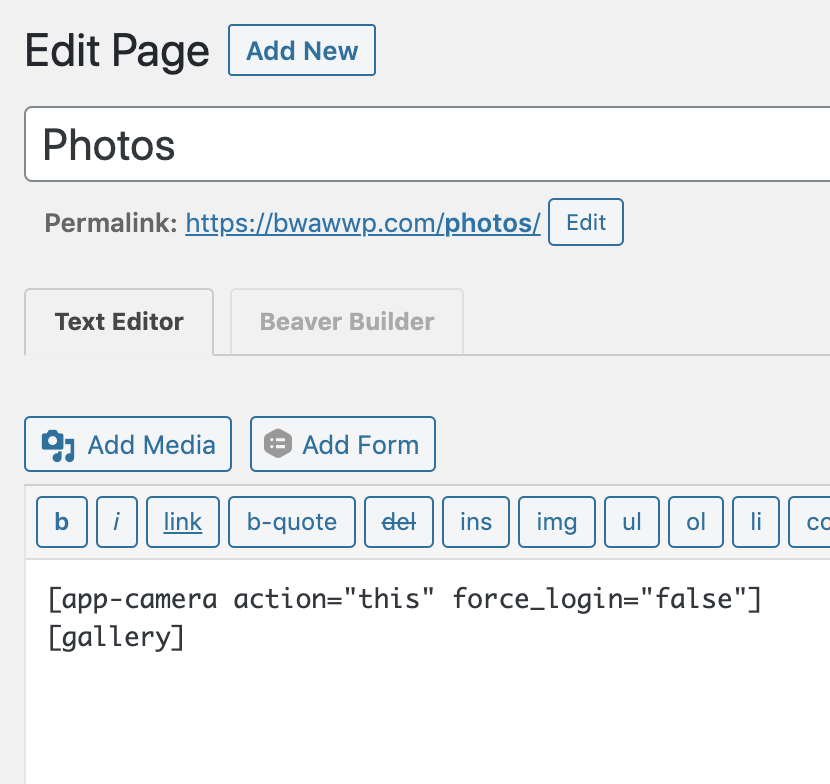
Figure 16-2. AppPhoto shortcode
- Gallery shortcode
You can add a WordPress gallery shortcode
[gallery], on the same page where you have the[app-camera]shortcode. This will display your images. Note that this page does not refresh dynamically to display newly uploaded images, but you can use JavaScript to do that if needed.Action="this"If you are using
[app-camera action="this"], each photo from the app will be uploaded to the media library and attached to the current post or page where the shortcode is.Action="new"If you are using
[app-camera action="new"], each photo will create a new post. You can then display these posts any way you like, such as a custom template in your theme, or a plugin like Display Posts Shortcode.
[app-camera action="new"][app-camera post_type="page"][app-camera post_title="true"][app-camera not_logged_in="Please log in first"][app-camera description="You can upload your photos!"]
Note
[app-camera post_type="page" force_login="false" action="new"]

Figure 16-3. Moderating uploads
appp_after_camera_buttonsHooks immediately after the form for the photo upload has displayed.
appp_after_process_uploadsHooks immediately after the photo upload handling is done. Passes in the affected post ID and the new attachment ID from the upload. This allows you to do more processing on either post or attachment afterwards.
appp_before_camera_buttonsHooks immediately before the form where the photo upload is displayed.
active_pluginsAllows you to intercept
get_option( active_plugins )before your extension determines whether the required plugins are presently active. Default value:get_option( active_plugins ).appp_camera_descriptionAllows you to intercept and modify, if needed, the text to display as the description. This value is originally set in the Camera section of the AppPresser settings page. Default value:
Upload your photos!appp_camera_not_logged_in_textAllows you to intercept and modify, if needed, the text to display to not-logged-in users. This value is originally set in the Camera section of the AppPresser settings page. Default value:
Upload your own customer image!appp_camera_post_title_labelAllows you to intercept and modify the label for the post_title field that is displayed via the
[app-camera]shortcode. Default value:<label> . __( Title:, appp ) . </label>appp_upload_email_messageAllows you to intercept and modify the default message that is set with the email notifications for new uploads.
appp_upload_email_subjectAllows you to intercept and modify the default subject that gets set with the email notifications for new uploads. Default value:
A new photo was uploaded.appp_upload_email_toAllows you to intercept and modify the default email recipient who will be receiving the email notifications for new uploads. Default value:
get_settings( admin_email ).appp_camera_photo_blog_embedded_img_sizeAllows you to intercept and modify the default size for photo blog image embeds. Default value:
array( 768, 2500, false ). The first parameter is width in pixels, the second parameter is height in pixels, and the third parameter is whether to crop.appp_moderate_maybe_publishAllows you to intercept and modify, if needed, the array of arguments used for the publishing of the post once a photo is approved from moderation. Default value:
array( ID ⇒ absint( $parent[0] ), post_status ⇒ publish );.appp_insert_photo_postPlaces the uploaded image into the post content area, if a user has chosen not to have the image applied to the featured image.
WooCommerce plugins
Shapes the page layout for single products to fit nicely with app-like structure. It accomplishes this by removing various WooCommerce hook callbacks as well as registering some new ones for AppTheme to achieve the desired layout.
Provides integration with AppSwiper and helps with Ajax and sliders for product images. This way you can more easily display multiple product images and variety for your customers.
If you have AppCamera active, it will automatically add the ability for users to upload and submit images to each product.
Provides a user profile in the left panel menu for your returning customers. When they toggle the menu, they’ll see their name and profile picture.
Provides cart information and totals in the left panel menu for your customer. Provide easy access to your customer’s information and orders, directly from the menu.
appp_after_product_imagesHooks right after the product images gallery display.
active_pluginsAllows you to intercept
get_option( active_plugins )before the WooCommerce extension determines if WooCommerce is presently active. Default value:get_option( active_plugins ).apppresser_woocom_gallery_idsAllows you to intercept and modify, if needed, an array of gallery image IDs used with the gallery display. Default value:
$gallery_ids.apppresser_disable_woo_stylesAllows you to intercept and prevent the disabling of WooCommerce styles. Default value:
true //Styles will be disabled.
jQuery(document).ready(function($){if($('body').hasClass('woocommerce-page')){varmessage_array={};message_array['post_title']=window.appp.post_title;message_array['cart_link']=window.apppwoo.cart_url;parent.postMessage(JSON.stringify(message_array),'*');}});
<woo-list route="products" infiniteScroll="true"></woo-list>
<woo-list route="products?stock_status=outofstock" infiniteScroll="true">
</woo-list>
Note
<woo-cart></woo-cart>
<woo-account></woo-account>
Note
<woo-list wishlist="true"></woo-list>
Note
LearnDash/AppLMS
<ap-list wp="true" card="true" class="col-2"
     route="https://mysite.com/wp-json/wp/v2/sfwd-courses?per_page=10">
</ap-list><ap-list wp="true" route="https://mysite.com/wp-json/wp/
v2/sfwd-courses" infiniteScroll="true"></ap-list>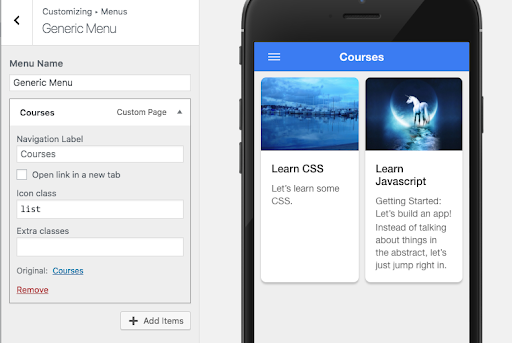
Figure 16-4. Adding courses to your app
AppPush
You cannot test push notifications in a simulator or on the AppPresser Preview app; you must use an actual device.
Most problems derive from iOS certificates, so make sure to follow the instructions exactly.
You must have a valid iOS developer account for Apple. You can find more information at Apple Developer.
Android requires a free Firebase project and API key.