
this article describes how to utilize the various management options available so that you can administer your Google Cloud Platform (GCP) services with ease. In the previous posts, we touched on the command-line tools that are available so that we can manage Google services. In this article, we will look at these tools in more detail, which include gcloud, cbt, bq, and gsutil.
Exam Tip
You must know about the most efficient command-line tool for managing a particular service. Review and understand each command-line tool in this article and ensure that you can quickly map them to a GCP service. For example, if we are asked to create a new storage bucket using a command-line tool, we should know instantly that we need to use gsutil.
We also recommend that you take a deeper look at the gsutil command lines and understand them so that you can set life cycle policies.
As we cover each management option in this article, you can expect to understand how to access it and gain hands-on knowledge from examples. You can also expect to see code-based commands that can be used in the real world but are important to understand for exam success. We will begin by looking at using application programming interfaces (APIs) and will then look at the remaining tools.
In this article, we will introduce the various management options that you can use. Specifically, we will cover the following topics:
- Using APIs to manage resources
- Using Google Cloud Shell
- The GCP Software Development Kit (SDK)
- Exploring Cloud Deployment Manager
- Pricing Calculator
- Additional things to consider
Using APIs to manage resources
API usage is extremely common now. APIs are access points to an application that offer developers flexibility in the way they communicate with them, dramatically increasing their efficiency.
Important Note
GCP offers full documentation on the APIs for their services. We recommend that you check out https://cloud.google.com/apis/ and click on the specific service you wish to read more about.
APIs use different authentication services, depending on where the API calls come from and the resource(s) they are requesting:
- API keys: These are encrypted strings that can be used when API calls don't need to access user data. These are great for getting developers up and running quickly. Keys are created from the GCP console under APIs & Services | Credentials. These keys are then used in the API request.
- OAuth client IDs: These are based on the scope, meaning that different privileges will be granted to different IDs. This method is used if a developer needs to request user data.
- Service Accounts: These belong to an application of a Virtual Machine (VM) instance. Please refer to This Post, Security and Compliance, for more in-depth information on service accounts.
Let's look at an example of using an API. As we mentioned previously, we can browse to API & Services from the GCP console and then select ENABLE APIS AND SERVICES. If we search for Compute Engine, as shown in the following screenshot, we can select TRY THIS API:
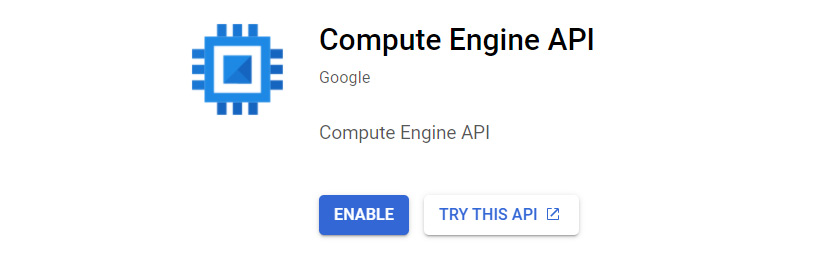
Figure 16.1 – Enabling the API
This will take us to the Compute Engine API documentation page. This is a nice feature that GCP offers to assist us in using our API calls for all of its services. If can scroll through the documentation, we will see a list of all the API calls that are related to GCE. Let's look for a method that we can use to create a new instance; that is, under the v1.instances.insert listing:

Figure 16.2 – API example
If we click on this method, it will bring us to a page that allows us to request a VM instance via the API. The first thing that we should notice is the menu on the right-hand side, where we can select OAuth 2.0 as our authentication method. This allows us to authorize the API call using the same user we used to log into the GCP console. There is some mandatory information to populate, and this is specified in red:
- project: This is the ID of your GCP project.
- zone: This is the zone where you would like the VM to reside.
The following screenshot shows an example of these fields populated:
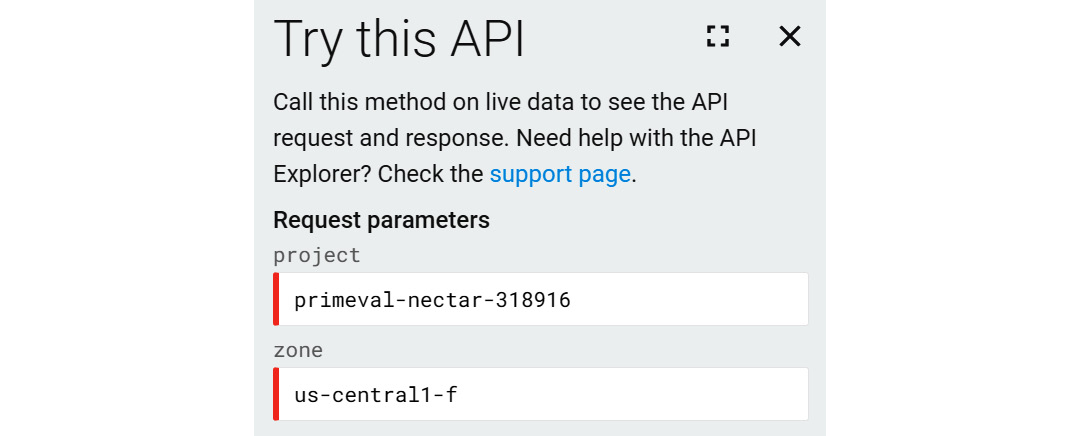
Figure 16.3 – Try this API
We also need to populate the request body with information about our request. Let's look at what is required in the following example. We are required to provide information regarding the machine's type, the machine's name, and the disk and image type:
{
"machineType": "zones/us-central1-f/machineTypes/n1-standard-1",
"name": "test001",
"disks": [
{
"initializeParams": {
"sourceImage": "projects/debian-cloud/global/images/family/debian-9"
},
"boot": true,
"interface": "SCSI"
}
],
"networkInterfaces": [
{
"network": "global/networks/default"
}
]
}
After its initial validation, we can execute our request by clicking Authorize and execute. Response code 200 OK means that our request was successfully executed:

Figure 16.4 – API return code
By taking a closer look, we can see information about the user, URI, and zone:
{
"id": "5737119379050389182",
"name": "operation-1625514064727-5c6657c67cea7-42560a30-2bf3bace",
"zone": "https://www.googleapis.com/compute/v1/projects/primeval-nectar-318916/zones/us-central1-f",
"operationType": "insert",
"targetLink": "https://www.googleapis.com/compute/v1/projects/primeval-nectar-318916/zones/us-central1-f/instances/test001",
"targetId": "6541634553944923838",
"status": "PENDING",
"user": "This email address is being protected from spambots. You need JavaScript enabled to view it.",
"progress": 0,
"insertTime": "2021-07-05T12:41:06.131-07:00",
"selfLink": "https://www.googleapis.com/compute/v1/projects/primeval-nectar-318916/zones/us-central1-f/operations/operation-1625514064727-5c6657c67cea7-42560a30-2bf3bace",
"kind": "compute#operation"
}
Now, let's look at another example by creating a new disk. We can simply search for the v1.instances.insert method. Again, we have the project and zone to populate. The request body is also required:
{
"name": "newdisk001",
"sizeGb": 10
}
After clicking Authorize and execute, we can, once again, see the response:
{
"id": "4514886327875854282",
"name": "operation-1625514277056-5c665890fb0fa-1bd73387-5f597370",
"zone": "https://www.googleapis.com/compute/v1/projects/primeval-nectar-318916/zones/us-central1-f",
"operationType": "insert",
"targetLink": "https://www.googleapis.com/compute/v1/projects/primeval-nectar-318916/zones/us-central1-f/disks/newdisk001",
"targetId": "3511243588531838922",
"status": "RUNNING",
"user": "This email address is being protected from spambots. You need JavaScript enabled to view it.",
"progress": 0,
"insertTime": "2021-07-05T12:44:37.706-07:00",
"startTime": "2021-07-05T12:44:37.713-07:00",
"selfLink": "https://www.googleapis.com/compute/v1/projects/primeval-nectar-318916/zones/us-central1-f/operations/operation-1625514277056-5c665890fb0fa-1bd73387-5f597370",
"kind": "compute#operation"
}
We recommend that you explore the GCP API's Explorer page to review what APIs are available in the core GCP services. In the upcoming sections, we will be looking at more command-line tools that are available to us.
Using Google Cloud Shell
The main management tool in the GCP suite is Google Cloud Shell. This is a free g1-small Google Compute Engine (GCE) instance that provides command-line access so that you can manage your GCP infrastructure through a Linux shell. The interesting thing here is that it can be accessed directly from your GCP console simply by clicking on the shell access button at the top-right-hand side:

Figure 16.5 – Initiating Google Cloud Shell
Once activated, the console screen will split in two and Google Cloud Shell will become visible inside the browser:

Figure 16.6 – Google Cloud Shell
No additional steps are required for authorization, so we can manage projects and resources securely without the need to install any other management toolset. Moreover, the SDK command lines that we will look at in this article are packaged as standard. Additionally, Google Cloud Shell has preinstalled admin tools such as the MySQL client, Docker, and kubectl. Finally, your developers can also access different languages, including Go, Python, Node.js, and Ruby. For a full and up-to-date list of features that have been installed, we recommend that you visit https://cloud.google.com/shell/docs/features#tools.
Google Cloud Shell comes with 5 GB of persistent disk storage, which is mounted to your $HOME directory. This means that you can store scripts or user configurations safely between sessions and install any required packages. Note that anything that's saved outside the $HOME directory will be lost when the session terminates; that is, after it has been idle for an hour.
We can upload and download from our local machine using the console shell's settings, as shown in the following screenshot:
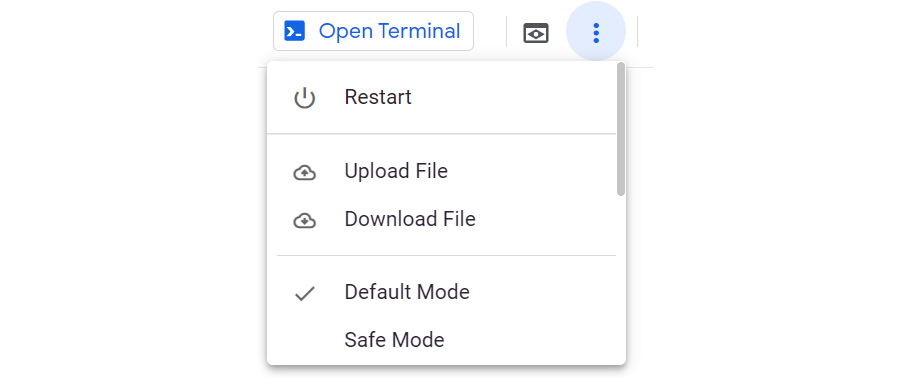
Figure 16.7 – The Upload File and Download File options
Google Cloud Shell's code editor can also be used to browse the folder path from persistent storage. We can easily access this by clicking the pencil icon in the Cloud Shell menu bar:

Figure 16.8 – Cloud Shell menu
From here, we can update our scripts or files directly in Cloud Shell. The Cloud Shell virtual instance also comes with standard Linux-based editors such as nano and vim. Note that, at the time of writing, the code editor is in the beta stage:
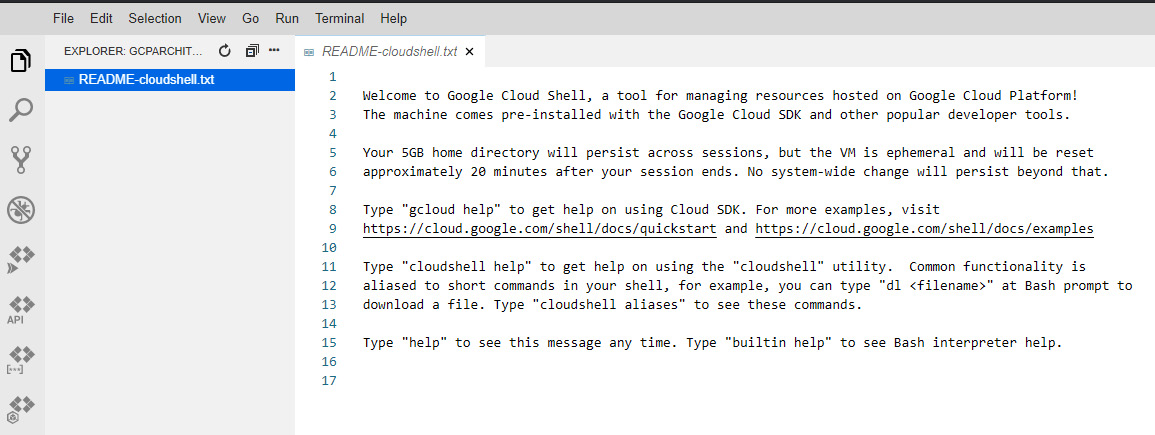
Figure 16.9 – Cloud Shell editor
Now that we have covered Google Cloud Shell, let's move on and look at the GCP SDK.
The GCP SDK
This section will describe how to use the Google Cloud SDK. The SDK is a set of tools that allows you to manage your GCP resources and applications and includes the gcloud, gsutil, and bq command-line tools. There are, as expected, some prerequisites to installing this kit. The SDK can run on Linux, macOS, and Windows OSes and requires you to have Python 2.7.x installed. Some tools that come bundled may have additional requirements. Please refer to https://cloud.google.com/sdk/install for specific system and operating system requirements.
gcloud
gcloud is the primary command-line tool for GCP and allows you to perform common tasks in your GCP environment. There are many use cases for gcloud; for example, creating and managing GCE instances, Cloud SQL instances, Kubernetes Engine clusters, Dataproc clusters, DNS zones, and Cloud Deployment Manager deployments.
When you are using gcloud for the first time, it is advisable to check out the usage guidelines. Adding -h to a command will offer the following guidelines:
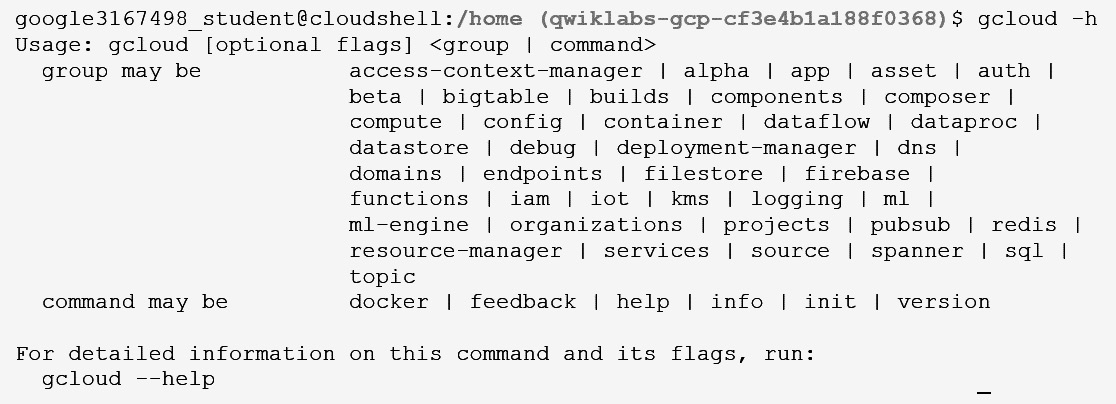
Figure 16.10 – gcloud help
For detailed information about this command and its flags, we can run the following command:
gcloud –-help
This will list far more details – try it out and take a look at the output you receive! Press the spacebar to continue looking through the detailed output or press Q to exit.
Important Note
gcloud has a command reference for features and resources hosted on GCP, which we recommend that you review. This can be found at https://cloud.google.com/sdk/gcloud/reference/.
Let's have a look at how we can use gcloud to create a new VM instance.
We will also show you how we can use gcloud to connect to our VM via SSH, create a new disk, and attach it to our VM instance. Follow these steps:
- To create a VM, we should use the following syntax:
gcloud compute instances create <instance name> --zone <zone name>
Here, <instance name> is the name of your VM instance, and <zone> is the zone where your instance will be deployed.
- The following example will create a new VM instance named myinstance in zone us-central1-f:
gcloud compute instances create myinstance --zone us-central1-f
- Once we have created our instance, gcloud also allows us to connect to the instance and manage it. This is a thin wrapper around the SSH command that will deal with the authentication and instance name to IP address resolution. The connection will, by default, initiate the SSH session using the user credentials that are running the command:
gcloud compute ssh <instance name> --zone <zone name>
Here, <instance name> is the name of your GCE VM instance, and <zone> is the zone where your instance will be deployed.
- The following example will connect to a new VM instance named myinstance in zone us-central1-f using the following SSH command:
gcloud compute ssh myinstance --zone us-central1-f
- gcloud also allows us to perform day 2 operations. As an example, let's add a disk to the VM instance we've already created. First, we need to create the disk using the following syntax:
gcloud compute disks create <disk name> --zone <zone name>
Here, <disk name> is the name of the disk we are creating, and <zone name> is the zone where the disk will be created.
- The following example will create a new disk named newdisk001 in zone us-central1-f:
gcloud compute disks create newdisk001 --zone us-central1-f
We should note that, in the preceding example, I didn't use the optional size flag. We should note that the default disk size for a standard HDD is 500 GB. Also, you can see that we have created the disk in the same zone as the instance.
- Finally, we need to attach the disk to our instance. This can be accomplished using the following syntax:
gcloud compute instances attach-disk <instance name> attach-disk <disk name> --zone <zone>
Here, <instance name> is the name of your GCE VM instance, <disk name> is the name of the disk you want to attach to your VM instance, and <zone name> is the zone your instance resides in.
- The following example will attach a disk called newdisk001 to a VM instance called myinstance in the us-central1-f zone:
gcloud compute instances attach-disk myinstance --disk newdisk001 --zone us-central1-f
Finally, it is wise to mention the alpha and beta commands, which you may find in gcloud. Alpha commands are typically not production-ready and may still be in the development phase. They may change without any notice, and some are only fully accessible via invitation. Beta commands are typically almost fully developed and being tested in production. However, these may also be changed without notice.
gsutil
In this section, we will describe the usage of gsutil. The main purpose of this is to ensure that you understand the primary use case for gsutil and show examples of real-life scenarios. gsutil is a Python application that can be used to manage Cloud Storage resources and can be triggered from Cloud Shell. By using gsutil, we can do the following:
- Create and delete buckets.
- Manage access to these buckets and their objects.
- Copy and move storage data.
- List the contents of a bucket.
- Transfer data in and out of our Cloud Shell instance (note that this is not limited to Cloud Shell).
Important Note
You need to understand that the gsutil syntax works in gsutil <action> gs://<bucket name>/<resource name> format.
An example of <action> could be mb, which is used to create a bucket. Here, gs:// is the prefix to indicate a resource in Cloud Storage. <bucket name>/<object name> could be cloudarchitect/notes.txt, for example. For a full range of gsutil commands, please refer to https://cloud.google.com/storage/docs/gsutil.
Creating a bucket is a good place to start with gsutil. Buckets are basic containers where you can store your data. We covered storage in detail in This Post, Exploring Storage and Database Options in GCP – Part 1.
Let's look at some examples of common tasks that we can use gsutil for. Let's create a bucket, upload some content to it, list some files, and then remove the bucket:
- The following syntax can be used to create a bucket:
gsutil mb -l <zone name> gs://<bucket name>
Here, <zone name> is the zone where you will be creating your storage bucket, and <bucket name> is a globally unique bucket name. In the following example, we will create a bucket called cloudarchitect001 in the us-east1 zone:
gsutil mb -l us-east1 gs://cloudarchitect001
- Now that we have created a new bucket, let's add a file to it. In this example, I will create a new file on my local persistent Google Cloud Shell storage. Let's assume that we have a file called examnotes.txt in our Cloud Shell environment. This can be uploaded as described in the Using Google Cloud Shell section. To copy this to our bucket, we can use the following syntax:
gsutil cp <file to copy> gs://<bucket name>
Here, <file to copy> is the file you wish to copy to your bucket, and <bucket name> is a globally unique bucket name where you want the file to reside. In the following example, we will copy a file called examnotes.txt to a bucket called cloudarchitect001:
gsutil cp examnotes.txt gs://cloudarchitect001
- The output from the previous command will confirm the success of this copy. We should also note that options can be specified when using cp to extend the command. For example, the –n option will prevent overwriting the content of existing files. The –r option will copy an entire directory tree and, importantly, –m will allow us to perform a parallel multi-threaded/multi-processing copy. We can list the contents of our bucket to ensure that the file is there using the following syntax:
gsutil ls gs://<bucket name>
Here, <bucket name> is the name of the bucket you wish to list resources in. Let's list the resources of our cloudarchitect001 bucket:
gsutil ls gs://cloudarchitect001
- If we wish to remove files from our bucket, we can use the following syntax:
gsutil rm gs://<bucket name>/<object name>
Here, <bucket name> is the name of the bucket where our resource resides, and <object name> is the object we wish to remove. Let's remove examnotes.txt from our cloudarchitect001 bucket:
gsutil rm gs://cloudarchitect001/examnotes.txt
- Finally, if we wish to remove the bucket completely (remember, resources come at a cost!), we can use the following syntax:
gsutil rb gs://<bucket name>
Here, <bucket name> is the name of the bucket we wish to delete. Let's delete our cloudarchitect001 bucket:
gsutil rb gs://cloudarchitect001
Note that we could also run this command with the -r flag, which would remove the bucket and all its contents.
bq
Now, let's look at the command-line tools for BigQuery. BigQuery was described in more detail in This Post, Analyzing Big Data Options, so in this section, we won't do a deep dive into the service. However, in general, the main way to interact with BigQuery is to load, export, query, view, and manage data. One of the ways we can do this is from Cloud Shell using the bq command-line tool.
Important Note
BigQuery can be complex to use from the bq command line, and it is recommended to review the bq command-line tool reference page for full details: https://cloud.google.com/bigquery/docs/bq-command-line-tool.
Let's look at some common use cases. In the following examples, we will create a new dataset, create a table, and then query it:
- The following syntax is used to create a new dataset in its simplest form:
bq --location=<location> mk --dataset <dataset name>
Here, <location> is the dataset location, and <dataset name> is the name of your new dataset. The location can be multi-regional, such as the US or EU, or it can be a regional location, such as us-west2 or europe-north1.
- Let's create a new dataset called newdataset as a multi-regional location of the US:
bq --location=US mk --dataset newdataset
Important Note
Some optional flags can be set. It is good practice to configure the default table's expiration for the default tables of your datasets, the expiration time for your tables, and the partition expiration for your partitioned tables.
- Now, let's create a new empty table in its simplest form. To do so, we can use the following syntax:
bq mk -t <dataset name>.<table name> <schema>
Here, <dataset name> is the name of the dataset you wish to create a new table in, <table name> is the name of the table to be created, and <schema> is the inline schema definition in [FIELD:DATA_TYPE] format. A path to a JSON file on your local machine can also be used. The <schema> parameter may be a bit confusing but, to clarify, this is like a column in an Excel file.
- Let's create a new table called newtable inside our dataset called newdataset. We will create two new columns named examname and result that we will want to populate with character (Unicode) data; that is, STRING data:
bq mk -t newdataset.newdataset \ examname:STRING,result:STRING
- Finally, let's look at how we can use bq to run queries. To do so, we need to use the following syntax:
bq query '<SQL query>'
Here, <SQL query> is the SQL query that you wish BigQuery to execute on the data. <SQL query> will contain information on the data to query from a specific dataset and table. If we want to connect to a project that isn't set as our default, we can also specify this in our SQL request. If we were to query the full path of the table, it would look as follows:
<projects>.<dataset>.<table>
To clarify this, let's look at an example. GCP provides some sample datasets and tables that we can make use of. Let's execute a bq query on a table called Shakespeare from a dataset called samples. The dataset and the table reside under a public project that Google allows us to connect to called bigquery-public-data.
In this example, we want to see how many times the word beloved appears in Shakespeare's works. We will search by the columns in the table, which are word and corpus. Also, note that we are specifying #standardSql as the query type:
bq query "#standardSql SELECT word, corpus, COUNT(word) FROM \'bigquery-public-data.samples.shakespeare\'
WHERE word LIKE '%beloved%' GROUP BY word, corpus"
Important Note
Please note that ' in \'bigquery-public-data.samples.shakespeare\' is a backquote, not an apostrophe.
This will return the following results:
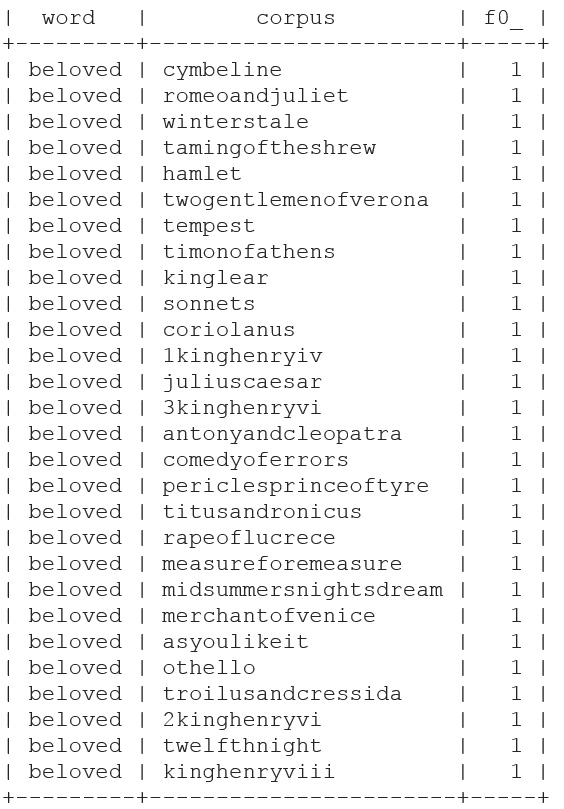
Figure 16.11 – bq output
For exam success, we should understand the power of the bq command line, but mostly ensure that we understand which command-line tool to use to query BigQuery tables.
cbt
In this section, we will discover the command-line tool for Cloud Bigtable – cbt. Written in Go, the CLI allows us to perform basic interactions with Bigtable. Unlike the previous command-line tools we've looked at, we must install this component using Cloud Shell and the gcloud command.
Again, we took a deeper look at this service in This Article, Exploring Storage and Database Options in GCP – Part 2, but before we look at the command-line tool, we should remind ourselves that Bigtable is a high-performance NoSQL database service that uses instances, clusters, and nodes. Bigtable is a container for your clusters and nodes. Tables belong to these Bigtable instances:
gcloud components install cbt
Note that if you receive feedback that the Cloud SDK component manager is disabled, then you can also run the following command:
sudo apt-get install google-cloud-sdk-cbt
You may have noticed that the different tools we have looked at have slightly different syntax and that cbt is no different. The usage of cbt is as follows:
cbt <command>
Let's look at an example of creating a new instance in Bigtable called myfirstinstance. There are additional flags we must add. Let's look at the syntax:
cbt createinstance <instance id> <display name> <cluster id> <zone> <number of nodes> <storage type>
Here, <instance id> is an identifier you wish to give your Bigtable instance, <display name> is the display name of your Bigtable instance, <cluster id> is an identifier for the cluster of nodes, <zone> is the zone that your instances will be deployed in, <number of nodes> is the number of VM instances in the cluster, and <storage type> is the storage type we wish to use for our VM instances. This can be set to either SSD or HDD.
Let's look at the syntax that we'd have if we wanted to create a new instance with an ID of instance001, a display name of myfirstinstance, a cluster ID of cluster001, and three nodes deployed in the europe-west2-a zone using SSD storage:
cbt createinstance instance001 myfirstinstance cluster001 europe-west2-a 3 SSD
If we look inside our console, we can verify that this has been created correctly:
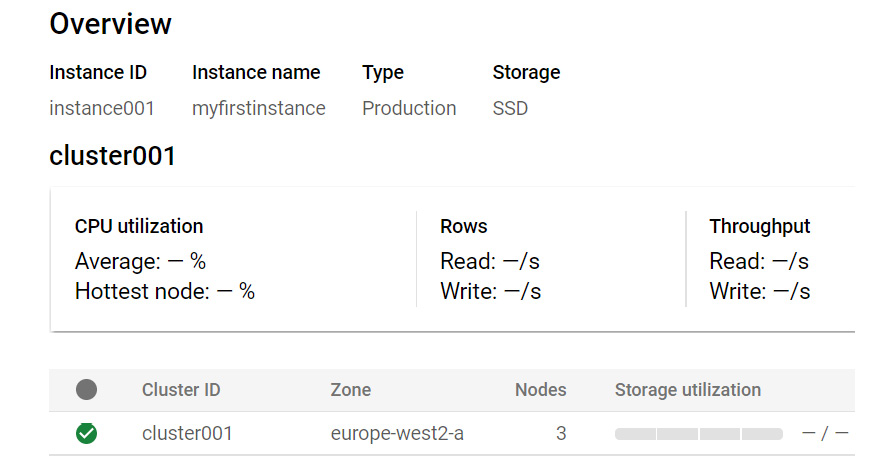
Figure 16.12 – Overview
Important Note
You can also use gcloud commands to create Bigtable instances. gcloud lets us create production or development environments, where developments have limited performance and no SLA. If you need to create a development Bigtable instance, then use gcloud.
Exploring Cloud Deployment Manager
In this section, we will look at one of the most useful management tools – Google Cloud Deployment Manager. It's important to understand the concepts of Cloud Deployment Manager for exam success.
Deployment Manager allows us to automate the process of creating and configuring a variety of GCP resources. We can write all the resources our application needs in a declarative format using YAML files, which ensure repeatable deployments with consistent results. YAML is a data sequencing language that humans can easily read. Overall, Deployment Manager can be referred to as Infrastructure as Code (IaC). You may have some experience with tools such as Ansible or Terraform and will recognize that you can nest elements through indentation, rather than any braces or brackets, which are used in some other languages.
Exam Tip
Deployment Manager is a very large topic, and deep-dive courses are available so that you can gain further knowledge. For the exam, we will explain the fundamental knowledge that's needed to be successful.
Some components are fundamental to Deployment Manager. Configuration files contain all the resources we want to deploy, as well as their properties.
A configuration file starts with the resource string and is followed by a list of entries, each of which has the following fields:
- Name: The name of the resource we are deploying; for example, vm001.
- Type: This specifies the base type of this resource. There are many available resource types, and they relate to the type of resource we wish to deploy. For example, the resource type for a new VM instance would be compute.v1.instance. Note that v1 stands for production-ready.
- Properties: This specifies the properties that are required to create the resource. For example, if we wish to deploy a new VM instance from the GUI, we need to populate mandatory fields such as OS type, disk type, and image and network interfaces. These would be populated in the properties section of a configuration file.
Important Note
A full list of resource types can be found here: https://cloud.google.com/deployment-manager/docs/configuration/supported-resource-types.
Let's look at how we can construct our first example configuration file. In the Using Google Cloud Shell section of this article, we referred to the Cloud Shell editor. Let's open this up and create a new file. To do this, simply right-click on your user ID and select New File:
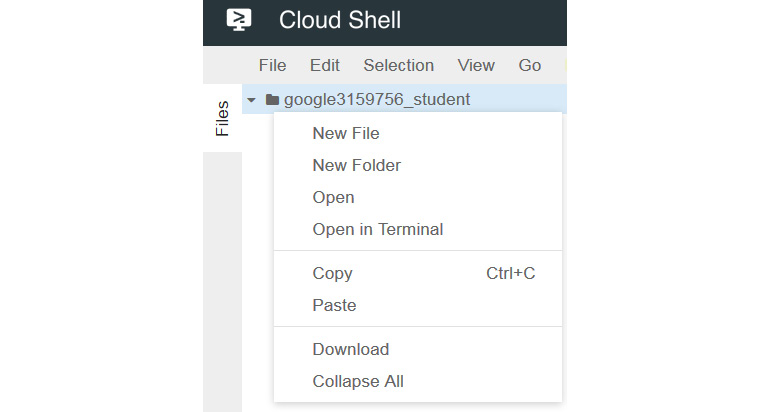
Figure 16.13 – Cloud Shell – New File
Give the file a name – for example, vm001.yaml – and click OK to create it. We are now ready to edit. In this example, the code will do the following:
- Create a VM in the europe-west4-a zone.
- Size it as the g1-small machine type.
- Use centos-6 as our image.
- Create a persistent boot disk.
- Add the VM to the default network.
- Add access configurations as external NATs.
The completed configuration file will look as follows:
resources:
- name: vm001
type: compute.v1.instance
properties:
zone: europe-west4-a
machineType: https://www.googleapis.com/compute/v1/projects/primeval-nectar-318916/zones/europe-west4-a/machineTypes/g1-small
disks:
- deviceName: boot
type: PERSISTENT
boot: true
autoDelete: true
initializeParams:
sourceImage: https://www.googleapis.com/compute/v1/projects/centos-cloud/global/images/centos-stream-8-v20210721
networkInterfaces:
- network: https://www.googleapis.com/compute/v1/projects/primeval-nectar-318916/global/networks/default
accessConfigs:
- name: External NAT
type: ONE_TO_ONE_NAT
Now, let's save it and use this configuration file to deploy a VM. Again, we will use the Cloud Shell tool to execute this using the Deployment Manager command-line syntax:
gcloud deployment-manager deployments create <deployment name> --config <config file>
Here, <deployment name> is the name of your overall deployment name. Remember that the VM instance name is specified in our configuration file and that <config file> is the name of the configuration file we created previously. Let's look at an example of creating a new deployment called deployment01 using our vm001.yaml configuration file:
gcloud deployment-manager deployments create deployment01 --config vm001.yaml
If we browse to Deployment Manager in our GCP console, we can confirm that this was deployed:
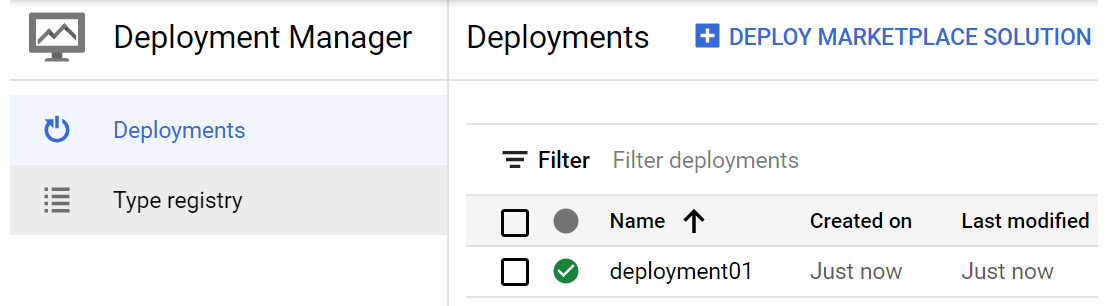
Figure 16.14 – Deployment Manager
We can also browse to Compute Engine in our GCP console and confirm that the VM instance exists:

Figure 16.15 – VM instance
So, although we have taken time to create a configuration file, we have only deployed a single VM instance. Deployment Manager allows us to deploy full environments. To do this, we should use templates. A template allows us to abstract part of a configuration file into individual building blocks that can be reused across deployments.
A template is a separate file from your configuration file. It is also written in a different language – either Jinja or Python – and is imported and used as a type in a configuration file.
Templates allow us to pass variables from our configuration files, which means they can stay pretty static, and we can just pass in the edited variables from our configuration file. We need to modify our configuration file to reflect the fact that we want to call a template file. This can be done by adding a path from the template to the top of our configuration file. We can also edit the configuration file to reflect the variables we want to pass.
Let's look at an example. We want to keep a static template for creating debian-9 VMs, but we want to pass variables such as the hostname, zone, and machine type. Let's create a new configuration YAML file as follows. Let's call it createdbytemplate.yaml. Note that we have added the vm-template.jinja file as a type and that our variables are set as properties:
imports:
- path: vm-template.jinja
resources:
- name: newinstance
type: vm-template.jinja
properties:
name: createdbytemplate
zone: europe-west4-a
type: g1-small
Now, we need to configure our template file, which will contain the values of our variables to be passed through. Note that our hostname, machine type, and zone are set inside our brackets in the following format:
Here, variable name is the string that's passed from the configuration file. The following code is our Jinja template file:
resources:
- name:
type: compute.v1.instance
properties:
zone:
machineType: zones//machineTypes/
disks:
- deviceName: boot
type: PERSISTENT
boot: true
autoDelete: true
initializeParams:
sourceImage: projects/debian-cloud/global/images/family/debian-9
networkInterfaces:
- network: global/networks/default
We can save this and call it vm-template.jinja. Now, we can use our gcloud commands to call our createdbytemplate.yaml file:
gcloud deployment-manager deployments create templatedeployment --config createdbytemplate.yaml
Now, we can check our console to verify that we have a new VM called createdbytemplate:
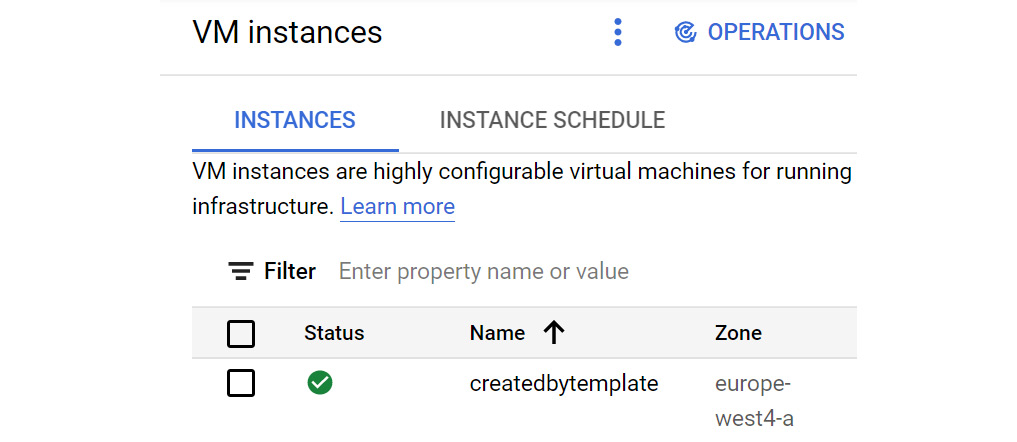
Figure 16.16 – New VM instance
We can also specify the variable properties in our gcloud command. In the following example, we have a new template called vm-template1.jinja, which is expecting variables for a hostname and a zone:
resources:
- name:
type: compute.v1.instance
properties:
zone:
machineType: zones//machineTypes/g1-small
disks:
- deviceName: boot
type: PERSISTENT
boot: true
autoDelete: true
initializeParams:
sourceImage: projects/centos-cloud/global/images/centos-stream-8-v20210721
networkInterfaces:
- network: global/networks/default
accessConfigs:
- name: External NAT
type: ONE_TO_ONE_NAT
Once again, let's use our gcloud commands to create this. However, we need to specify the name as vm002 and the zone as europe-west4-a:
gcloud deployment-manager deployments create deployment002 --template vm-template1.jinja --properties name:vm002,zone:europe-west4-a
Let's check our GCP console and confirm that we now have a VM instance called vm002 in the europe-west4-a zone:
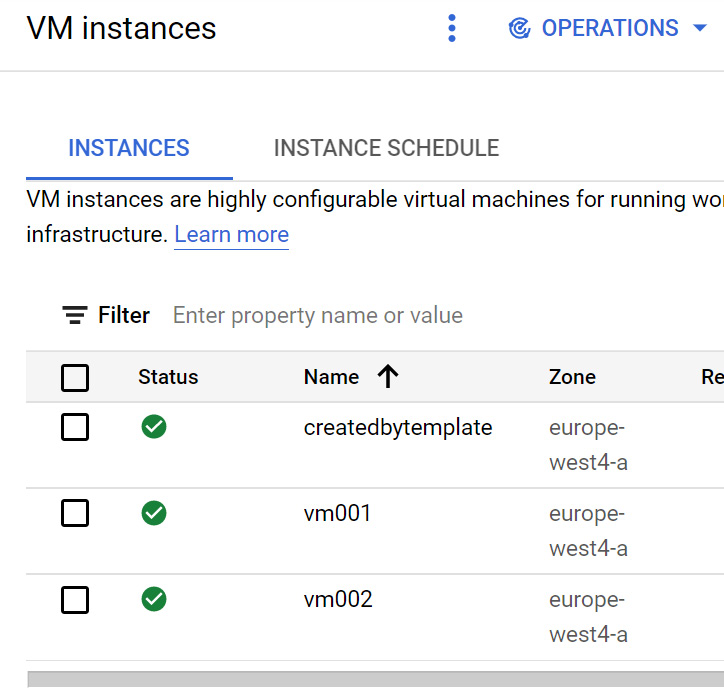
Figure 16.17 – Instances
So far, we have only looked at single VM deployments, but we can also deploy multiple VMs via Deployment Manager.
Let's look at an example where we want to deploy a three-tier application made up of a web application and a DB server in different zones. We can expand on our previous templates to add the information that's required. Note that we are now specifying three separate resources. Let's create a new template file called vm-template2.jinja:
resources:
- name:
type: compute.v1.instance
properties:
zone:
machineType: zones//machineTypes/
disks:
- deviceName: boot
type: PERSISTENT
boot: true
autoDelete: true
initializeParams:
sourceImage: projects/centos-cloud/global/images/centos-stream-8-v20210701
networkInterfaces:
- network: global/networks/default
accessConfigs:
- name: External NAT
type: ONE_TO_ONE_NAT
Now, we need to update our configuration file. Let's create a new file and call it multi.yaml. Let's add the following text:
imports:
- path: vm-template2.jinja
resources:
- name: newinstance
type: vm-template2.jinja
properties:
webname: web001
webzone: europe-west2-a
appname: app001
appzone: europe-west4-b
dbname: db001
dbzone: europe-west6-c
type: g1-small
Now, we can run the following command to trigger a deployment called multideployment:
gcloud deployment-manager deployments create multideployment --config multi.yaml
Now, let's check our results from Cloud Shell:

Figure 16.18 – Multideployment
We can confirm our deployment via the GCP console. Let's check out the Deployment Manager menu, where we can see that our deployments have been successful:
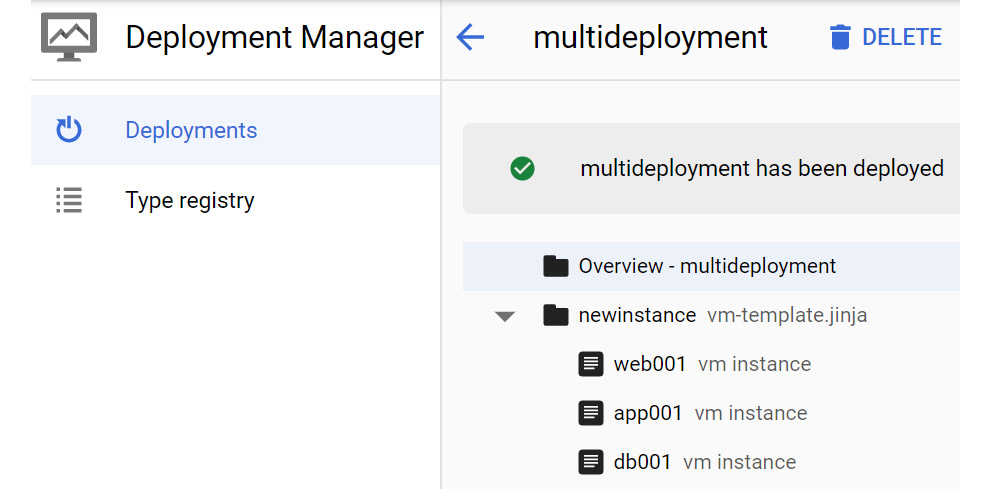
Figure 16.19 – Result
We can also see that each VM instance has been deployed to the correct zone:
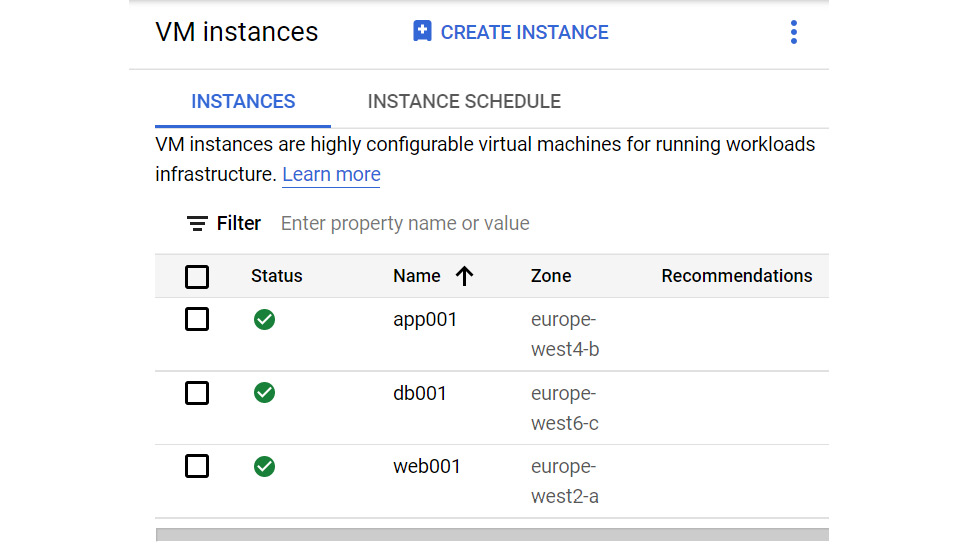
Figure 16.20 – Instances
This is how we can configure a template for VM instance types only. We can also extend our template to other types of services, such as networking. As a final example, let's look at how to create a template and configuration file to create a networking and firewall ruleset. In this example, we need to have three separate templates: one for our network, one for our subnetwork, and one for our firewall rule.
Let's look at our network first. This is pretty simple. Note that we are now using a type of compute.v1.network and that we have single properties. We set this to false to avoid automatically creating a corresponding subnetwork. The name is a variable that's passed from our configuration file. Let's save this file as network.jinja:
resources:
- name:
type: compute.v1.network
properties:
autoCreateSubnetworks: false
Next, we can create a subnetwork template. Again, we have the name as a variable, which will be passed from our configuration file. We will also be passing information about the IP range and the network to attach it to, which we will create using the network.jinja template, as well as the region to create the subnet in. Let's save this as subnet.jinja:
resources:
- name:
type: compute.v1.subnetwork
properties:
ipCidrRange:
network:
region:
Finally, let's create a template so that we can create a firewall rule. Once again, we will pass the name from our configuration file, but this time, we will append the name with a hardcoded value. We will also set the network to attach this to and pass in the protocol for our firewall rule. Let's save this template as firewall.jinja:
resources:
- name: -firewall-rule
type: compute.v1.firewall
properties:
network:
sourceRanges: ["0.0.0.0/0"]
allowed:
- IPProtocol:
ports: ["80"]
Now, we need our configuration file. We will import all three of our templates rather than a single file, as we did in the previous examples. There is no real complexity to this – we just add an extra line for each template to import. One of the key things to note here is to make sure we connect the subnet and firewall rule to the correct network. We can pass the variable as follows:
$(ref.custom-net.selfLink)
Here, custom-net is the name of the network we are creating. This name is passed as a variable. Let's save this configuration file as config.yaml:
imports:
- path: network.jinja
- path: subnet.jinja
- path: firewall.jinja
resources:
- name: custom-net
type: network.jinja
- name: custom-subnet
type: subnet.jinja
properties:
iprange: 10.10.0.0/16
network: $(ref.custom-net.selfLink)
region: us-central1
- name: custom
type: firewall.jinja
properties:
network: $(ref.custom-net.selfLink)
Protocol: TCP
Finally, let's upload these files to our Cloud Shell environment and trigger the gcloud commands that we have become familiar with:
gcloud deployment-manager deployments create networking --config config.yaml
Let's see what the output of this command looks like in Cloud Shell:

Figure 16.21 – Google Cloud Shell output
There is one final file that we should also discuss. A schema file is used as a guide to show users how to interact with and use your template. For example, let's look at a configuration file that will require a zone to be passed as a variable to the template. We can provide our users with information on how it is used, and which variables need to be set:
info:
title: VM Instance Template
author: Cloud Architect
description: Creates a new instance
version: 0.1
imports:
- path: vm-template.jinja
required:
- zone
properties:
zone:
type: string
description: zone where VM will reside
Important Note
Some great Deployment Manager examples are provided by Google, which we can download and use in our free-tier environment. We recommend that you download and look at a further, more complex, Cloud Deployment Manager template at https://github.com/GoogleCloudPlatform/deploymentmanager-samples.
In the next section, we will look at an alternative to Cloud Deployment Manager: Terraform.
Terraform
Terraform is an open source tool that lets us provision Google Cloud resources in a declarative manner. We should note that it is not exclusive to Google Cloud. Terraform can deploy resources in AWS, Azure, and VMware, to name a few vendors. Like Cloud Deployment Manager, Terraform also uses an IaC approach and keeps a note of the desired state that we want our environment to look like. No modifications should be made to the backend and Terraform should be the source of truth. This is similar to Deployment Manager, which creates manifest files that store information about our deployed resources. Terraform, however, uses its structured language called HashiCorp Configuration Language (HCL), which is an alternative to the YAML file approach we looked at in the previous section. This can bring a bit of a steeper learning curve for those looking at IaC for the first time. Terraform integrates with GCP using a provider that is responsible for understanding API interactions with the underlying infrastructure. The Google provider for Terraform is used to configure our GCP infrastructure and is jointly maintained by the Terraform team at Google and the Terraform team at HashiCorp, though they do accept community contributions!
With Google Cloud Shell, Terraform is automatically authenticated and we can begin experimenting with it straight from Terraform's Google Provider documentation pages. Many of the examples have Open in Google Cloud Shell buttons, allowing us to launch an interactive Cloud Shell session with the example loaded and Terraform ready to use.
Now, let's look at an example of deploying a Cloud Storage bucket. We will not go into details about the Terraform HCL code as it is outside the scope of this book, but it is good to get a high-level idea of what it looks like. Terraform has some main commands to deploy a resource. First, we must run terraform init, which will look for the specific providers we need and download them. One of the benefits of Terraform is its drift detection, whereby running the next Terraform commands terraform plan, will present the difference between the configuration we want to apply against what is deployed. When we run the plan, it does not deploy anything. To execute the plan, we must run the terraform apply command.
For our example, we will look at creating a Google Storage bucket. Let's clone some code from GitHub for the Terraform modules by executing the git clone command from the repository at https://github.com/terraform-google-modules/terraform-google-cloud-storage.
Next, we must change directories to /terraform-google-cloud-storage/examples/simple_bucket and run terraform init, which will look for the specific providers we need and download them:
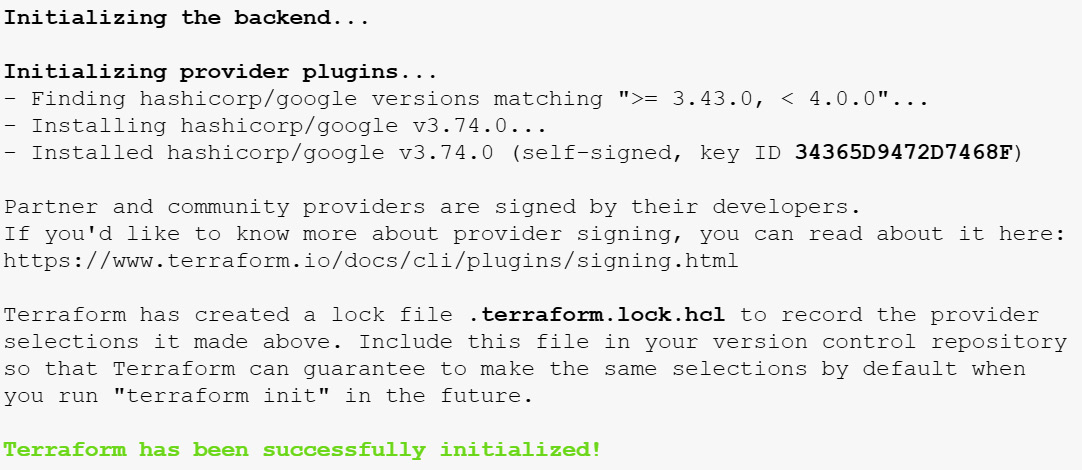
Figure 16.22 – terraform init output
When we run the terraform plan command, we will be prompted for a bucket name and the ID of our project. It will not deploy anything. In this example, we can see that we are creating a new multi-region bucket called cloudarchitectupdate001 in the EU location:
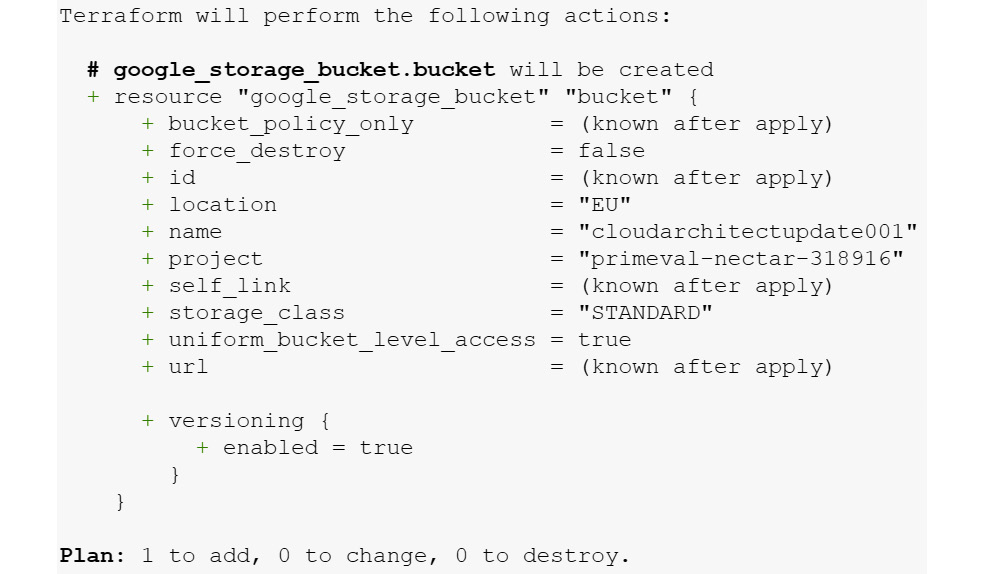
Figure 16.23 – terraform plan output
To execute the plan, we must run the terraform apply command. The output will look similar to the following:

Figure 16.24 – terraform apply output
Finally, we can browse to Cloud Storage in our console and confirm that our new bucket has been created in the correct location:
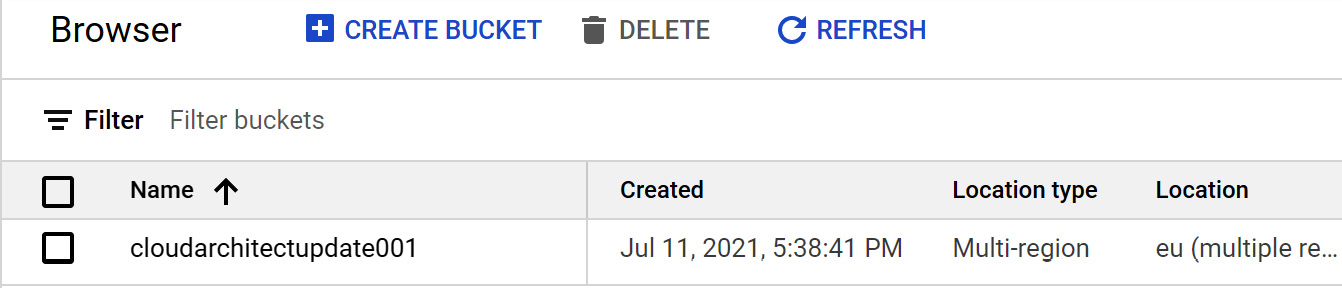
Figure 16.25 – Google Cloud Storage bucket
Of course, this is a very simple example, but you can deploy a much more complex set of resources with multiple VMs, GKE clusters, load balancers, and so on. If you feel intimidated by the complexity of syntax of Terraform templates, do not worry! Google comes with a set of already existing templates that you can use and learn from.
Cloud Foundation Toolkit
Cloud Foundation Toolkit (CFT) (https://cloud.google.com/foundation-toolkit) offers ready-made templates for both Deployment Manager and Terraform. The code from the previous Terraform example, which was used to create the Cloud Storage bucket, came directly from these off-the-shelf templates. They are designed so that we can quickly build repeatable enterprise-ready foundations inside our Cloud platform. These templates are time-saving tools that we can build on to customize in a way that can add value to our business. They also free us to focus on the applications rather than tedious infrastructure tasks.
In the next section, we will look at Pricing Calculator.
Pricing Calculator
Google offers help when it comes to calculating the cost of running your apps in GCP. Instead of checking the prices in the documentation of each service, you can use the GCP Pricing Calculator. This calculator is available online via https://cloud.google.com/products/calculator. It allows you to choose the services and configuration you want to use for your application. You can also add your estimated storage and network requirements. The total price will be calculated for you:

Figure 16.26 – Pricing Calculator
Here, you can see an example of the cost for five nodes on the GKE cluster with 500 GB disk space. To add your estimated egress networking traffic, simply choose the NETWORKING icon and define where your traffic will go:

Figure 16.27 – Pricing Calculator – Networking
Let's look at another example, this time for Cloud Storage. In this example, we are showing you how much it will cost to use 1 TB of Cloud Storage in Singapore. We have estimated that we will have 500,000 class A and 500,000 class B operations per month. Please note that when you are adding operations into the calculator, it expects the figure in millions. In our example, we have put 0.5 million:
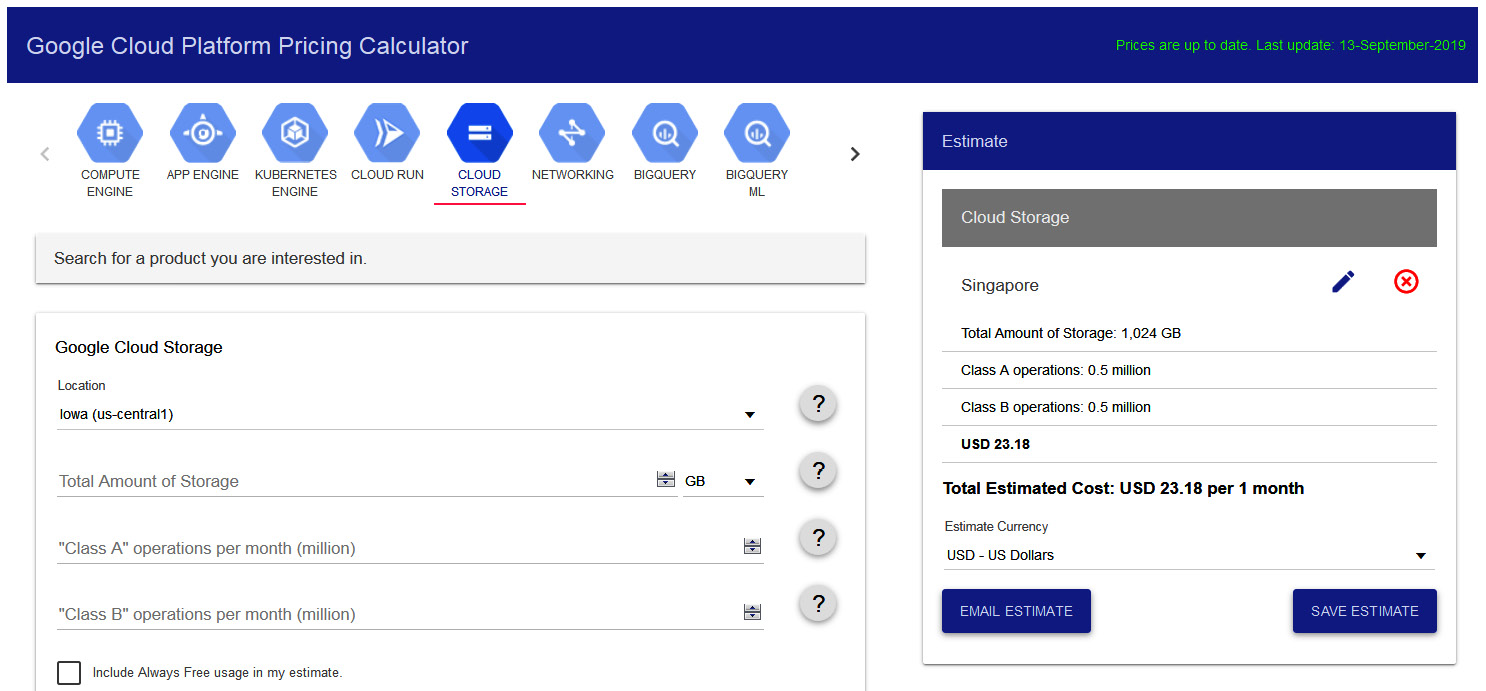
Figure 16.28 – Pricing Calculator – Storage
We encourage you to navigate to this website and familiarize yourself with different examples.
Additional things to consider
There are additional management tools that we need to consider. For the exam, it is also important to be aware of the following:
- Cloud Source Repositories: These are fully featured GitHub repositories that are hosted on GCP and support the collaborative development of an application. You can use the gcloud commands to create code, commit code, and manage new repositories. More information can be found at https://cloud.google.com/source-repositories/docs/.
- Cloud Build: This is a GCP CI/CD service that will execute your builds on the GCP infrastructure. It can import source code from Google Cloud Storage, Cloud Source Repositories, GitHub, or Bitbucket. More information can be found in This Post, Managing Kubernetes Clusters with Google Kubernetes Engine, and here: https://cloud.google.com/cloud-build/docs/.
- Cloud Scheduler: This is a fully managed cron job scheduler service. It can be used to trigger jobs on App Engine, send Pub/Sub messages, or even hit HTTP(S) endpoints.
- Container Registry: This provides us with private Docker repository storage on our GCP platform. We can use the gcloud commands to push images to our registry, and then we can pull these images using an HTTP endpoint from any GCE instance or even our hardware. More information can be found in This Blog, Managing Kubernetes Clusters with Google Kubernetes Engine.
- Cloud Endpoints: This acts as an API management system that allows us to manage our APIs on any Google Cloud backend. Once you have deployed your API in Cloud Endpoints, you can create a developer portal that users can interact with and access and view documentation.
Summary
In this article, we looked over the main management tools that can be used to manage GCP services. It's important to reiterate that you should understand which services can be managed by which command-line tool and the basic command-line structure. Let's review what we would use each tool for:
- gcloud can be used to manage many GCP services, but it is most commonly used to manage Compute Engine VM instances, Cloud SQL instances, Kubernetes Engine clusters, and Cloud Deployment Manager deployments.
- Use cbt to manage Bigtable.
- Use bq to manage BigQuery.
- Use gsutil to manage Cloud Storage. We need to understand the different syntax for creating buckets, copying data, and removing buckets.
- Deployment Manager can be used to automate a variety of GCP services within templates and configuration files.
- Pricing Calculator.
Remember that Google offers a free tier where you can use these command-line tools and familiarize yourself with creating and managing different services.
In the next chapter, we will look at how to monitor our GCP services.
Further reading
Read the following articles for more information about what was covered in this article:
- APIs Explorer: https://developers.google.com/apis-explorer/#p/
- gsutil: https://cloud.google.com/storage/docs/gsutil
- cbt: https://cloud.google.com/bigtable/docs/quickstart-cbt
- gcloud: https://cloud.google.com/sdk/gcloud/
- bq: https://cloud.google.com/bigquery/docs/bq-command-line-tool
- Cloud Deployment Manager: https://cloud.google.com/deployment-manager/docs/